Many different website hosts have their own custom-built website building tools. These offerings help people who don’t have experience coding websites from scratch to create a site of their own.
However, people find these drag-and-drop website builders have some drawbacks. Because they’re a one-size-fits-all offering, they tend to lack the personalization and functionality of many modern sites. Additionally, the lack of crisp, clean lines that dragging-and-dropping sometimes creates can make a page look less than professional, and these sites don’t necessarily transfer cleanly to mobile devices like phones or tablets.
Moving to WordPress.com solves those problems, and can bring an additional level of crisp professionalism to any site.
Because many drag-and-drop site builders and HTML-only options don’t offer an export option, you’ll need to manually copy and paste your site content to migrate from a site builder to WordPress.com. This can take time and work, but the results will be worth it.
In this guide
The fastest way to save your content from a drag-and-drop or HTML builder is to save each individual page to your computer.
For each page you’d like to replicate, go to File > Save Page As > Webpage, Complete.
This will save a copy of all your photos and writing on a duplicate page, saved to your computer. It will also create some sub-folders where you can access all your files.
If you use the above method to save your pages, your images will save, but they will sometimes be cropped or resized to the same size as they display on the website. The best way to include full-size images in your new WordPress.com website is to upload the original image files directly from your computer.
If you haven’t already, create your new site at WordPress.com by visiting this link.
This will guide you through the process of getting your site started. You’ll be asked to pick a style and theme, a free site address, and a plan. You can always change your theme and plan later, so don’t stress too much about the choice!
You’ll want to start by adding your site’s images to your Media library. To do this, go to the folder on your computer where you saved the information for this page and upload any JPGs, GIFs, or PNG images for this page. You’ll see a lot of other files in this folder, but you want to find and upload only the images. The other files will not transfer to WordPress.com.
- Open a copy of your downloaded site in a browser such as Chrome or Firefox, or go to the live version of your old website, and load a page you want to recreate on your WordPress.com site.
- Create a new page on your WordPress.com site. To create your first page, go to Pages → Add New in your dashboard.
- Copy and paste the main text of the old page onto your new WordPress.com page.
💡
You don’t need to copy and paste your site’s navigation menu. Your WordPress.com site menus are created and managed elsewhere. For more on this, please see Menus.
The above is an example of a page built on a page builder, somewhere outside of WordPress.com. If you try to copy the entire page, it may make some rather interesting HTML, and it may not look the way you’d like. For this reason, it’s generally best to only copy the main text of a single page (knowing you’ll edit the overall look and feel of the website later), then insert your images for this page and align them where you want them in your text.
Here’s an example of a WordPress.com editor screen showing what you’d want to copy from the above page, and where to put it:
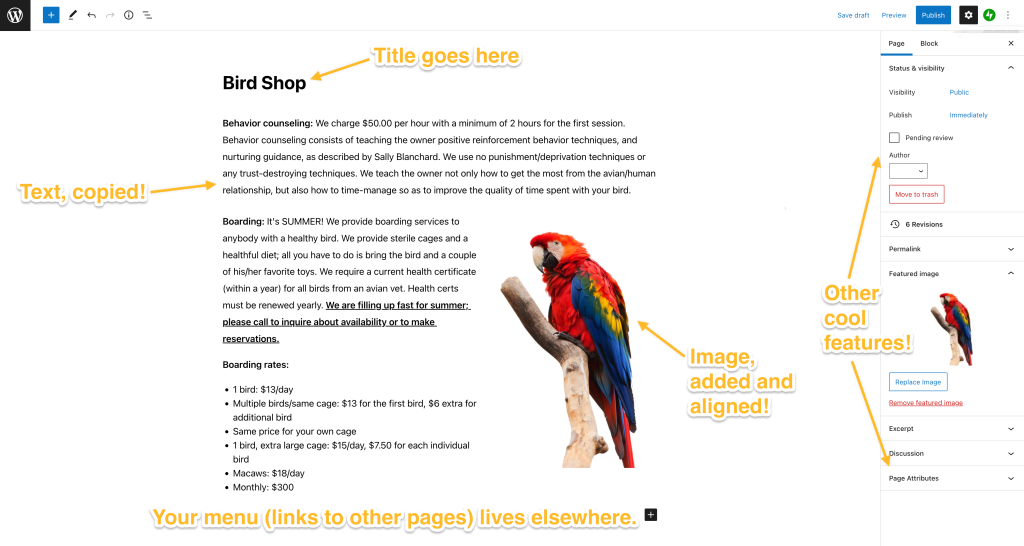
Focus on adding only your text and your images. If you’re pretty savvy with HTML coding, you can copy and paste some code, but not all HTML code us supported on WordPress.com sites. Check out our list of supported HTML code.
💡
Note that CSS code styling is only available on eligible plans (Explorer plan and above), and lives in a separate section.
Repeat steps 1, 2, and 3 for all of your pages. Having these set up ahead of time can save you a headache when you go to design the overall look and feel of your site, so we recommend creating all pages first.
Once you’re done creating all your pages and moving your text and images, it’s time for step 4!
Your next step will be to create a menu for your site! This is how people will find the majority of the pages on your site.
One of the benefits of moving to WordPress.com is the ability to swiftly adjust the overall look and feel of your entire site rather than having to go page by page, like in some page builders. You can edit your menu through Appearance → Menus or in the Appearance → Editor, depending on which theme you have chosen.
💡
Creating a page doesn’t necessarily make it appear in your site’s main menu. This means you get to choose which pages do show up, creating a polished appearance.
It is time to set up your theme! This is essentially the overall look and feel of your site. We have hundreds of free and Premium themes available, some of which may look similar to your site, some of which may be totally new. Whether you want to replicate the general look or feel of your former site or try out something new, one thing you can be assured of is that your new site will look polished and professional.
WordPress.com has a ton of additional features that can be added to your site, from social media connections to videos to monetizing your site and more!
Did you buy a domain with your drag-and-drop or HTML hosting provider that you want to use with your new website? Read over our guide to using your domain with your WordPress.com site.
If you run into any snags, please check our support site for guides, and don’t be afraid to ask us for help!
