The WordPress editor autosaves your work and stores a revision history for each page and post on your site. This guide will show you how to restore an earlier version of a page or post.
In this guide
While editing, your changes are automatically saved to your local device every 15 seconds and online about once per minute. At the top-right of the editing screen, you’ll see the notification move from Save Draft to Autosaving to Saved:

If you have not yet published the page or post, you can save it manually by clicking on the Save Draft link at the top of the page:

If you are editing a post or page that has already been published, autosave continues to work but will not overwrite the published content. The changes will not be displayed on the site until you click the Update button at the top of the screen:

If you go offline while editing or accidentally navigate away from a post/page while working on it, WordPress.com will save your post to your web browser’s local storage. When you return to the editor, you will see a note that says There is an autosave of this post that is more recent than the version below.

Click the X to return to the draft as-is, or click View the autosave to restore the most recent autosave. You can also browse the revisions to restore an earlier version of your content.
A revision is not stored for every autosave, just the last one the system captured. A revision is stored when you save manually or click Update/ Publish.
When you save a draft manually or select Update, a revision is created. Revisions allow you to view the recent changes and revert to an earlier version if necessary.
The number of previous revisions depends on your site’s plan:
- On free, Starter, and Explorer plan sites, the 25 most recent revisions are saved.
- On Creator and Entrepreneur plan sites or the legacy Pro plan, the last 100 revisions are stored.
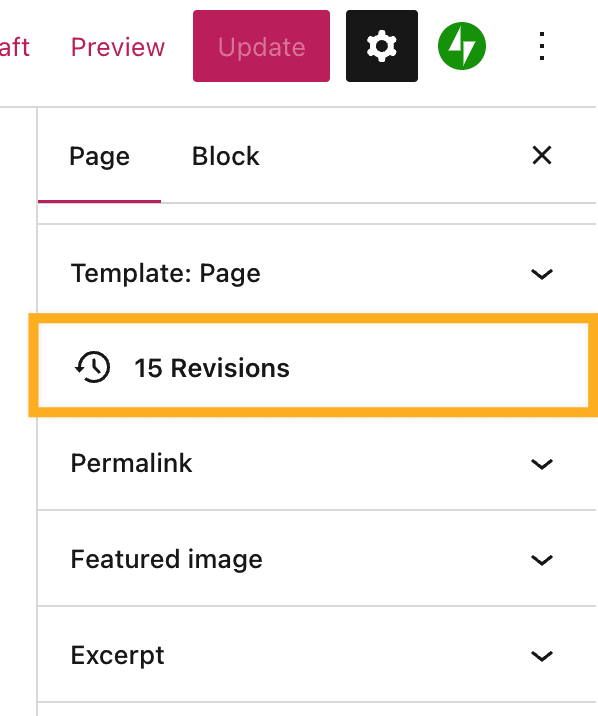
To view the saved revisions of a page or post:
- Visit your dashboard.
- Navigate to Pages or Posts.
- Click on the page or post you wish to edit.
- Open the settings sidebar.
If you do not see the sidebar on the right, click the Settings icon in the top right corner to bring up the settings. This icon looks like a square with two uneven columns:

- Click on Revisions.
- If this option is absent, there are no saved revisions to view yet. Check these other tips to recover lost content.
Depending on your user role, the following revisions can be accessed:
- Administrators and editors can access all available revisions.
- Authors can see revisions for any posts they have authored.
- Contributors can see revisions on their drafts only.
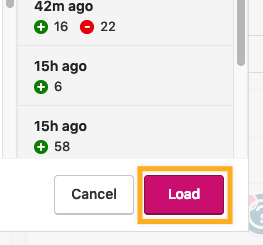
On the left side of the revisions screen, the content is shown. New content added to the page is highlighted, while deleted content has a line crossed through it.
Each saved revision is listed on the right side, showing the following information:
- The date and time the revision was saved.
- The name of the user who made the changes.
- The number of changes made:
- A green plus sign indicates content that’s been added.
- A red minus sign indicates content that’s been deleted.
- For example, “+11 -2” indicates 11 instances of added content and 2 instances of deleted content.

You can select two different views when browsing revisions:
- Unified: View the changes made on the selected revision only.
- Split: View the revision compared with the revision immediately previous to it:

Once you have identified the version you wish to restore, click the Load button to return to the editor with the selected revision.
If you find it difficult to read the revision (since it displays in code instead of the rendered content), you can Load any revision to see the content in the editor and decide if it’s the correct version. If it’s not, return to Revisions and choose a different version.
If you want to restore a specific part of a revision without replacing the entire content, you can copy just the content you wish to restore. Follow these steps:
- View the revisions as described above.
- Highlight the part of the revision you want to recover.
- Right-click and select Copy or use cmd+c on Mac or ctrl+c on PC.
- Click Cancel to close the Revisions window without loading the entire revision.
- Insert a Custom HTML block in the position you want to add the copied content.
- Right-click and select Paste or use cmd+v on Mac or ctrl+v on PC to paste the part of the revision into the Custom HTML block.
- Click the ellipses (three dots) in the Custom HTML block toolbar and select Convert to blocks.
If you use the WP-Admin dashboard view, your revisions will look slightly different. However, the functionality remains the same.
You will still see a history of revisions as they’re described above, but the navigation between revisions is different. At the top of the screen, you will find a slider that you can use to load earlier page versions:

Click the Compare any two revisions option to compare two revisions side by side. When you compare two revisions, the selected revision is on the right and the previous one is on the left.
Click Restore This Revision when you want to revert to a revision. This will restore the selected revision from the right.
Click Return to editor to return to the editor without restoring any revisions.
If you ever lose content for a post or page you were working on and you cannot locate the content in the revisions, check these other common reasons why content can be lost:
- Check the trash to ensure the post/page wasn’t accidentally deleted.
- Check your other drafts in both Posts and Pages to ensure you didn’t start writing a post as a page or vice versa.
- Ensure you don’t have another post or page editor tab open. Having the editor open in multiple browser windows/tabs can cause the autosave to trigger in one tab while you’re working in a different one.
- Ensure that autosave is working and the post says Saved in the top right every few seconds after making changes. If not, click Save Draft manually to ensure the post or page is saving, then try clearing your browser’s cache.
- If you’re writing a very long post within the editor itself, it’s a great idea to keep a backup by copying and pasting it onto your local computer somewhere, such as in a Word or text document.

