Use the Mailchimp block to insert a subscription box for your website visitors to easily join your Mailchimp audience (i.e., your mailing list). This guide will show you how to connect your site to Mailchimp and display an email signup form.
In this guide
Editing and sending emails are managed through your Mailchimp account. To use Mailchimp on your WordPress.com website, you will need:
- a Mailchimp account. You can sign up here for free if you don’t have one.
- at least one “audience” created on this account (“audiences” are what Mailchimp calls mailing lists where your subscriber email addresses will be collected.) How to create an audience.
For the Mailchimp integration to work properly, navigate to Settings → Audience fields and *|MERGE|* tags and ensure the merge tags option on your Mailchimp audience is set as non-required as shown in the image below:

Next, follow these steps to connect your Mailchimp account to WordPress.com and choose an audience:
- Visit your website’s dashboard.
- On the left side, navigate to Tools → Marketing → Connections.
- Scroll down to the “Manage connections” section.
- Next to Mailchimp, click the “Connect” button:

- You will be prompted for the username and password to your Mailchimp account. Upon successful login, you will be returned to your WordPress.com account.
- Back in Tools → Marketing → Connections → Mailchimp, choose the audience you want your website visitors to subscribe to:

If you have more than one site on your WordPress.com account, you only need to set up the Mailchimp connection once which will work across all sites. You can connect only one Mailchimp account to your WordPress.com account.
You can create a different audience in Mailchimp for each site and then choose the specific audience in Tools → Connections → Manage Connections for a specific site. You can have a different audience for each site, but all of the audiences need to be in one Mailchimp account.
Disconnecting will turn off Mailchimp for all sites in your account.
Edit the page, post, or template where you wish to display the Mailchimp signup form.
Add the Mailchimp block by clicking the + Block Inserter icon and searching for “mailchimp” as shown below:

💡
Using your keyboard, you can also type /mailchimp on a new line and press enter to quickly add a new Mailchimp block.

For more information, visit our detailed instructions on adding blocks.
If you add the Mailchimp block before connecting your Mailchimp account, the block will show a “Set up Mailchimp” form button that will bring you to the connection settings:

You might need to click the “Re-check Connection” button on the Mailchimp block if you added the block before connecting to Mailchimp in your settings.
When you add the Mailchimp block, it will contain default content for you to customize:
- Change the “Enter your email” text in the Mailchimp block settings.
- Change the “Join my Mailchimp audience” button text by clicking on the text and typing.
- Change the signup button’s appearance by clicking on it and adjusting the Button block’s settings.
- Change the disclaimer text below the button by clicking on the text and typing. It’s a good practice to include a disclaimer in your sign-up form so that your subscribers are less likely to mark your emails as spam.

When you click on the Mailchimp block, a toolbar of options will appear above or below it:

The Mailchimp block has the following options in its toolbar:
- Change block type.
- Drag the block.
- Move the block up or down.
- Change alignment.
- More options.
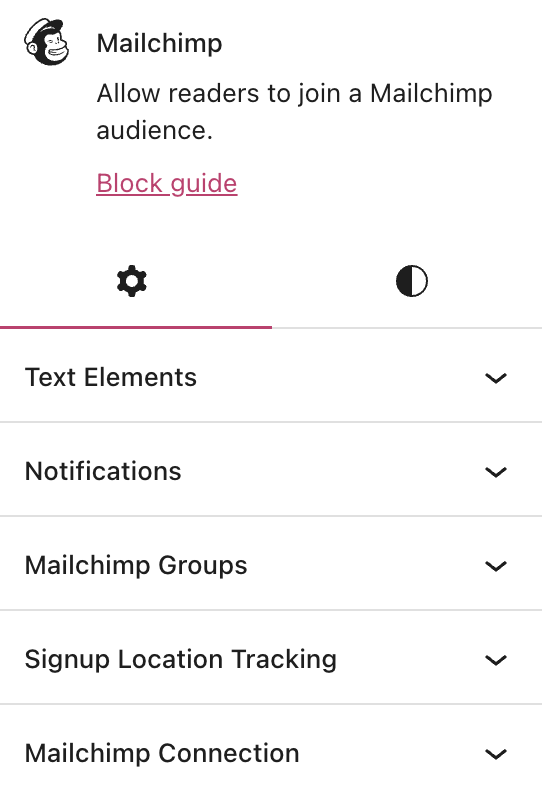
When you select a block, you will find additional block settings in the right sidebar. If you do not see the sidebar, you may need to click the Settings icon in the top-right corner to bring up the settings. This icon looks like a square with two uneven columns:
The Mailchimp block has multiple settings you can adjust, each explained below.
The “Email Placeholder” is the text shown inside the email box. By default, it is set to “Enter your email”. You can type new text to appear instead.
The email placeholder text disappears once the visitor starts typing in the box.
There are three messages related to the function of the form that you can modify:
- The Processing text message shows while an email is being added to the audience.
- The Success text is displayed when an email is successfully submitted.
- The Error text is shown when the email address was not submitted successfully.
Segment and sort your subscriber list into groups. Learn more about Groups from Mailchimp here.
If you embed your signup form on multiple pages like a homepage, a contact page, and a blog page, you may want to find out where subscribers signed up. Learn more about signup location tracking from Mailchimp here.
Click the “Manage Connection” link to visit the Marketing settings if you need to connect, disconnect, or change the Mailchimp audience you are using with this site.
The Mailchimp block also includes Advanced settings.
In the block settings sidebar, click on the Styles icon to access the design settings for the block. The Styles icon is in the shape of a circle with half of the circle filled in:
The Mailchimp block includes the following settings to adjust the appearance of the signup form:
Remember that your visitors signed up for the updates you promised them. They expect specific messages, and they can unsubscribe at any point. For your email list to be successful, it’s best to:
- Send updates about something your audience may be interested in. For example, share articles you find valuable or updates you do not share elsewhere.
- Engaging with your audience directly once in a while is a good idea. For example, ask questions in your emails that encourage them to respond or interact with the email.
- If you promote your product, mix it up with other content so your audience members find value in staying subscribed.
For more tips, check out the Mailchimp 101 page.
On higher-level plans, you can also add a Mailchimp Subscriber pop-up to your website.

