Jetpack is a powerful plugin that adds essential features to plugin-enabled sites on WordPress.com. While errors are rare, this guide will cover common issues you may encounter with Jetpack and how to resolve them.
In this guide
In many cases, Jetpack will self-heal and resolve an issue without manual intervention, but you may continue to see the error after Jetpack has already self-healed. Your first step should be to take the common steps to clear any browser or network-related issues:
- Force Refresh
- Clear Your Browser Cache
- Clear WordPress.com Cookies
- Log out of WordPress.com and back in again.
- Further Troubleshooting, such as trying another browser, device, or network
After ruling out browser and network issues, you can move on to the next sections that detail common errors in Jetpack.
The URL stored by the Jetpack servers does not match your site.If you have a domain or URL-related error such as this, ensure your site has a working domain. If your domain is not ready, you can make Jetpack operational by temporarily using the default site address as your site’s primary domain. The steps are:
- Visit your site’s dashboard.
- Navigate to Upgrades → Domains (if using Default View) or Hosting → Domains (if using WP-Admin View).
- In the “Primary site address” box, click on the drop-down menu and select the
wpcomstaging.comsite address. - Click the button labeled “Set as primary.”
- Navigate to Jetpack → Dashboard to restore the Jetpack connection.
You can continue working on your website content and design under this address. Once your domain becomes fully active, you can set it as the primary address.
Error Message: Jetpack can’t communicate with your site because your site isn’t connected.To resolve an error with not being connected to Jetpack, follow these steps:
- Visit your site’s dashboard.
- Navigate to Jetpack → Dashboard:

- If you have a Jetpack connection error message, click the “Restore Connection” button or the “Set up Jetpack” button to fix it:


Error Message: Jetpack can’t communicate with your site due to a critical error on the site.You may have the following error on your live site:

This error usually occurs when a theme or plugin causes a conflict on your site. The first step is to identify the theme or plugin causing the issue:
- Check the email address associated with your account for messages from WordPress.com regarding the error. You may receive an email with more information about the error to help identify the theme or plugin causing the issue.
- If you do not receive an email, or the email doesn’t specify which plugin or theme is causing the issue, perform the steps in this guide to identify plugin or theme conflicts.
Once you know which plugin or theme is causing the problem, you can follow these steps to deactivate the troubling plugin or theme:
- Visit your site’s dashboard.
- Visit Plugins → Installed Plugins or Appearance → Themes, depending on which you will need to deactivate.
- Deactivate the plugin or switch the theme to bring your site back online.
If you cannot access your WordPress.com dashboard to deactivate the theme or plugin, contact us here.
Once the faulty theme or plugin has been identified, you can decide if you want to continue to use the plugin or theme and reach out to the developer of that feature for further assistance.
Error Message: Jetpack can’t communicate with your site because your site isn’t responding to requests.If Jetpack cannot communicate with your website, take the following steps:
- Navigate to Plugins → Installed Plugins.
- Temporarily deactivate all of your plugins except Jetpack:
- If the error disappears then reactivate one plugin at a time. Refresh your page each time you reactivate a plugin to see what causes the error to return, which will tell you which plugin is responsible.
- If you still see this error message after deactivating all plugins, contact us here.
Error Message: Jetpack is unable to connect to your domain because your domain’s DNS records aren’t pointing to your site.SSL: no alternative certificate subject name matches target host nameIf you have recently connected, transferred, or registered a domain, it can take up to 72 hours for your domain to become active. In the meantime, you can set your free subdomain as your primary site address. This will allow you to continue working on your site while your DNS propagates.
If your domain is not correctly displaying your WordPress.com site or an SSL certificate is not present, check your DNS is correctly configured with the following steps:
- From your site’s dashboard, navigate to Upgrades → Domains (or Hosting → Domains if using WP-Admin).
- Click on your domain name.
- Click on the “Name Servers” section and ensure the option to “Use WordPress.com name servers” is in the ON position.
- Click on the “DNS Records” section and click the “Manage” button.
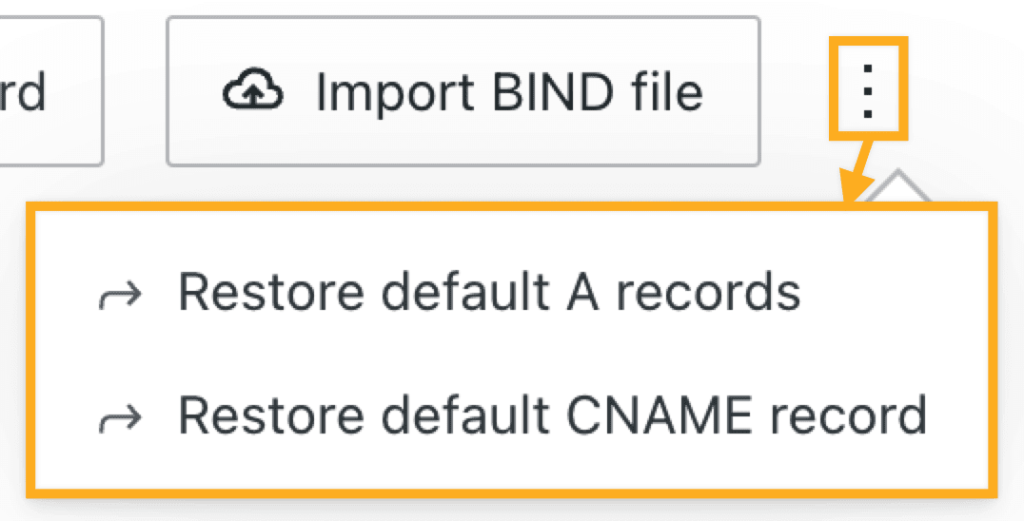
- Ensure that your domain’s A and CNAME records are set to the default values for WordPress.com by:
- Clicking the ellipses (three dots) at the top right of your screen.
- Clicking “Restore default A records” and/or “Restore default CNAME record”:
Once you have completed these steps, your WordPress.com site will appear on your domain within a few hours.
If your domain is connected from another registrar, ensure that you have completed the domain connection.
Error Message: We can’t communicate with your site because the Jetpack plugin is deactivated.Plugin-enabled sites hosted on WordPress.com must have Jetpack enabled to properly function. You cannot deactivate/disable Jetpack on WordPress.com, but if you migrate a site from another host, Jetpack may be deactivated in error during that process.
Activate Jetpack again by following these steps:
- Visit your site’s dashboard.
- Navigate to Plugins → Installed Plugins.
- Locate Jetpack in the list of installed plugins and ensure that the plugin is active.
- Visit Jetpack → Dashboard.
- Click the “Set Up Jetpack” button.
If you cannot access your site’s dashboard, contact us here.
Error Message: Jetpack can’t communicate with your site because XML-RPC is not responding correctly. or
Error Message: Jetpack can’t communicate with your site because the REST API is not responding correctly.These errors may be caused by custom code added to your wp-config.php file or by plugins interfering with your site’s Jetpack connection. If the cause is a plugin, it could be a plugin that is specifically designed to disable REST API or XML-RPC, or it could be a security plugin.
Removing this code or deactivating these plugins may resolve the issue. If issues persist, contact us here.
Error Message: The site you have requested is not installed.
Run `wp core install` to create database tables.
This error can occur if your default table prefix, defined in your wp-config.php, does not match the existing prefix, or if your site is missing its wp_options table.
If the issue is the table prefix and you have SSH or SFTP access established, you can update the prefix to the correct one by updating your wp-config.php file. The default prefix is wp_. You can confirm the actual prefix in use with SSH access with this command wp db query "SHOW TABLES;"
If the issue is a missing table, you can import a backed-up version of this table (if you have access to one) via SSH access and the use of WP-CLI commands.
If you need assistance confirming your database prefix or need help restoring working tables to your site, contact us here.

