With patterns, you can save customized blocks to reuse across your site. If you’re repeatedly adding the same groups of blocks to new pages, patterns will save you a lot of time. In this guide, you will learn how to create and use patterns.
💡
Get inspired by our collection of patterns, made by the design team at WordPress.com to build exactly the pages you need.
In this guide
First, create the content you plan to reuse. A pattern can be a single block or a group of multiple blocks. In our example, we’ll use an image, header, text, and a call to action button that looks like this:

Once you’ve created your content, follow these steps to turn it into a pattern you can use anywhere on your site.
- Select all the blocks you’ll want to reuse. There are multiple ways to select blocks:
- You can highlight multiple blocks next to each other with your mouse.
- Using List View, click on the first block, then hold the shift key on your keyboard and click on the last block. This will select all blocks between the first and last block.
- Click on the three dots that appear in the block toolbar.
- Click on the “Create pattern” option.
- Give it a name to help you remember what the pattern is for. The name is only visible to you.
- Optionally assign the pattern to a category, which is useful if you have a lot of patterns that you wish to keep organized.
- Toggle the “Synced” option on or off:
- Synced: Any edits you make to the pattern will apply everywhere the pattern has been inserted. Ideal for reusing blocks.
- Unsynced: Any edits you make to the pattern will apply to one instance of the pattern only. Ideal if you want to use the same layout on multiple pages but change the content in the pattern on each page.
- Click the “Create” button.
Once you have created a pattern, insert it into your content by following the steps below.
- Click on the + Block Inserter icon.
- Select the Patterns tab:

- Choose from:
- All patterns: Browse every pattern, including patterns provided by WordPress.com.
- My patterns: Browse only patterns you have created yourself.
- Browse sample patterns by category, such as About, Banners, Forms, Services, and many more.
- Click on a pattern once to add it to your page.
💡
Using your keyboard, you can also type a forward slash / and the name of your pattern on a new line and press enter to quickly add a pattern you’ve created.
After adding a pattern, you can edit it in two ways:
- Add the pattern to your site, as explained in the previous section.
- Select the block and click on the “Edit original” option in the block toolbar:

- Make your changes, which may involve typing new text, reordering blocks, adding new blocks, or removing blocks.
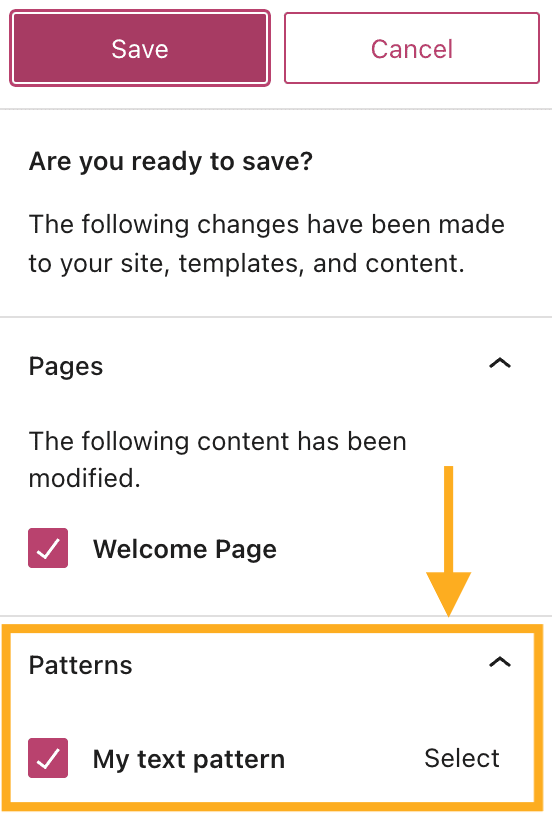
- When you finish the changes, click the Save / Update / Publish button in the top right corner.
- Before your changes are saved, you’ll find a summary of changes you made to your site. If you have edited a synced pattern, it will be highlighted here.
- Click the “Save” button again to confirm the change, or untick the box next to any changes you don’t wish to save.
Click the “Reset” option in the toolbar to immediately restore a synced pattern back to the original content.
- Visit your dashboard.
- Navigate to Appearance → Editor.
- Click on the “Patterns” option.
- Select your pattern and click the pencil icon to edit that pattern.
- Once done with the edits, click the “Save” button.
If you cannot access Appearance → Editor, your site is not using a block theme. To edit a pattern without access to the Site Editor:
- Visit your dashboard.
- Navigate to Appearance → Patterns.
- Click on the title of the pattern to edit that pattern.
- Once done with the edits, click the “Update” button.
When creating a pattern, you could make it a synced or unsynced pattern. Here, we’ll explain each option and how to work with both types of patterns.
A synced pattern is a pattern that remains the same everywhere you use it on your site. When you edit the synced pattern in one place on your site, that change will be applied to everywhere the pattern is used. For example, if you create a synced pattern for your business hours, you can change those hours in one instance of the pattern, and it will be updated throughout your site.
Synced patterns are identified by the pattern symbol that looks like a diamond with another diamond behind it. You will also see the name of the pattern in the following places in the editor:
- The block toolbar.
- The block settings sidebar.
- List View.
- Breadcrumbs at the bottom of the screen.

You can change a synced pattern anywhere the pattern is in use. When you save your changes, they will be applied to all pages and posts that use that pattern.
Detaching a synced pattern allows you to edit the content in the pattern for just that page or post. It turns that inserted pattern into an unsynced pattern, leaving your existing synced pattern untouched.
To turn a synced pattern into an unsynced pattern:
- Add the pattern to your site, as explained in the previous section.
- Click on the pattern, and a toolbar will appear above or below it.
- Click the ellipses (three dots) at the end of the toolbar and select the “Detach” option:

You can override content within a synced pattern while keeping the rest of the content structure the same. This allows you to set, on a block-by-block basis, the ability to customize the content of individual instances while keeping the overall layout intact. Learn more about pattern overrides.
An unsynced pattern is a collection of blocks you’ve designed and want to use again but also want the freedom to change the content in the blocks after you’ve added them to a page or post. For example, you might have a consistent layout that includes images and text for your blog posts. You can create a pattern, turn off the sync option, and then be able to modify the images and text using the same layout on each blog post.
Unlike synced patterns, once an unsynced pattern is added to a page, it behaves like a regular collection of blocks. You can change the content of the unsynced pattern, which will only apply to that single page or post.
As you make changes to patterns, previous versions of the blocks are saved in case you need to revert to an earlier version. Follow these steps to access a pattern’s revisions:
- Visit your dashboard.
- Navigate to Appearance → Editor.
- Select Patterns.
- Click the “Manage all of my patterns” option.
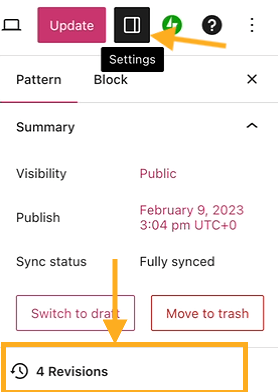
- Hover your mouse over the title of any pattern and select Edit.
- Open the settings sidebar, as shown on the right. The icon looks like a square with two uneven columns.
- Under the Pattern tab, click Revisions. If “Revisions” doesn’t appear, there are no saved revisions yet.
If you cannot access Appearance → Editor, your site is not using a block theme. To access pattern revisions without access to the Site Editor:
- Visit your dashboard.
- Navigate to Appearance → Patterns.
- Click on the title of the pattern whose revisions you want to see.
- Open the settings sidebar, as shown on the right. The icon looks like a square with two uneven columns.
- Under the Pattern tab, click Revisions. If “Revisions” doesn’t appear, there are no saved revisions yet.
The revisions will show you all previously saved versions of the pattern. Similar to revisions for pages and posts, you can load an older version of the pattern here if you wish.
To delete patterns from your site:
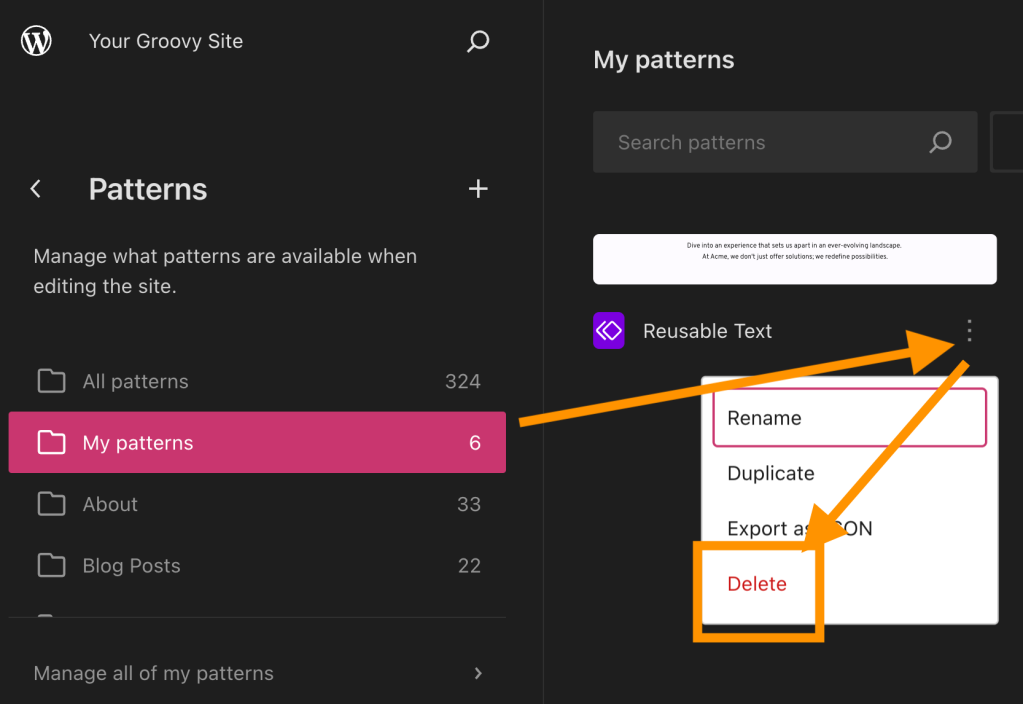
- Visit your dashboard and navigate to Appearance → Editor.
- Select Patterns → My patterns.
- Click the three dots next to the name of any pattern and select the “Delete” option to delete the pattern.
If you cannot access Appearance → Editor, your site is not using a block theme. To delete a pattern revisions without access to the Site Editor:
- Visit your dashboard.
- Navigate to Appearance → Patterns.
- Hover over the title of the pattern you want to delete.
- Below the title, select the “Trash” option.
If you have a pattern on one site that you wish to move to another site, here’s how to export and import the blocks as a JSON file:
- Visit your dashboard.
- Navigate to Appearance → Editor.
- Select Patterns.
- Click “Manage all of my patterns” where you can
- Export a pattern: hover your mouse over the title of any pattern and click the “Export as JSON” option. This will save a file to your computer. If you’ve created any patterns, you can bulk-select these with checkboxes to export them as a group.
- Import a pattern: click on the “Import from JSON” button at the top of the pattern management screen:

If you cannot access Appearance → Editor, your site is not using a block theme. To import a pattern without access to the Site Editor:
- Visit your dashboard.
- Navigate to Appearance → Patterns.
- Click on the “Import from JSON” button at the top of the Patterns screen.
- Click “Choose file” and select a file to upload.
- Click “Import“.
To export a pattern without access to the Site Editor:
- Visit your dashboard.
- Navigate to Appearance → Patterns.
- Hover over the title of the pattern you want to export.
- Below the title, select the “Export as JSON” option.

