Use the Paid Content block to accept one-time, monthly, or annual payments on your website for access to exclusive content that you create – video, images, text, or anything at all. Engage your audience with exclusive content while earning money to support your website.
In this guide
The Paid Content block (formerly known as the Premium Content block) allows you to restrict content on a page or post to paying subscribers only. You can display any kind of content for only paid subscribers to see.
Visitors see options to subscribe or log in when attempting to view the paid content:

You can use this block as a paywall to share your content only with paying subscribers. Add subscriber-only videos, cheat sheets, and other goodies to an exclusive section of your site.
The Paid Content block uses Payments to manage subscriptions.
In this video, we demonstrate how to create blog content for paying members only using the Paid Content block (formerly known as the Premium Content block):
The Paid Content Block can’t be added through the Jetpack app yet. You can use a browser on your mobile device or a desktop computer to add this block to posts or pages:
To add the Paid Content block, click the + Block Inserter icon and search for “Paid Content”.
💡
Using your keyboard, you can also type /paid on a new line and press enter to quickly add a new Paid Content block.

For more information, visit our detailed instructions on adding blocks.
📌
For plugin-enabled sites, the WordPress.com Editing Toolkit plugin must be active for the Paid Content block. If you can’t find this block, go to Plugins → Installed Plugins to ensure that the WordPress.com Editing Toolkit plugin is active.
If this is your first time using any WordPress.com payments features, we’ll prompt you to connect your WordPress.com account to Stripe — the payment processor used to collect your funds. Click the Connect button, and you’ll be directed to Stripe to continue:

With Stripe, you can create an account or sign in to an existing one. Any money you earn using WordPress.com Payments will go into your Stripe account. WordPress.com never has any access to the money you earn. From your Stripe account, you can move your earnings to the personal bank account of your choice.
Supported Countries and Currencies (click to reveal)
To start accepting payments using a Stripe account, you must be a citizen or own a company in one of the countries where Stripe is available for business. We officially support the countries listed below.
Your customers can pay using a credit card issued anywhere in the world.
- Australia
- Austria
- Belgium
- Brazil
- Bulgaria
- Canada
- Cyprus
- Czech Republic
- Denmark
- Estonia
- Finland
- France
- Germany
- Greece
- Hong Kong
- Ireland
- Italy
- Japan
- Latvia
- Lithuania
- Luxembourg
- Malaysia
- Malta
- Mexico
- Netherlands
- New Zealand
- Norway
- Poland
- Portugal
- Romania
- Singapore
- Slovakia
- Slovenia
- Spain
- Sweden
- Switzerland
- United Kingdom
- United States
The Paid Content block toolbar has four components explained below:

- The subscription required to view this content
- Subscriber view: Select this tab to add the content for paying subscribers to see.
- Guest view: Select this tab to add a prompt or content seen by non-paying subscribers.
- The editable content area to add subscriber and guest content, depending on which tab is selected.
After adding the Paid Content block, take the following steps:
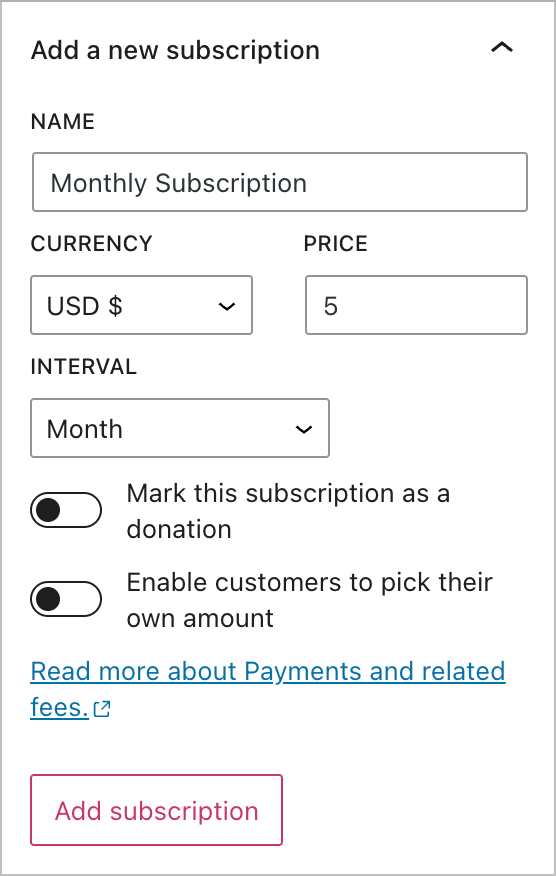
First, create a subscription plan for your readers to purchase. You’ll choose a name, price, and renewal interval:
- Click the list of subscriptions (as marked with a 1 in the above image) and choose “Add a new subscription,” or use the sidebar settings (shown right) to create a new subscription.
- Give the subscription a name, set the currency, price, and how often you want the subscription to renew (monthly, yearly, or a one-off payment.)
- Toggle on or off if the subscription is a donation, and if you want to enable your customers to choose to pay their own amount.
- Click “Add subscription“.
You can manage your subscriptions, see subscribers, and monitor your revenue from your site’s dashboard by going to Tools → Monetize (or Hosting → Monetize if using WP-Admin).
You can add multiple subscription levels. For example, you can add bronze, silver, and gold tiers with increasing benefits for each one. Remember that a single Paid Content block can have just one subscription selected, so you would insert three Paid Content blocks in this scenario, one for each payment plan/subscription level.
💡
Transactions using this block do not account for taxes or shipping and will only charge the amount specified. If you wish to capture taxes or shipping in addition to the price, you can include this in the transaction amount when setting up the block.
Next, click on the “Subscriber View” tab. This is where you will add the content your subscribers are paying for. You can place text, images, and any other content at all.
Make sure your exclusive content is nested under the “Subscriber View” so that it can be seen by paying subscribers only. A handy way to ensure your content is in the right place is to use List View. The content should be nested under the “Subscriber View“, as shown in this screenshot:

Next, click on the “Guest View” tab. Visitors without access to the subscription will see this content. You can use this area to showcase a teaser of your paid content and explain the benefits of subscribing.
This view is visible to anyone that is not yet subscribed. Once a visitor becomes a paying customer, they will stop seeing this view.

When your content is ready to go, publish the post or page. As the site owner, you see the subscriber-only content on your site. To see how the post or page looks for non-subscribers, visit the page using an incognito browser window.
You can manage your subscriptions and subscribers by visiting Tools → Monetize → Collect Payments (or Hosting → Monetize → Collect Payments if using WP-Admin). Visit our Payments Management guide to learn more.
Fees for payments are based on the WordPress.com or Jetpack plan you have and are calculated as a percentage of your revenue:
| WordPress.com Plan | Related Fees |
|---|---|
| WordPress.com Entrepreneur | 0 |
| WordPress.com Creator | 2% |
| WordPress.com Explorer | 4% |
| WordPress.com Starter | 8% |
| WordPress.com Pro (Legacy) | 2% |
| WordPress.com Starter (Legacy) | 3% |
| WordPress.com Free | 10% |
| Jetpack Plan | Related Fees |
|---|---|
| Security and Complete | 2% |
| Security Daily | 4% |
| Jetpack free | 10% |
| Woo Express Plan | Related Fees |
|---|---|
| Essential | 0 |
| Performance | 0 |
In addition to the fees listed above, Stripe collects 2.9% + US$0.30 for each payment made to your Stripe account. Not in the USA? Check Stripe’s fees in your currency.
This system allows you to offer Payments with minimal upfront investment. As you collect more supporters, it may make sense to move to a higher plan to retain more revenue.
Note that if your WordPress.com or Jetpack plan expires, the fee associated with your plan will increase to 10%. The Stripe fee will be unaffected.
If the cursor leaves the Paid Content block, the View selector may be hidden. Clicking on the Paid Content block brings back the option, allowing you to choose the “Subscriber View” or the “Guest View”. You can also use List View to select the appropriate part of the block.
If only the Login button shows, and not a Subscribe button, make sure you have selected a subscription in the block’s toolbar.
Only paying subscribers can view the content you place in the Subscriber View of the Paid Content block. Remember that if you have added other administrators or editors to your site, they have access to the paid content without a subscription because of their ability to edit the content on the site.
Only the HTML content is currently blocked. Non-subscribers can access files, videos, or images with a known direct link.
No. Subscribers are authenticated with WordPress.com, and site owners can see and export the list of subscribers from Tools → Monetize → Collect Payments (or Hosting → Monetize → Collect Payments if using WP-Admin).
If you have a plugin-enabled site, the WordPress.com Secure Sign On (SSO) feature will need to be enabled for the Paid Content block to work as expected.
You can access this setting under Settings → Security. The setting “Allow users to log in to this site using WordPress.com accounts” should be turned on.

