The Cookies & Consents Banner widget for classic themes adds a banner to your site that prompts visitors to consent to the tracking cookies. This guide will show you how to add the Cookies & Consents Banner Legacy Widget to your site.
💡
Themes that support the Site Editor do not use widgets, so you won’t see Appearance → Widgets in your dashboard. Instead, you can use the Cookie Consent Block.
In this guide
When browsing sites hosted on WordPress.com, you may see a privacy banner appear across the bottom of the screen:

The banner links by default to a page with details on the information we at WordPress.com collect and may store, including an explanation of personalized advertisements. For visitors from the European Union, we will not show you ads that have been personalized to your interests (as determined by an individual cookie) until you click the “Close and accept” button.
The privacy banner will automatically display on sites that are ad-supported.
If you have one of our other paid hosting plans, then both advertising and this banner are optional. On sites with these plans, you can customize the banner to fit your needs and include your own privacy disclosures by adding the Cookies & Consents widget, as explained below, or the Cookie Consent block for sites without access to widgets. This can be useful for following the EU Global Data Protection Regulation (GDPR) or other local laws.
Note: The privacy banner will not appear on ad-supported sites until ads are actually displayed, which is usually about 30 days after the site has been published.
⚠️
Please note that it is your responsibility to ensure that you comply with the relevant applicable laws in your jurisdiction. This widget is designed to help you take steps towards this, but is not offered as a guaranteed or complete solution for compliance with the GDPR or other laws applicable to you.
Sites hosted on WordPress.com make use of cookies for a variety of different purposes. Some cookies are only set for registered WordPress.com users, whereas others are set for all visitors. We aim to collect the minimal amount of data necessary to provide our services. For more detailed information, see our dedicated Cookie Policy page and Privacy Policy.
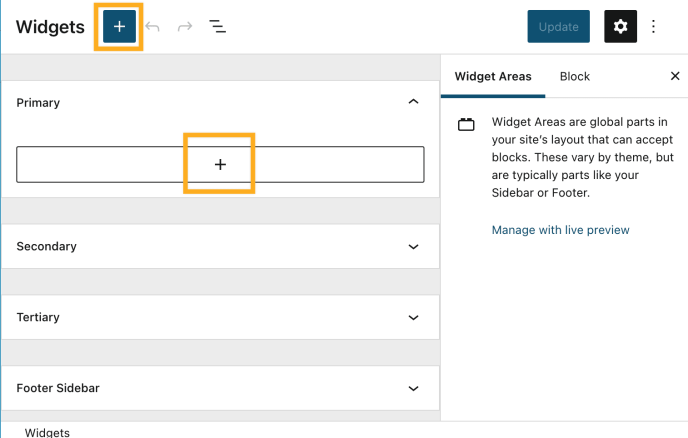
To add the widget to your site:
- In your dashboard, click on Appearance → Widgets.
- Choose the location where you’d like to place the widget on your site. Standard options include the Footer and Sidebar, but this may differ depending on your theme.
- Click either of the + block inserter buttons (see right) to see a list of all the available blocks and widgets.
- Scroll down to the Widgets section and click on the widget once to add it to your site.
For more general information, see this guide on working with widgets.
You can place it in any widget area, as the banner will display across the bottom of the screen when the site is loaded.
Note: The banner will only appear on posts or pages on your site that display the widget area where you add the widget. To display the banner on the front page of your site, be sure to add the widget to a widget area that appears there.
After adding the widget following the steps above, you can customize the following settings:
- Banner text: The banner will display a default cookie notification message, which can be customized. Click Custom to set up your own notification message.
- Privacy Policy Link: By default, this creates a link to the WordPress.com cookies policy. Should you wish to link to your own policy, you can do so by creating a page to your site, and inserting the link in the field Custom URL. After inserting the link, you can select the custom option.
- Link Text: By default, this is ‘Our Cookie Policy’, which can be customized as needed.
- Button Text: The text of the button that visitors will click to accept or dismiss the cookie notice.
- Capture consent & Hiding the banner: The banner can be set to be dismissed in one of three ways: when a visitor specifically clicks the button, when a visitor scrolls, or after a specific time (the minimum length of time is 3 seconds, and the maximum is 1000.) Once the banner is hidden, a technical cookie named
eucookielawis set, which prevents it from being displayed to the same user again for 30 days. For members of the WordAds program, EU visitors must click the “Close and accept” button for their ads to be personalized on your site. Such ads return a higher revenue rate to be shared with you. Keep this in mind when deciding how to hide the banner. - Consent expires after: The number of days the consent will expire.
- Color scheme: Display the banner using a dark or light palette. This can be further customized using CSS if you wish. The relevant CSS selector is
#eu-cookie-law.
In addition to the widget, you may wish to add a link to the WordPress.com cookies policy. This can be achieved by inserting a custom link into your menu.
The following external links contain helpful information about website cookies:
