Last updated:
Templates are at the heart of website creation with WordPress and as such, they’re crucial to understand. They’re also the biggest tripping point for most users and have the biggest learning curve.
The release of the Site Editor and access to templates has opened up a world of possibilities that previously only developers or those savvy with code could truly tap into. It’s also a slightly different concept to how other website builders function. By nature of the power this provides, it adds some layers of complexity as well as opportunity and flexibility.
That said, you don’t need to be an expert on every tiny detail. The more you use the features, the more you’ll understand them. The more you learn about the features, the easier they will become to use.
This lesson gives you a solid foundation for understanding templates and their relationship with content.
One of the key points to remember is that the WordPress software is powerful. Unlike other website builders, we don’t lock down sections forcing you to work within a preconceived idea of how any given page should be set up. We do provide starting points of suggested layouts to simplify the process, but you have full control over whether you want to follow that structure or not. That also means you have full control to mess up a layout as well as customize it (don’t worry, there are undo buttons and revision histories available too). If you’re learning this information for the first time, be patient and intentional with the steps and actions you take.
If you’re building your first WordPress site, some of the information in this lesson may feel a bit unfamiliar initially. But we recommend reading through it for awareness, then as you’re working through other courses and lessons, refer back to this lesson for clarification. It’ll be fun to connect the dots and experience those aha moments, we promise!
As you work through building your site, remember that WordPress also offers advanced functionality for advanced users. If you’re a beginner, you don’t need to deep dive into the advanced features, but it’s worth being aware that they exist, as you truly can build your website without limits, but you can get there progressively over time.
Note:
If you have, or plan to build, a site using a Classic theme↗︎ or a Hybrid theme↗︎, none of the information in this lesson will apply to your site. The Site Editor is only available for Block themes (aka Full Site Editing↗︎ themes). If you’re using a Block theme, you will have a link to Editor located under the Appearance section of your main dashboard↗︎.

Be sure to review the Wrapping up section at the end as well, as it will succinctly summarize the details covered in this lesson.
When it comes to building a website, there are several terms that end up getting used interchangeably, and sometimes the same term is used for entirely different purposes by different companies or products. Themes, templates, and layouts are one such area where terminology can get a bit confusing. So first, let’s clarify what these terms mean in WordPress.
Themes provide the base look and feel of a website. Every site must have an active theme, and each site can only have one active theme. There is a wide variety of themes to choose from as explained further in the Understanding Themes lesson. They each come with many pre-set defaults and sometimes unique features, but they each also have significant customization abilities. For some themes, like Classic themes, certain customizations may require more advanced coding. But for other themes, like Block themes, most customization doesn’t require any coding at all.
Ideally, it’s best to choose a Block theme that you generally like the overall look of as is. While it’s possible to fully customize every aspect of any theme, choosing one that most closely matches your end goal will significantly reduce the amount of time you need to spend doing customizations. However, even if the perfect theme doesn’t seem to exist, don’t worry, just pick one that is close and you can customize the rest. For further guidance on choosing a theme, see our Choose a Theme lesson.
Layouts are the arrangement of blocks on any given page, post, or template, commonly referred to as patterns. Layouts can be a simple placement of a heading and a paragraph, or a more complex collection of multiple blocks displayed in a specific way.
Templates in WordPress are key to defining the underlying structure of individual pages or posts, as well as groups of them, throughout your site. They’re distinct from Themes which set the overall design parameters of your site.
Templates function as full-page layouts (or blueprints), composed of various blocks, to organize the page structure into sections. They use template parts for the header and footer, which are reusable, synced patterns of blocks. Templates also include a content area. It also helps to understand that there are two main types of templates: multi-use templates and single use templates, which we cover in detail below. Template layouts are also fully customizable.
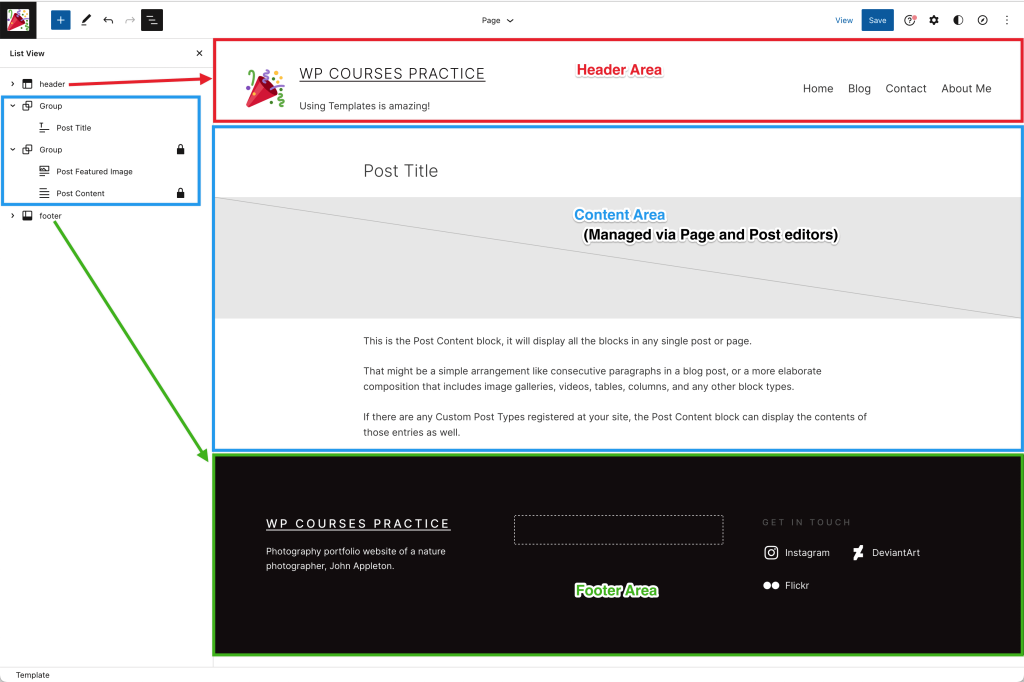
Every page or post within your website has the same basic anatomy. You can make it look vastly different on any given page or post, but the core elements are the same. There is a Header Area, a Content Area, and a Footer Area. Even if you choose to delete one of these sections, the location where they would live still remains the same.
Page anatomy as viewed when editing template:
Page anatomy as viewed on the front end of a site:

When you compare the image of a template in the editor to the site’s front end image, you can see how these sections correlate.
When thinking about the process of building your site using a Block theme, it helps to think of your site as falling into two separate categories: Content (your pages and posts) and Theme (your templates and styles).
You use the Pages and Posts editor to create your “content” that will display on each individual page or post. You can get to your list of Pages or Posts to edit, add, or remove them from the main dashboard↗︎ of your site. We cover the details of working with pages and posts in the Creating Pages lesson of our Create Your Site course.
You use the Site Editor to build the overall structure, layout, and design aspects of your “theme” by managing your templates, template parts, and styles. You can dig deeper into practicing this process in the Editing Templates lesson of our Create Your Site course.
Upon activating a theme, a range of base templates are generated, including dedicated templates for the Default Homepage, the Pages template for all regular pages, and the Single Posts template for all individual blog posts.
Additionally, Block themes also offer specialized templates like the 404 error page, the Search results page, the All Archives for category, tag, or author archives, and more. You can also add custom templates as desired.
While each theme may come with its own unique set of templates pre-activated, most themes will include at least the following base templates:
- All Archives
- Index
- Page: 404
- Pages
- Search Results
- Single Posts
You can see the pre-activated templates for your theme under Appearance > Editor > Templates. When you click on a template name you will see a description of what the template can be used for as well as a preview of the template structure.
If any of the above templates are missing, you can add them by clicking the + sign to add a new template and you’ll see the missing template as an option you can add.
These are the templates that you pair with regular pages and posts. In most situations, you’ll use one template for multiple pages and one template for multiple posts. The default template for pages is always the template called “Pages”. When you create a new page, it will automatically be assigned this default “Pages” template.

The default template for posts is always the template called “Single Posts”. When you create a new post, it will automatically be assigned this default “Single Posts” template.

You can think of multi-use templates like a “frame” and your content as the “picture” that goes inside the frame. You can change the picture inside a particular frame, or you can change the frame on a particular picture. You have the same control with your templates and content because of the Site Editor.
Aside from the default Pages and Single Posts templates, the only other multi-use templates are custom templates that either come pre-created with your theme or that you create.
When working with a multi-use template it’s important to remember that the changes you make to these templates will affect all of the regular pages and posts within your site that are using them.
So, if you add an Image block directly to the Pages template, then that image will display on all of your pages. The same is true for the Single Posts template, and all of your posts.
For this reason, you don’t want to add page or post specific content to either of these templates.
But you may decide to add a Cover block, assign it to use the Featured Image, and place the page or post Title block in the Cover block — this would then act as a custom header per page or post, and will be dynamic for each page or post. Or, you may decide to add a Columns block with a wide left column for your Content block and a narrow right column to set up a sidebar with specific blocks (such as the Search block, the Categories List block, a Subscribe block, or even just some specific text in a Paragraph block) that repeats on every page or post. We practice both of the scenarios in our Editing Templates lesson in the Create Your Site course.
Just remember, whatever layout structure you use within multi-use templates will apply to all of the pages or posts using them.
Important!
It’s also critical to remember that these multi-use templates must include the “Content” block. This is the block that will populate your content in the “Content Area” of your webpage as shown in the Webpage anatomy section above. If you remove the Content block from a multi-use template, the content from your pages or posts assigned to use the template will not display on your site.
A simple page or post layout will include at least three components: Header template part, Content block, and Footer template part. (You may also find, or want to add, the Title and/or Featured Image block.)
For consistency throughout your site, you’ll want to use the same Header and Footer template parts on all of your templates. More on that in the Template parts section of this lesson.
There are some situations when you may want to create a custom template to use for specific pages or posts. Just remember that custom templates are multi-use templates that require the Content block in order to work properly. Also be sure that you have an intentional use case for a custom template that can’t be handled via the default Pages or Single Posts templates. In most cases, it’s not necessary to create a separate template for every single page or post.
To switch from using the default Pages or Single Posts template and assign a custom multi-use template to any given page or post:
- Open the Pages or Posts section from your main dashboard↗︎
- Edit the page or post you want to assign a specific template to
- Find the Template section in the Settings sidebar on the right
- Click the name of the current template
- Select a new template from the drop down list.
If the template you want to use is not listed in this drop down, it’s not a multi-use template.
Note:
When you’re editing your page or post content, you won’t see the pieces that are part of your multi-use template, such as the Header or Footer, you’ll only see the page or post specific content.

When you’re editing a multi-use template in the Site Editor, you won’t see your “content” for regular pages and posts. Instead you’ll see dynamic placeholder blocks for your content such as Content, Title, Featured Image and more. (Also note that your homepage may behave differently, which we cover in the Homepage and Posts Page lesson.)

Pro tip:
It is possible to access your Pages content from the Design panel within the Site Editor. From the Page or Post Editor, you can also access the assigned template a specific page or post is using from the Settings sidebar.
These options can make moving back and forth between content and templates much more convenient, and allow you to see both your template components and your actual content in one place. But it can also take some getting used to. It’s best to have a solid understanding of the relationship between your templates and your content before using these advanced tools. It’s especially important to understand that if you edit a multi-use template from within the Page or Post editor, that change will affect other pages or posts using the same template.
When learning more about these advanced tools, be sure to spend some time understanding where pieces such as pages, posts, and templates live and make a mental note of the visual differences when moving between the different sections, to help reduce mistakes and confusion.
At the moment, it’s not possible to access post content from within the Site Editor, but it is anticipated that this feature will be released in the future.
For beginners, we recommend going to the Pages and Posts sections of your main dashboard↗︎ to edit page and post content, and to Appearance > Editor to access the Templates section of the Site Editor to edit templates, and keep a clear distinction between the two for now. You can always preview the front end of the site to see these components displayed together.
Any template that is not a multi-use template is a single-use template.
Single-use templates mean that you cannot assign them to multiple pages or posts, and the content they display is controlled directly in the template.
The most common single-use template that you’ll work with frequently is the Default Homepage template.
The Default Homepage template will be one of three templates: Index, Blog Home, or Front Page. When you activate a new Block theme, the Default Homepage is assigned as your homepage automatically. You can edit every aspect of your homepage directly in this template as desired. Editing the Default Homepage content won’t affect your other pages, however, editing the Header and Footer template parts might. Please review the Template parts section below for further information. You can also choose to create a Custom Homepage instead, though this is less common with the newer Block themes. The Homepage options and applicable templates are covered in more depth in our lesson on Homepage and Posts Page.
Other examples of single-use templates are the Page: 404 and the Search Results templates, which are exactly what their names imply.
Page: 404 is the page that will display if someone tries to access a URL for your particular site that doesn’t exist. This could be because they typed something wrong, or because you’ve deleted a previously published page or post. In either case, the site visitor will see a page telling them that what they’re looking for doesn’t exist, or that “Nothing was found”. A 404 error page also typically includes a search box so the visitor can try searching for whatever they were looking for.
Before the existence of the Site Editor, the 404 error page was a system default page, created and designed by the theme author, and you had no control over what was on it without custom coding or the use of a plugin.
Now, this is a template, built-in to your theme, that you have full control over through the templates section of the Site Editor. You can control the information on this page by editing, adding, and removing blocks, just like you would for any regular page, post, or template. This allows you to fully customize even your 404 error page to truly reflect your brand and personality.
The same goes for the Search Results page. This is the default page that will be used whenever a visitor uses a search box anywhere you place it in your site. Again, with the Site Editor, you have full control over the text, images, and any other content you want to include on your search results page.
Note:
The Search Results page comes with a Query Loop block in place and pre-configured to display your search results. We recommend leaving the configuration for the Query Loop block as is in order for it to properly display search results. However, within the Query Loop block there is the Post Template that includes a collection of blocks in a specific layout. You can rearrange these Post Template blocks however you like, you can even add or remove specific blocks, such as the Date block for example, to customize the way the search results display.
The last standard template that is often automatically included is the All Archives template. This is a bit of a catch-all template that will be used to display archives of specific types of content, including posts by a single: author, category, tag, and date. You can also create custom templates for any archive if you want to deeply customize different types of content on your site.
Pro-tip:
There is also a unique, hybrid template that we’d like to highlight, as it’s often misused. The “Pages”: [Specific Page] template provides the ability to create a custom template that can only be used with one specific page. It can behave like a multi-use template that merges with just one specific page or like a single-use template where you build the content directly in the template. The Single Item: Post template offers the same functionality for posts, but is less commonly misused.
This hybrid template is handled via the Templates section of the Site Editor, when you add a new template. If you choose the Pages template option and you select a specific page from the list, this new custom template will only apply to the page you assign it to on creation. You cannot apply this template to any other page.
You’ll be given a choice to start with a page layout pattern, which will include the required blocks (such as the Content block) to merge this template with your existing page. However, if you skip adding the page layout, the template will be blank and it won’t display your existing page content.
You can instead choose to create the content directly in this template, and it won’t affect other pages. You can also start from blank, add your own block patterns to it, and include the Content block if you want this template to merge with the existing page you’ve assigned it to.
This option is mostly intended to be used for creating specific and dedicated landing pages within a site and shouldn’t be used when creating regular pages for your site. It can result in a lot of unnecessary extra work and confusion if not used intentionally.
Working with templates isn’t much different to working with your page or post content. In all cases you’re adding, removing, and editing blocks. The important aspect of templates is understanding their relationship with your content.
We recommend reviewing our Editing Templates lesson in the Create Your Site course to further understand the editing process of templates.
In addition to understanding what templates you have and what they’re used for, it’s worth investigating what types of blocks and template parts are added to your templates by default.
You can review these blocks in the Site Editor by opening the List View for each template. Click on the blocks in the List View to see them selected within the editor portion of the screen so that you know what they’re for and what names they’re using.
The template you’re investigating will determine which blocks you see in the List View, but may include: Header, Content, Query Loop, and/or Footer.
Header: This is the default template part that will display at the top of your site. It may be nested inside other blocks such as a Group or Column. It will use a purple icon color in the List View.
Content: This is a placeholder block to represent where in your template your regular page or post content will be displayed. This block is required for any multi-use templates. (In the case of a single-use template this block would be replaced with a collection of specific content blocks.) Remember, the Pages template is the default multi-use template for all of your regular pages, and the Single Posts template is the default multi-use template for all of your posts.
Query Loop: This is a dynamic block used to display the published posts in your site. In some cases, such as a Default Homepage designed to function as a blog, this will be the only content related block. In other cases, the Query Loop block may be part of a collection of other blocks. And for some themes, the Query Loop block won’t be used at all.
Footer: This is the default template part that will display at the bottom of your site. It’s not typically nested inside other blocks. It’s usually the last block on any template and spans the full width of the template. It will use a purple icon color in the List View.
A template part is a reusable synced pattern of blocks that can be placed within multiple templates. When you change the pieces of a template part in one place it will update across all locations of your site that are using it.
This provides both convenience and flexibility. When you want every page or post throughout your site to display the same header and/or footer, simply make sure that you’re using the same template part(s) on all templates. It saves you from having to make updates in multiple locations.
The templates provided by a theme come with a default Header template part and a default Footer template part, and these will usually be the same template parts across all templates.
These template parts are something that both multi-use and single-use templates have in common. Since they’re synced patterns, if you edit the default Header template part on a single-use template, such as your Default Homepage, it will affect the Header template part on your Pages and Single Posts template, as well as all other templates. Unless, you change which template part is being used.
You can replace an existing template part on any given template by following these steps:
- Select the specific template part in the List View
- Click the 3 dots on in the toolbar
- Select Replace
This will open a modal showing your existing template parts and additional patterns that you can use instead. When you choose a new pattern it will automatically save it as an existing template part.
A common use case for this is when you want your homepage to display a larger, hero image type header with a call-to-action button, but you want a simple, single row header on the rest of your pages. If you’re using the Default Homepage template (or you create a custom template for your homepage) you could create a header template part called “Homepage Header” that you just use in this one template. Then you can leave the default Header template part on the rest of your templates and edit it separately as desired.
Remember, if you edit the default Header template part in your Default Homepage template, it will change the header that displays on your regular pages and posts as well. So if you want them to be different, replace the Header template part instead.
You can get extremely creative with this feature by creating custom header template parts to combine with specific templates to use for different categories or sections within your site as well. This is a more advanced use case, but you’re more than welcome to play with this idea and explore the options.
You may also notice that some blocks have a lock icon next to them in the List View. This is a good reminder that you shouldn’t delete that particular block. If you’re familiar with working templates, and you’re sure you want to delete one of these locked blocks, it is possible, but we don’t usually recommend it. You can also lock blocks yourself as a reminder of important pieces that you want to keep in place. You can manage the lock setting for any block by selecting the block, click the 3 dots in the block toolbar, then select Lock (or Unlock if it’s already locked).
You can also find the existing template parts for your theme under Appearance > Editor and click on Patterns in the left Design panel. At the bottom of this panel you’ll see the section for Template Parts which includes: Header, Footer, and General. You can duplicate existing template parts, edit them, and create new ones. Each template part must have its own unique name.
Template parts cannot be used directly within Pages or Posts, they’re only available for Templates. The Content block used in multi-use templates also can’t be used directly within specific pages or posts.
However, the one other place the Content block can be used is within the Query Loop block. If you’ve set up a Custom Posts Page, and you want the page to display the full content of each of your posts, you can add the Content block instead of the Excerpt block, within the Query Loop block that you place within a specific page.
There are a number of other content specific blocks found in templates such as: Title, Featured Image, Date, Author, Comments, and more. While these are content specific blocks, they can be used within both templates and content (such as pages or posts) depending on your desired use case.
Note:
Template parts won’t transfer when you switch themes. If you create template parts that you then want to keep after switching themes, you’ll want to convert them into a Pattern. After switching themes you will then be able to access these Patterns. We cover this process in more detail in the Switching Themes lesson of our Create Your Site course.
This lesson covers a tremendous amount of information for the sole purpose of introducing you to some of the various components you’ll encounter while building your site. While there is a great deal of power and control available to you, there’s no need to memorize all the possibilities to get started. As you progress, refer back to this lesson as needed for a refresher or clarification.
For a more straightforward website creation experience, stick to using the provided templates, template parts, and patterns, and you’ll be up and running before you know it.
Themes, templates and layouts work together to create the final output of your site. You can’t have one without the others, and it can really help to understand how they are different yet work together.
- Themes provide the overall design parameters of your site. Site wide theme customizations are managed through the Styles section of the Site Editor.
- Templates define the overall structure for pages and posts. They’re created and edited in the Templates section of the Site Editor. Multi-use templates merge with the content of your pages and posts. Single-use templates contain the content directly in the template.
- Layouts are the arrangement of blocks, also called patterns, that you use on pages, posts, and templates.
It is possible to use your theme as is and not worry about diving into a broader range of customizations. The most straightforward approach to building a simple website is to use the Design your own feature, as covered in our Quick Launch course. Alternatively, work with your theme of choice using the templates, customizations, and layouts as provided:
- Use the Default Homepage, and manage your homepage content from the Site Editor directly within the template used by the theme.
- Create a Custom Posts Page by setting it up as a regular page and manage this content within the page.
- Use the default Pages template for all pages, keep the Content block in this template.
- Use the default Single Posts template for all posts, keep the Content block in this template.
- Keep the same Header and Footer template parts in all templates as provided by the theme and edit them as desired.
- Manage your site menu from the Navigation block within your Header template part.
- Edit your colors and fonts using the Styles section within the Site Editor (if desired).
- Manage your templates from the Site Editor by going to Appearance > Editor > Templates.
- Create and edit your page and post content from the main dashboard↗︎ in their respective locations.
- Use the available Page Layouts and Block Patterns to set up the layout of additional pages and posts.
With the understanding that you’re not restricted to this approach and that at any time you can further explore advanced customizations as desired, without having to start over from scratch.
Points to remember:
- Themes come with pre-activated templates assigned to specific types of content: Homepage, Pages, Posts, Archives and more.
- Templates are either multi-use (one template that merges with multiple pages or posts) or single-use (content is built directly in the template for a single purpose).
- You can create custom multi-use templates.
- You can assign multi-use templates on a per page or post basis.
- All templates are built using blocks, the same as pages or posts.
- The most important block in any multi-use template being used for regular pages or posts is the “Content” block. This is the block that will merge your template with your content on the front end of your site. If you remove this block from a template, your website won’t display any of the content from your pages or posts that are using this template.
- Any blocks that you add to a multi-use template will display on all pages or posts that are using that template.
- Some blocks found in the Site Editor are unique to templates, meaning they don’t work in a regular page or post. (Such as the Header or Footer template parts.)
- Template parts represent global components of your site, like Headers and Footers, that can be created and edited within templates. Similar to Synced Patterns, any changes you make to template parts will apply across all templates that are using those template parts.
- You can use different template parts on different templates.
- You can customize templates that come pre-activated with your theme, and you can clear those customizations, but you can’t delete templates that come pre-activated with your theme.
- You can create custom templates and delete custom templates, but you can’t clear customizations to reset them.
- All editors include an undo button and a Revision History section to revert changes you’ve made.
- Templates and template parts do not transfer between themes when you switch themes. (But you can always switch back to a previous theme to find your previous templates and template parts.) If you want to transfer content built within a template to a new theme, you’ll want to create a pattern of the content, or copy the content to a page: Transfer Content From the Site Editor
Working with the Site Editor and Templates can be kept to a minimum for simplicity, and it can open up an exciting world of control and customization beyond what you imagined. Take your time to explore and experiment, and be sure to return to this lesson often for a refresher.
To dig into some hands-on examples of working with templates be sure to check out our Editing Templates lesson.
Most importantly, have fun!
