Last updated:
Let’s take a short moment to reflect on all the progress you’ve made so far. You’ve set up a new site, you’ve explored themes, you’ve learned how to adjust some of your site settings, you’ve created a few new pages, and played with some blocks. This is a tremendous amount of progress and you should be proud!
For many websites, it might seem like there’s not much more that can be done beyond a rinse and repeat of those same steps.
The reality is, we’ve only just begun! With the activation of a Block theme, we’ve unleashed the power and ability of the Site Editor. Now it’s time to truly see the world that this opens up for you. If you haven’t reviewed our lessons on the Site Editor and Templates Explained in the Getting Started course, now would be a good time to do so.
In this lesson we’re going to focus on editing: templates and template parts.
To start, let’s recap a few important reminders that are covered in depth in the Templates Explained lesson.
Points to remember:
- Themes come with pre-activated templates assigned to specific types of content: Homepage, Pages, Posts, Archives and more.
- Templates are either multi-use (one template that merges with multiple pages or posts) or single-use (content is built directly in the template for a single purpose).
- You can create custom multi-use templates.
- You can assign multi-use templates on a per page or post basis.
- All templates are built using blocks, the same as pages or posts.
- The most important block in any multi-use template being used for regular pages or posts is the “Content” block. This is the block that will merge your template with your content on the front end of your site. If you remove this block from a template, your website won’t display any of the content from your pages or posts that are using this template.
- Any blocks that you add to a multi-use template will display on all pages or posts that are using that template.
- Some blocks found in the Site Editor are unique to templates, meaning they don’t work in a regular page or post. (Such as the Header or Footer template parts.)
- Template parts represent global components of your site, like Headers and Footers, that can be created and edited within templates. Similar to Synced Patterns, any changes you make to template parts will apply across all templates that are using those template parts.
- You can use different template parts on different templates.
- You can customize templates that come pre-activated with your theme, and you can clear those customizations, but you can’t delete templates that come pre-activated with your theme.
- You can create custom templates and delete custom templates, but you can’t clear customizations to reset them.
- All editors include an undo button and a Revision History section to revert changes you’ve made.
- Templates and template parts do not transfer between themes when you switch themes. (But you can always switch back to a previous theme to find your previous templates and template parts.) If you want to transfer content built within a template to a new theme, you’ll want to create a pattern of the content, or copy the content to a page: Transfer Content From the Site Editor
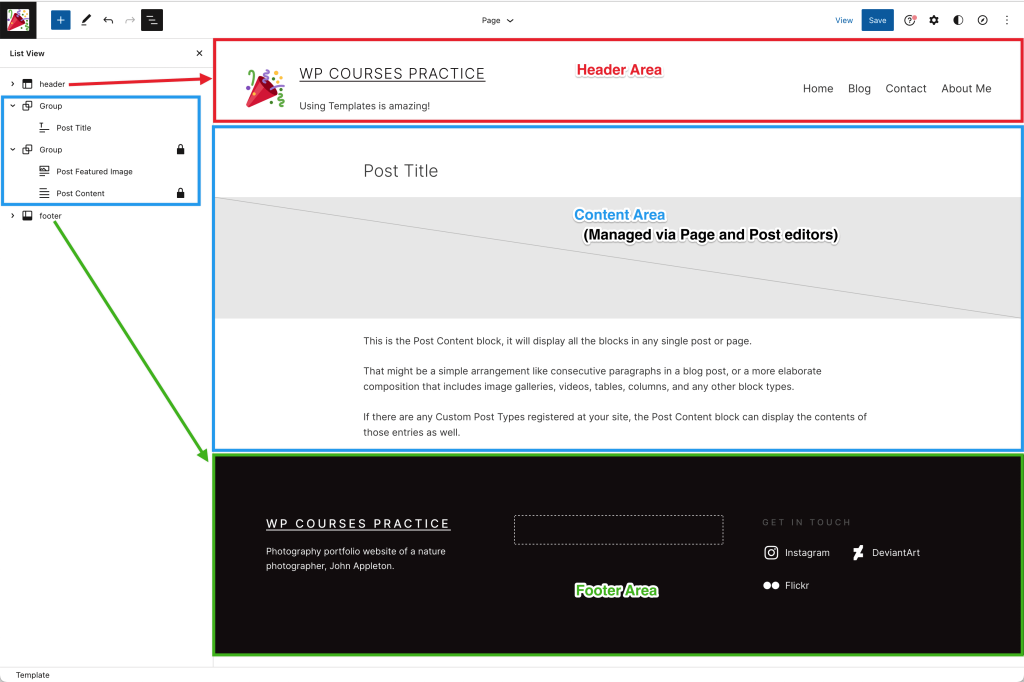
Also be sure to keep in mind the general anatomy of a webpage:
As previously explained, a multi-use template is a template that will be used to handle the structure of multiple pages or posts. This means that everything that is included in a multi-use template will display across all pages or posts that are using this template.
Remember, the most important block in a multi-use template is the Content block (we really can’t stress enough how important this is).
Let’s work with the default Pages template.
Go to Appearance > Editor > Templates click on the template called Pages then click the pencil icon, or anywhere in the preview window to open the editor.
Note:
While effort is made to keep the names of templates consistent, older themes might have variations for their names. For example, the Pages template might show up as “page” or “Page” — different capitalization and missing the ‘s’. If you want to double check the exact name that your pages or posts are using, open one of each from their respective sections from your main dashboard↗︎. The template name being used will be listed in the Settings sidebar on the right.
The specific set up and included blocks for your Pages template is going to depend entirely on the theme you have active. Since every theme is unique, there’s no singular possibility of what you might find, you’ll need to open the List View in the editor for the template and explore.
For example, the screenshots below show you the default structure in the List View on the left of the Pages template for three very different themes.
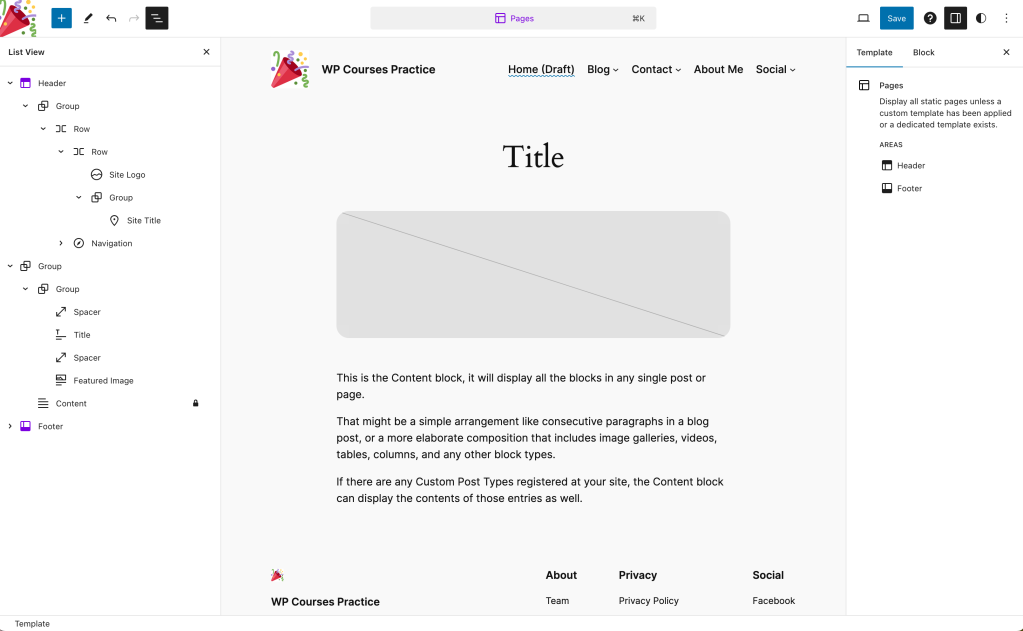
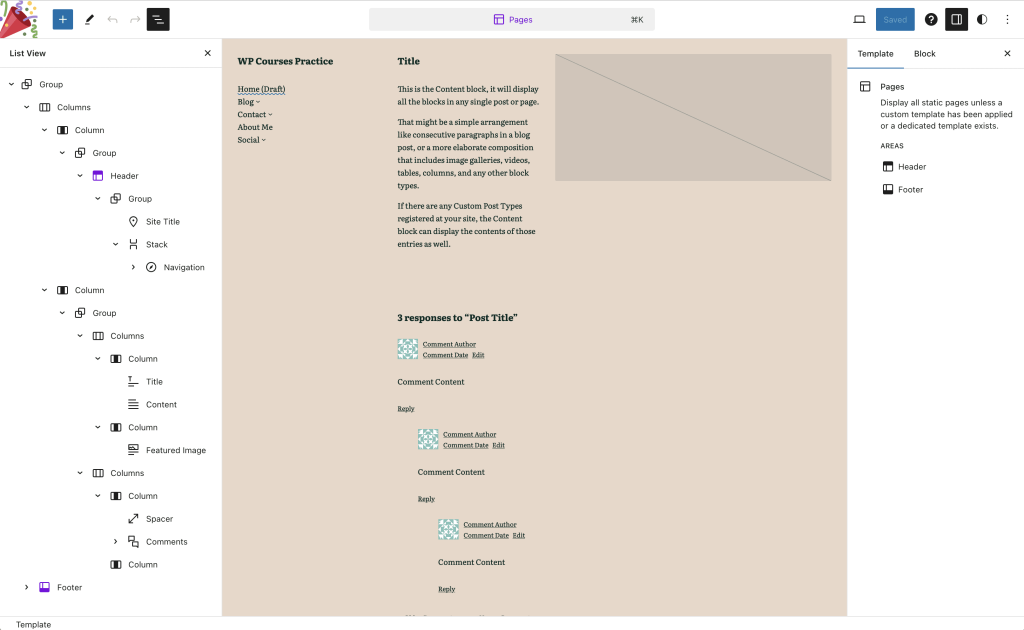
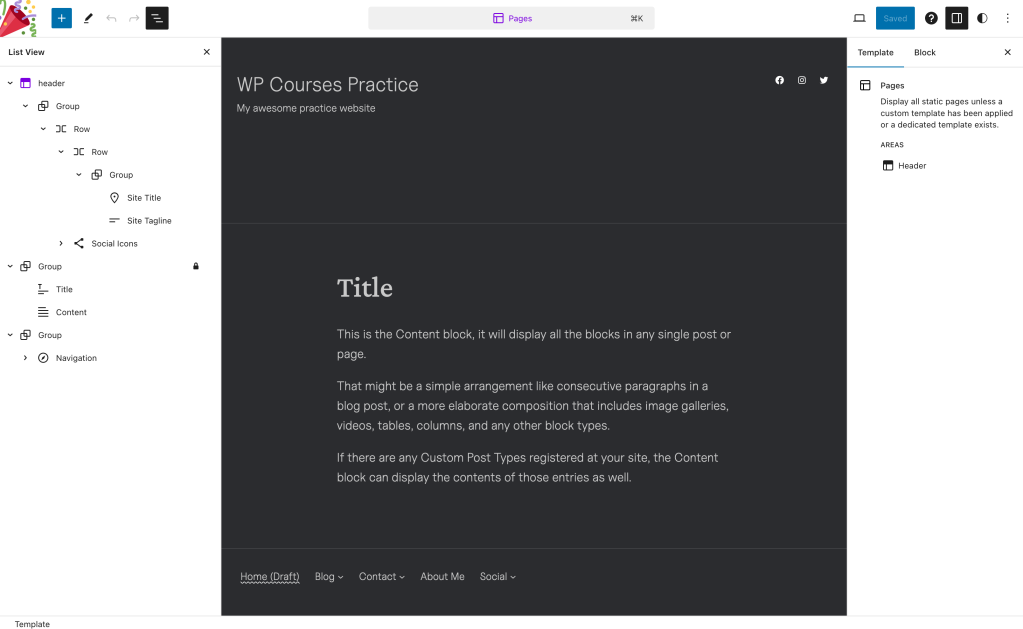
As you can see they range from simplistic and minimal, to complex and intricate.
In most cases the structure of the blocks in the Pages template will follow a general format of: Header area; Content area; Footer area.
You can also see that there is no “content” displayed in this template. The blocks within the Content area are all placeholders for the content that you build within your individual pages.
Ideally, you’ve chosen a theme that provides a default layout that you like as is, and you shouldn’t need to adjust the content area of the template. To see how this template merges with the content of your pages, in a new tab, open the Pages section from your main dashboard↗︎ and View (or Preview) one of the pages you created in the previous lesson. Then compare the front end of the page with the template in the Site Editor.
Keep both tabs open so that you can easily move back and forth between the Site Editor and the front end of your site (we’re going to ask you to refresh this page in the next section). For now, go back to the tab with your Site Editor.
So, if you don’t need to make adjustments to the content area, what might you want to adjust in the Pages template?
In many cases, you may only want to tweak your Header template part. Perhaps add your Site Logo, or remove the Site Title block. The process of adding and removing blocks in a template part works the same as anywhere else in the editor.
Just remember that if you change the default Header template part in the Pages template, it will also change this same Header template part in your other templates, such as your Single Posts template, your Default Homepage template, and others, that are using the same template part.
Often you can simply use the entire template exactly as is, without needing to make any changes at all. But, you may also decide that you want to use a different header entirely. Fortunately, you can replace the Header template part with a different one with just a few clicks.
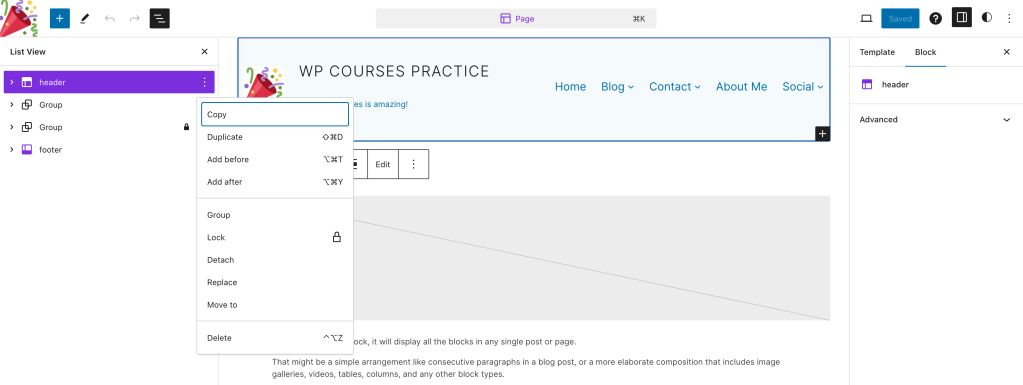
- Select the Header template part in the List View
- Click the 3 dots to the right of it
- Click on Replace
- In the modal that will open, browse through the available patterns and choose a different one
- You’ll notice that the name of your Header template part in the List View will change to the name of the new pattern you’ve selected

Replacing the Header template part in one template, such as the Pages template, won’t affect the Header template part being used in other templates. If you want other templates to use this new Header template part, you’ll want to repeat the above steps in each applicable template.
The above steps to replace the Header template part are the same steps you would take in your Default Homepage template to give your Homepage an entirely different header than the rest of your regular pages.
Now, let’s say you’d like to add a banner image near the top of every page only that displays the Featured Image for each page with the Page Title on top of the image. Here’s how you would achieve that:
First, let’s add a regular image in the template and see what happens to your pages.
- Click on the Header template part in the List View
- Click the 3 dots to the right
- Click Add after
- In the empty Paragraph block that appears type: /image and select the Image block from the list
- Upload an image from your computer, select one from your Media Library, or choose one from the Pexels Free Photos (you won’t be keeping this image, so choose anything that’s easy to get to)
- Save the template by clicking the Save button in the top right corner, then click Save again to confirm
Now go back to the tab with the front end of your site and refresh the page. (We’re assuming you kept the page open in a new tab from the last section.) You’ll see the image that you’ve just added show up. Now go to one of your other pages (not the homepage though), you’ll see the exact same image is displayed on all of your regular pages.
So remember, you don’t want to add page specific content to your Pages template. You only want to add blocks and content that you want to display on all of your regular pages.
Let’s adjust this image now to be a Cover block, using the Featured Image from your pages and place the page Title block on top of the Featured Image.
- Go back to your tab with the Site Editor
- Select the image you added
- In the block toolbar click the image icon then select Cover (this transforms the Image block to be a Cover block)
- In the Settings sidebar on the right, scroll down and click the Clear Media button
- In the block toolbar click the Add Media option
- Select the option to Use Featured Image (remember, we’re in a template, this is now a placeholder block and you won’t see an actual image display in the editor)
- Look through the blocks already in your template, if you have one called Title, drag it to be inside in the Cover block. If you don’t already have a Title block, click in the text area of the Cover block and type: /title and select it from the list to add it
- Style the Title block as desired using the options in the block toolbar and the Settings sidebar (perhaps you’d like to change the alignment of it, the size, or the font color)
- Save the template in the top right corner, click Save again to confirm
Go back to the tab with the front end of your site and refresh the page. You’ll see a banner that includes your page title. If you’ve already assigned a Featured Image to your pages, that image will be the background behind your page title. If you have not yet assigned a Featured Image to a page, the banner will display as a solid color background.
You can assign Featured Images to individual pages by editing the page in the main Pages section from your main dashboard↗︎.
Once you’ve added all your Featured Images to your pages, as you browse through the pages on the front end of your site, you’ll see that each page displays a unique image banner with the Featured Image assigned to each page, with its respective page title on top of the image.
You can further tweak the Cover block and the Title block (which works similar to the Heading block) in the Pages template within the Site Editor if you need to adjust settings like the opacity of the image or how the page title displays.
You may have noticed that we had you add this Cover block banner below the Header template part. This ensures that this Cover block banner will only apply to the pages using the default Pages template.
If you had added this Cover block banner inside the Header template part, every single template throughout your site would display this Cover block banner, and that might not work well for specific templates.
If you’d like your Posts to also include this Cover block banner, you can copy the Cover block from your Pages template (click the three dots in the block toolbar and click Copy). Then:
- Open the Single Posts template
- Select the Header template part from the List View
- Click the 3 dots to the right of it
- Click Add after
- Then paste into the empty Paragraph block
This will retain any styling that you applied to the Cover block and Title block without you having to set it up from scratch again.
While you may not need to adjust the content area of your Pages template, let’s say that your Pages template is very simple, displaying everything in a single column on the page. Maybe, you decide that you want to include a Sidebar on all of your pages. Rather than repeatedly creating the layout on each individual page, you can set up the structure of your Pages template to handle it automatically. Here’s how:
- In the List View of your Pages template, find and select the Content block
- If the Content block is not already inside a Group block, click the 3 dots for the Content block and select Group
- Click the 3 dots for the Content block again (not the Group block) and click Add before
- In the empty Paragraph block, type: /columns
- Select the Columns block and choose the column variation you want to use (66/33 would give you a sidebar on the right)
- In the toolbar for the Columns block (not a single column) check that the width alignment is set to Wide or Full width (if this option is missing, make sure the Group block as the toggle turned on for ‘Inner blocks use content width’)
- In the List View, drag the Content block into the left column of the Columns block (in some cases you may need to Unlock the Content block before moving it)
- Click the + sign inside the column on the right and add whatever blocks you’d like your sidebar to display on every page (for now add the Search block if you haven’t decided what you want to include in your sidebar yet)
- Save the template in the top right corner, and click Save again to confirm
Go back to the tab with the front end of your site and refresh the page. You will now see your page content in the wider, left-side column and your sidebar on the right will display the content you added to this column. As you browse through your other regular pages, you’ll see this same sidebar layout on all of them.
We also provide a support guide on Adding a sidebar that covers some additional ideas and approaches you can explore.
The Footer template part is much like your Header template part. In most themes, the default Footer will be included automatically in all templates.
Any changes you make to this template part will update across your entire site.
You can replace the default Footer template part the same way as you replace the Header template part.
If your theme isn’t using a Footer template part, you can add one by adding a new block at the bottom of your template and type: /footer. This will add a default Footer that you can then Replace with any pattern.
When working with a single-use template, you are editing the content directly in the template. There won’t be a Content block, and there may or may not be a Query Loop block. Whatever content you want these templates to display, you add, remove, and edit it in the template.
Examples of single-use templates include:
- Default Homepage (Index, Blog Home, Home, or Front Page)
- Page: 404
- Search Results
Even the All Archives is a type of single-use template in that you don’t specifically assign this template to individual pages or posts. Instead, this template is used to create the desired layout structure for custom post types such as: authors, categories, tags, and more. You can use the All Archives template for all of these custom post types, or you can create custom archive templates for each type of custom post. For example, you could create a custom Category Archive template for each of your categories in order to customize the look for each of your categories.
For beginners, we recommend keeping it simple and don’t try to create too many customized templates at first. You can always add more templates later.
When you’re editing the content on any single-use template, it’s the same process as editing the content of a page or post: add, remove, or edit the blocks within the template. You can also use Block Patterns within these templates to help with quickly creating professional layout designs.
As mentioned above, if you’d like your Default Homepage template to use a different Header template part than the rest of the pages in your site, you can achieve that by:
- Open the editor for the Default Homepage template
- In the List View, select the Header template part
- Click the 3 dots to the right
- Select Replace
- Browse and choose whatever pattern you’d like to use for your Homepage header
A big part of working with your WordPress site, the Site Editor, and Templates is a matter of exploring, clicking, and seeing what happens. WordPress is a multi-layered, powerful software that is capable of anything you can dream up, the trick is learning how.
It can be a bit scary sometimes, if you’re worried about breaking something or losing your work. But remember, there is an Undo button in the top left corner of every editor, and pages, posts, and templates all offer a Revision History (this support guide is for pages and posts, but template revisions work the same way).
This lesson has provided a few specific examples of ways that you can work with and edit templates to control the overall layout and structure of your pages and posts. But let your imagination kick-in. Also remember that every theme is unique. You may encounter blocks and layouts that differ from the examples we’ve provided. You may run into unique configurations that work differently to standard, more simplified configurations. WordPress is not a one-size-fits-all type of software and it would be impossible for us to cover every possible scenario that you may run into.
Our aim with this lesson is to provide you with some hands-on experience to get your own creative ideas flowing so that you can experiment with even more possibilities.
Since it bears repeating:
Points to remember:
- Themes come with pre-activated templates assigned to specific types of content: Homepage, Pages, Posts, Archives and more.
- Templates are either multi-use (one template that merges with multiple pages or posts) or single-use (content is built directly in the template for a single purpose).
- You can create custom multi-use templates.
- You can assign multi-use templates on a per page or post basis.
- All templates are built using blocks, the same as pages or posts.
- The most important block in any multi-use template being used for regular pages or posts is the “Content” block. This is the block that will merge your template with your content on the front end of your site. If you remove this block from a template, your website won’t display any of the content from your pages or posts that are using this template.
- Any blocks that you add to a multi-use template will display on all pages or posts that are using that template.
- Some blocks found in the Site Editor are unique to templates, meaning they don’t work in a regular page or post. (Such as the Header or Footer template parts.)
- Template parts represent global components of your site, like Headers and Footers, that can be created and edited within templates. Similar to Synced Patterns, any changes you make to template parts will apply across all templates that are using those template parts.
- You can use different template parts on different templates.
- You can customize templates that come pre-activated with your theme, and you can clear those customizations, but you can’t delete templates that come pre-activated with your theme.
- You can create custom templates and delete custom templates, but you can’t clear customizations to reset them.
- All editors include an undo button and a Revision History section to revert changes you’ve made.
- Templates and template parts do not transfer between themes when you switch themes. (But you can always switch back to a previous theme to find your previous templates and template parts.) If you want to transfer content built within a template to a new theme, you’ll want to create a pattern of the content, or copy the content to a page: Transfer Content From the Site Editor
