All about image widgets — and ideas and inspiration for customizing them.

Short on time? Skip ahead:
In the first post of this series, “Widgets 101,” we introduced some popular widgets, including the Text and Image Widgets, and quick ways to transform an image by changing its shape or adding a frame. In this post, let’s zoom in on Image Widgets and how to customize them.
Image Widget essentials
First, let’s make sure we’ve got the basics down. To activate an Image Widget in your sidebar or footer, go to My Site → Customize → Widgets, select the section of your site where you’d like to add a widget, click on Add a Widget, and search for and select the widget that says “Image.”
 You don’t need to fill in all of the fields in this widget, but make sure you fill in the fields shown on the right to ensure your widget displays properly. The “Image URL” is important, as WordPress.com needs to know where your image is saved so it can display it. In other words, you need to copy the image’s URL, which you can do by going into your Media Library where all of your images are stored.
To get to your Media Library, open up a new post, click on the “Add Media icon,” find and select the image you’d like to use, and click “Edit.” Then, copy the entire link in the “URL” field. This is the URL you’ll insert in the “Image URL” field, shown in the screenshot above.

The displayed Image Widget, which — when clicked — goes to a specific URL on your site.
You can also use an image URL on another website — be sure to check the URL in your browser before adding it to the widget to confirm it ends with an extension specific to an image file (such as .jpg, .gif, .png).
Also, take advantage of the “Link URL” widget field at the very bottom. If you want an image in your sidebar or footer to direct readers somewhere on your site (or elsewhere on the web), specify the link here.
Custom-made image widgets
 Many bloggers create custom-made Image Widgets for their sidebars, which direct readers to different places on their site: a static page, a category page, a social account, and more. The black-and-white images on the right were previously displayed on a writer’s site. The images, font, and captions work together as a cohesive visual set, and the objects in the images evoke the literary life.
Related Reading: Check out our in-depth tutorial on creating a custom Image Widget for non-designers.
You can create similar images, too. If you have a working knowledge of Photoshop, whipping up sidebar images is probably a snap. If you don’t have Photoshop, or are a design and photo editing newbie, use a beginner-friendly online photo editor (like PicMonkey, Pixlr, or FotoFlexer) to transform your images with text, textures and effects, overlays and icons, frames, and more.
Let’s say, for example, that I want to create an Image Widget for my sidebar that, when clicked, directs my readers to a page on my blog of galleries of ocean photographs. I can do this by adding effects to one of my own images.
So, here’s what I’ve done: I grabbed this Instagram image of the Pacific Ocean from my feed; dropped it into PicMonkey; and used its various effects to insert text, add texture, and crop and frame it — all in less than a minute. Here’s the result:
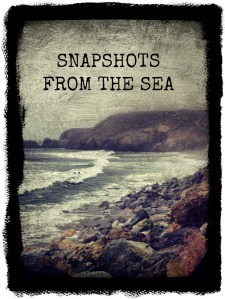
Next, I’ll open up a new post and add this image to my blog’s Media Library, copy the image’s “URL” as described in the section above, and insert this URL into the “Image URL” field in the widget. I’ll control the size by inputting the dimensions (in pixels) for the “Width” and “Height.” And voilà — I’ve created a custom-made Image Widget, which I can link to a gallery page on my site.
Custom-made Image Widgets help to shape your site’s overall aesthetic, as the writer’s widgets illustrate above, and contribute to the visual branding your blog, which we’ll talk about next.
Visual identity: branding your blog
Finally, let’s talk a bit about branding your blog: creating an overall mood and ensuring your site represents you and your interests. For example, consider the package of visual touches below (color, font, and pattern) that a blogger once used to create a visual identity:

An example of a custom header image
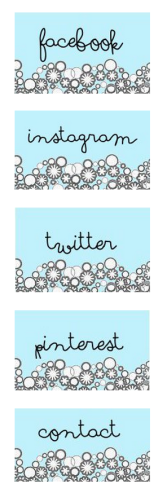
An example of complementary Image Widgets
The pattern used in the custom header — underneath the name of the blog — matches perfectly with the design in the accompanying image widgets, which direct readers to social profiles on Facebook, Instagram, Twitter, and Pinterest, as well as a contact email link.
In your Customizer, you’ll find many widgets to choose from, including ones for Twitter, Flickr, About.me, and more. They work in different ways — some display your latest content (tweets, Flickr photos), while others link to your profiles elsewhere.
Creating your own images for your favorite social networks will help to visually unify your site, especially when combined with a specific color palette, like the powder blue scheme shown in this example. (You can personalize colors if you have a Premium upgrade, while some themes on WordPress.com have free background color options or a setting to customize the link color, like Oxygen, Yoko, and Twenty Eleven.) You can create a cohesive visual package by matching your site’s header image, background, or link color with the elements in your custom images.
So, consider using color in Image Widgets, as well as other features like a custom header and custom background image, to visually brand your blog.
If you’re interested in experimenting with backgrounds and textures, browse options on sites like Subtle Patterns, My Site My Way, Squidfingers, and GRSites.
Ready for more? Continue on to “Widgets 301.”
Currently blogless? You’re a click away from sharing your story.
Create your blog at WordPress.com


Reblogged this on rendrasyahputrablog.
LikeLike
Just added an image widget to my blog and I love it! Just by doing this I feel the inspiration to take more control of my blog designs now and definitely to play around with my widgets more!
LikeLike
This is so helpful! Thank you! thank you! Just what I need to help my desperately dull site 🙂
LikeLike
Thank you so much for the idea! I like playing around with my photos, made myself a custom header, too, and I have no idea how it never occurred to me to also make some widgets.
Now they’re all done, and giving my blog a brand new – more cozy and pretty – look!
http://estrella05azul.wordpress.com/
LikeLike
How do you get more than one image into a sidebar, like the examples you have shown above with Connor and Miss Zoe? I can only seem to use the image widget to upload one picture.
LikeLike
You can activate more than one image widget in your sidebar, which is how you can achieve the column of multiple image widgets. Just drag a new image widget to the right — you can add as many as you want.
LikeLike
Thanks Michelle…I just figured it out and added another. For some reason I was looking and not seeing the image widget. You know, the kind of looking when something is always there but it’s temporarily invisible. 😉
LikeLike