If you own a domain name with DreamHost, you can use that domain with your WordPress.com site. This guide will show you how to connect a DreamHost domain to your WordPress site on WordPress.com.
In this guide
Connecting a domain from DreamHost is free with any paid WordPress.com plan. Connecting a DreamHost domain to your WordPress.com site means:
- Your domain will show the site you created on WordPress.com, without the WordPress name in the address.
- You will continue to renew the domain name with your registrar (DreamHost) unless you decide to also transfer the domain to WordPress.com.
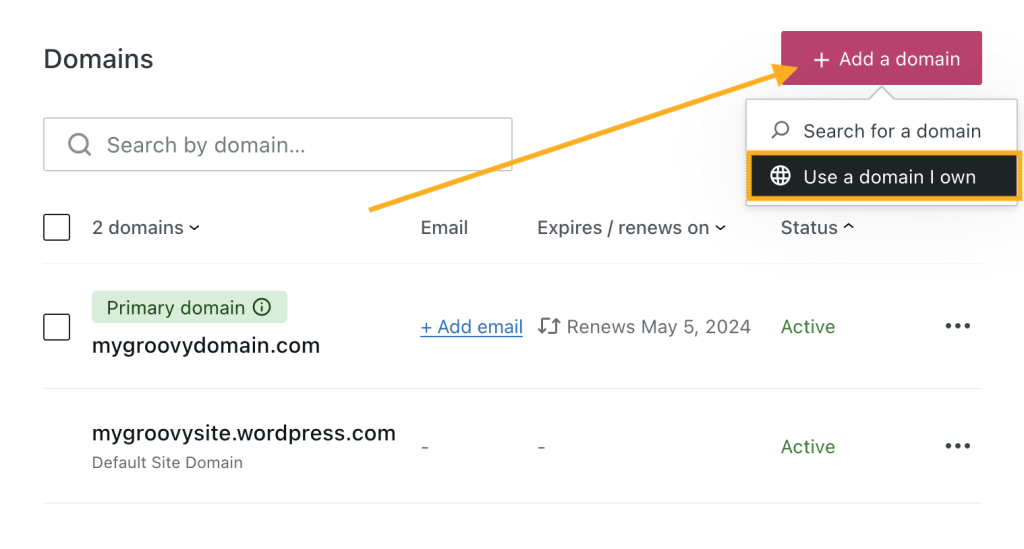
- Starting from your WordPress.com dashboard, navigate to Upgrades → Domains (or Hosting → Domains if using WP-Admin).
- Click the “Add a domain” button and select “Use a domain I own” from the drop-down menu:
- Type the domain name you own and click the “Next” button.
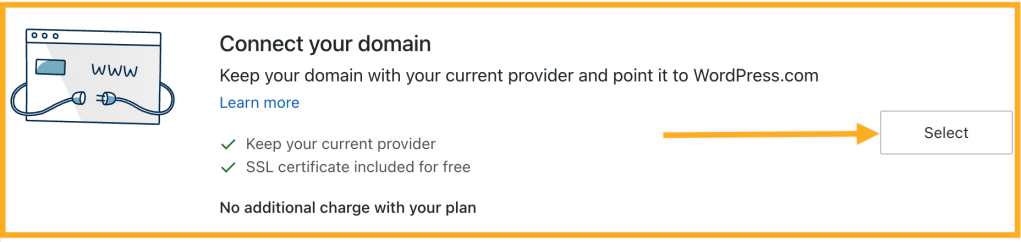
- On the next screen, you will see two options: transfer or connect. Click the “Select” button next to “Connect your domain”. It may take a few moments to be redirected to the next screen.
- Click the “Start setup” button on the connect screen.
If you have connected multiple domains to your WordPress.com site, you may be prompted to verify that you own the domain before starting the setup process.
The setup process will walk you through updating your domain’s name servers to point to WordPress.com.
Updating your name servers means your DNS records will be managed in your WordPress.com account. If you have an existing email service from your domain provider or another company, you will want to set up additional DNS records on WordPress.com to continue using that email service.

⚠️
If you already use email with your domain from another provider, your email may stop working upon changing the name servers. To avoid this, add the necessary DNS records to the DNS in WordPress.com before changing the name servers. See this guide for step-by-step instructions.
You have two options for updating your name servers to point to your WordPress.com site: update them yourself or contact your domain registrar’s support. We’ll explain each method below.
The manual setup process will walk you through updating your domain’s Name Servers to point to WordPress.com.
Updating your Name Servers means your DNS records will be managed in your WordPress.com account. If you have an existing email service from DreamHost or another company, you will want to set up additional DNS records on WordPress.com to continue using that email service.
You can update the nameservers through two different pages on the DreamHost panel.
- Navigate to the Manage Websites page
- Open the DNS Settings page

- If in Grid view, click the ‘vertical 3 dots’ button under your domain. From the popout menu, click the DNS Settings link.
- If in List view, click the ‘vertical 3 dots’ button to the right of your domain. From the popout menu, click the DNS Settings link.

- Scroll down to the Nameservers section.
- Click the Change button.

- Enter WordPress.com nameservers after clicking the ‘I’ll use my own nameservers’ option.
- Click the Save button when finished.
You can also edit the nameservers on the Manage Registrations page. If your domain is listed on this page, it is registered with DreamHost, and the nameservers can be edited.
- Navigate to the Manage Registrations page.
- Under the Modify Whois column, check the Whois box next to your domain.
- Click the Modify whois button.
- Click the Nameservers tab.
- Select an option:
- Use DreamHost’s nameservers: This sets the nameservers to DreamHost.
- Use another host’s nameservers: This allows you to change your nameservers to WordPress.com. In the fields provided, enter the WordPress.com nameservers.
You can contact DreamHost support here to make the DNS changes or help you make them. Here is a sample message you can send to them:
I would like to use my DreamHost domain with a WordPress.com site. In order to do this, I need to point my domain’s name servers to the following:
ns1.wordpress.com
ns2.wordpress.com
ns3.wordpress.com
After changing the name servers, give it time for the change to take effect. After changing the name servers, the domain might not load right away. It is usually up and running within a few hours, but it can take up to 72 hours for the DNS to fully update across global servers and internet service providers.
To confirm the domain is connected to your site, try visiting the domain in a new tab in your browser. If it loads your WordPress.com website, then it’s working! You can also visit Upgrades → Domains (or Hosting → Domains if using WP-Admin) and look under the Status column to the right of your domain. It should say “Active“, like this:

If it still says “Verifying“, try waiting a few hours before taking the next step. Once you see the status change to Active, then your domain is connected. If the domain is still not loading the correct site, you may need to clear your browser’s cache to see the changes.
The final step is to go to Upgrades → Domains (or Hosting → Domains if using WP-Admin) in your WordPress.com account and select your newly-connected domain as the primary domain. See Set a Primary Address for more.
💡
Transfer Your Domain to WordPress.com
Want to manage your domain and website all in one place, instead of with two separate companies? Transfer your domain’s registration to your WordPress.com account, which you can do before or after connecting the domain. You would no longer pay any domain registration fees to your current domain provider, and would instead renew both your domain and website plan here at WordPress.com.
