
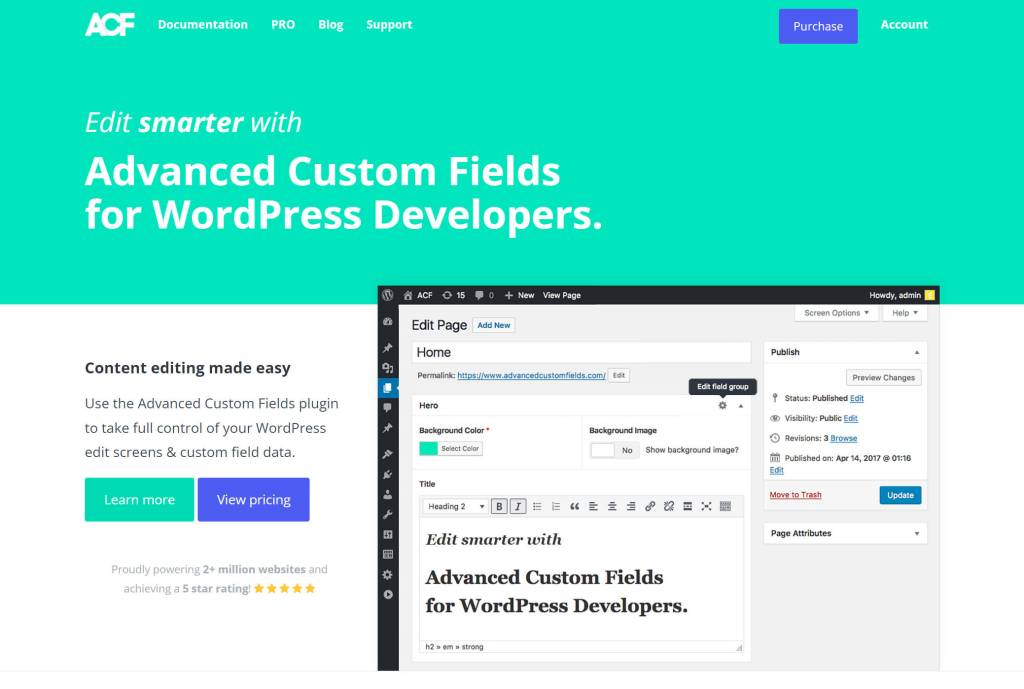
Custom fields unlock the ability to use WordPress in new and interesting ways. You can store custom information about a piece of content and then display that information to visitors in all sorts of helpful ways.
While WordPress does include a built-in feature to work with custom fields, Advanced Custom Fields is a freemium plugin that massively upgrades that functionality with an easier way to both create and use your custom fields.
In this hands-on Advanced Custom Fields review, you’ll learn what the plugin does, why it’s active on over one million sites, and how you can use it to create and display custom fields on your site.
Beyond that, you’ll also learn some of the popular Advanced Custom Fields alternatives, and why you might want to consider one of those plugins in certain situations.
In this article:
- What Does Advanced Custom Fields Do?
- What are Custom Fields?
- How to Set Up Custom Fields With Advanced Custom Fields
- How to Display Custom Field Information from Advanced Custom Fields
- Advanced Custom Fields Pricing
- Advanced Custom Fields Review: Who Should Use It?
- Popular Alternatives to Advanced Custom Fields
- Final Thoughts on Advanced Custom Fields
What Does Advanced Custom Fields Do?
In a nutshell, Advanced Custom Fields gives you an easier and more powerful way to work with custom fields on your WordPress site.
Ok, next question:
What are Custom Fields?
Custom fields are a way to store custom data alongside your blog posts, pages, or other types of content. In more technical terms, this type of data is called metadata.
Even if you’ve never heard the term “custom fields”, you’ve probably already interacted with them because many plugins and themes rely on custom fields to store information.
For example, let’s say you’ve created an eCommerce store with WooCommerce and now you’re adding the details for a product. You’ll probably add information for the product’s price, stock status, weight, size, and so on.
You would enter each piece of information in a custom field. That way, all of that data is stored separately and in a way that your site can easily access when needed. For example, users can filter your products by price on the frontend.
However, you don’t need to just rely on plugins to work with custom information – you can also create your own custom fields.
For example, let’s say you write book reviews. You could use custom fields to store the author of the book, the title of the book, your review rating, and so on.
While WordPress actually does include a built-in feature to help you set up your own custom fields, it’s pretty limited in what you can do with that.
Advanced Custom Fields changes that with its own system for creating and managing unlimited custom fields.
Did You Know? WordPress.com Starter and plugin-enabled plans come with built-in social sharing, in-depth stats, and SEO tools. See what else we offer.
Why Is Advanced Custom Fields So Popular?
By the numbers, Advanced Custom Fields is the most popular solution for working with custom fields.
So – why is that? Why use Advanced Custom Fields if WordPress already offers a built-in feature for adding custom fields?
There are two high-level benefits to using Advanced Custom Fields:
- Advanced Custom Fields gives you more flexibility for working with custom fields. For example, you can add 35+ different types of fields and you can use conditional logic to show/hide fields.
- Advanced Custom Fields makes it simpler to work with the data from your custom fields. For example, you get settings in the user interface to manage key choices, as well as a well-documented developer API for adding custom fields with PHP.
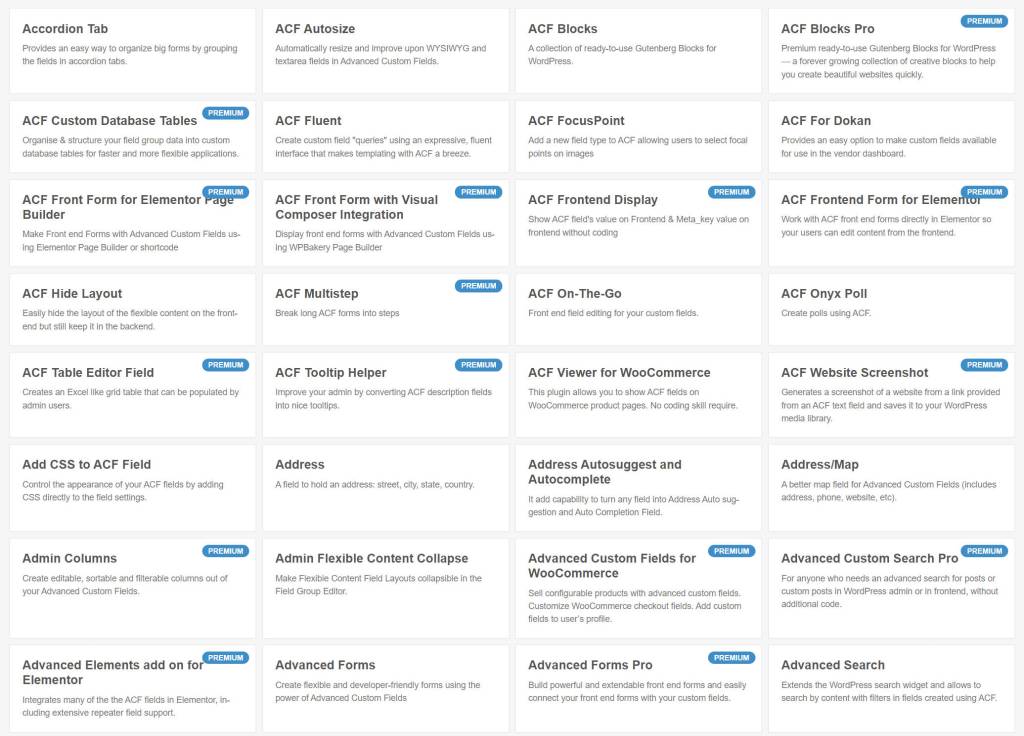
Its popularity also becomes a bit of a reinforcing feedback loop. Because it’s so popular, many third-party plugins have added support for Advanced Custom Fields.
For example, if you don’t feel comfortable working with PHP/code, you can find third-party tools that let you work with custom field information from the native WordPress editor or separate visual, drag-and-drop builders.
You can also find hundreds of Advanced Custom Fields extensions that add new features and field types. For example, AwesomeACF maintains a list of 170+ third-party extensions that add all types of useful features to Advanced Custom Fields.
How to Set Up Custom Fields With Advanced Custom Fields
In order to start collecting custom information on your site, you’ll first need to set up your custom fields.
Advanced Custom Fields lets you create unlimited custom fields and organize them into “field groups”. A field group is exactly what it sounds like – a “group” of one or more custom fields.
You can then assign your field groups to different types of content on your site. For example, you could create one group of fields that shows up when you’re editing blog posts and a different group of fields that shows up when you’re editing pages.
Here’s how it works…
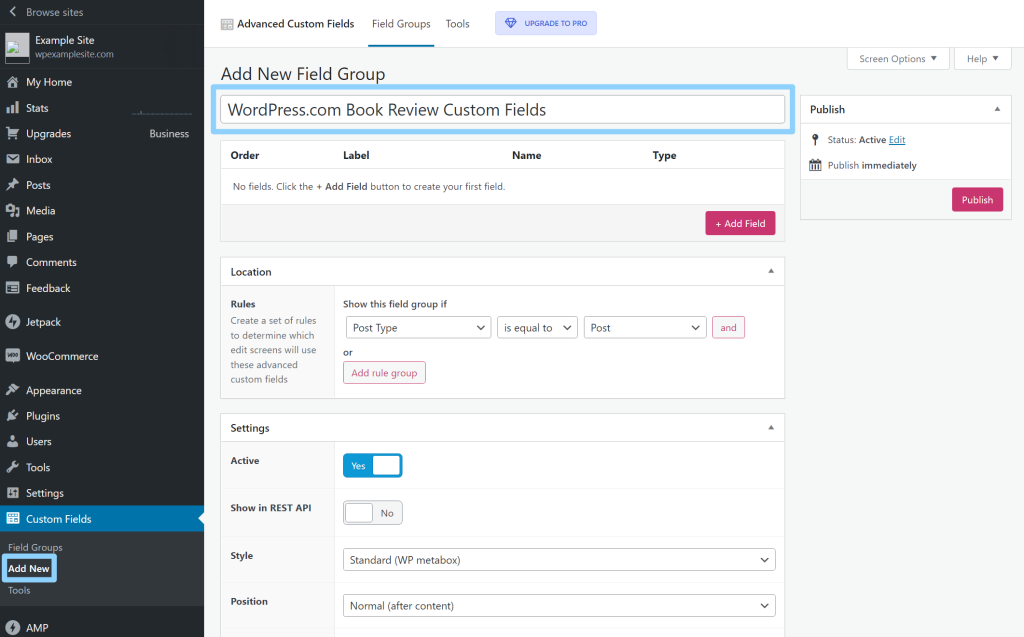
1. Create a New Field Group
Once you’ve installed and activated the plugin, you can head to Custom Fields → Add New in your WP Admin to get started.
At the top, give your field group a name – this is only visible inside your WP Admin and it will help you remember what these fields do.
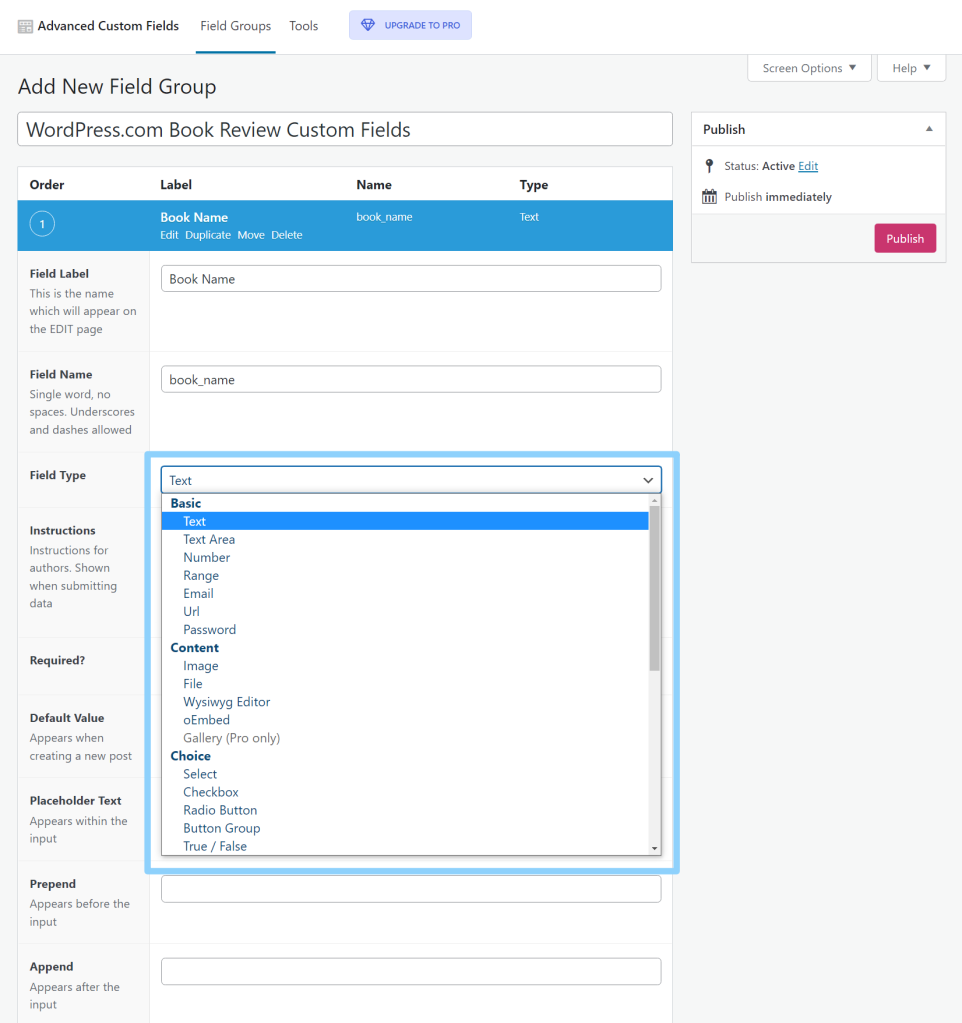
2. Add Your Custom Fields
Once you’ve added your field group, you can add the individual fields that will appear within that field group by clicking the + Add Field button.
This will expand a new list of options for that field. The most important choice here is the Field Type, which defines the type of data that you want to collect. For example, text, a number, an image file, a website URL, and so on.
One of the reasons that Advanced Custom Fields is so popular is because of how many different field types it supports. You get 31+ field types with the free version and 4+ new field types with the Pro version, for a total of 35+ different field types.
Below that, you’ll get a number of additional options that depend on your chosen field type. For example, if you choose a Number field, you’ll get options to specify a minimum and/or maximum value:
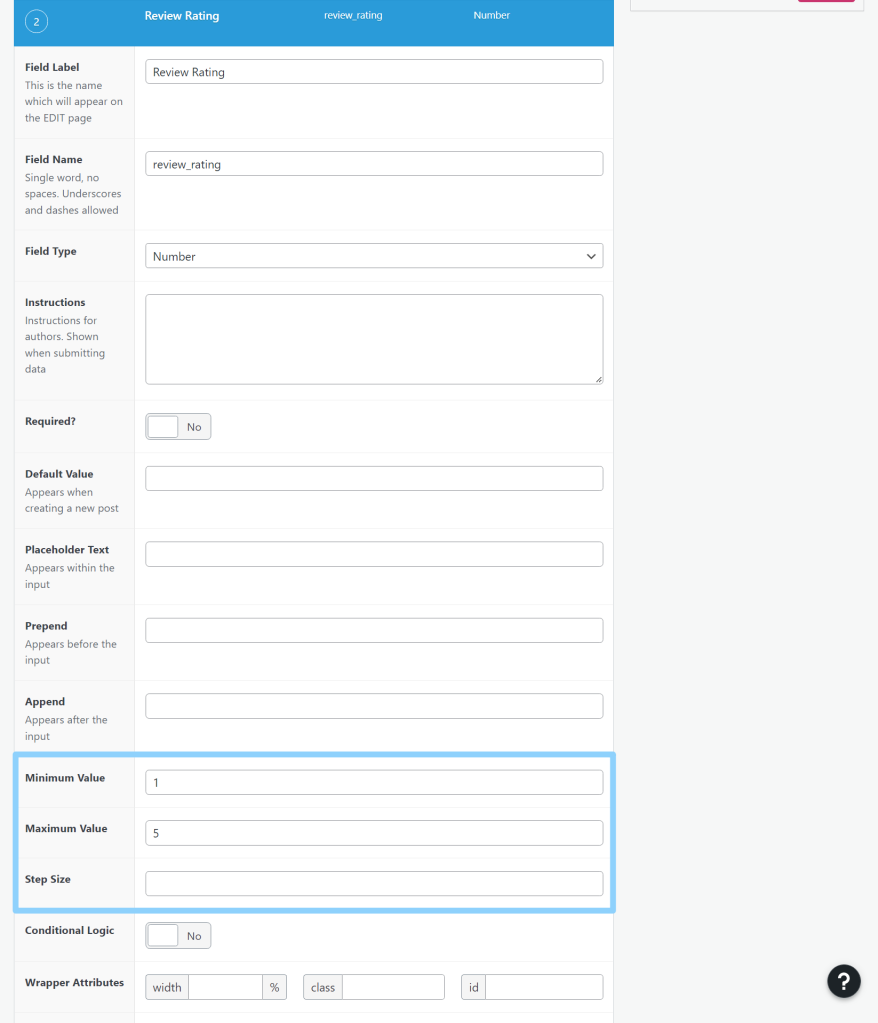
There are also some generic settings for all fields, such as instructions and whether or not the field is required. If you mark a field as required, users will not be able to publish content unless they’ve filled out the field.
You do not need to fill out every single setting. In fact, you’ll typically leave many of the settings blank. They’re there if you want them, but feel free to ignore anything that doesn’t apply.
At the bottom of the settings, you can also access another powerful Advanced Custom Fields setting – conditional logic.
With conditional logic, you can show/hide fields based on how other fields have been filled out. For example, you could create a yes/no field for “Is this a review post?”.
If a user answers “yes”, you could then show all of the review-related fields. But if the user answers “no”, you could keep those fields hidden.

You can add as many fields as needed – just keep clicking the + Add Field button to add new fields.
3. Choose Where to Display Your Field Group
Finally, you’ll want to use the Location settings to decide which type(s) of content you want to connect with this field group.
The simplest option is to target specific post types. For example, to show the field group on blog posts but not pages.
If needed, you can also get much more specific and target certain categories, tags, authors, and lots more. For example, you could only display these fields on blog posts that are in the Reviews category.

You can also add multiple display rules if needed.
4. Publish Your Field Group
At the bottom of the screen, you’ll get a few additional settings.
Typically, you can leave all of these as the defaults, but you’re free to edit them if desired.

Once you’re happy with how your field group looks, just click the Publish button to make it live.
5. Add Data to Your Field Group
Once you publish your field group, you should see those custom fields when you’re working in the editor (as long as the piece of content matches your field group’s display rules).
All you need to do is fill out the fields and then publish the content like you normally would. Now, all of that data will be stored in your database.
How to Display Custom Field Information from Advanced Custom Fields
At this point, you know how it works to create your custom fields and add information to them from the editor and/or your WP Admin.
However, when you add information to custom fields in your WP Admin, all you’re doing is saving that information in your site’s database – it won’t be visible to your site’s visitors on the frontend of your site…at least not yet.
To display the information from your custom fields on your site, Advanced Custom Fields gives you a few different options:
- PHP in template files – you can directly edit your theme’s template files to include the PHP functions for your custom fields. This is how most people use Advanced Custom Fields, but this option isn’t really accessible unless you know at least some basic PHP.
- Blocks – with the Pro version, you get a tool to help you create your own editor blocks to display information from custom fields. However, this still requires PHP knowledge to use.
- Shortcodes – you can include shortcodes in the editor that display the information from individual fields. This method is accessible to non-technical users, but it requires some manual effort and isn’t as flexible as using PHP.
There are also two other methods to display custom field information that rely on third-party tools:
- Dynamic data editor blocks – some plugins add the ability to dynamically populate a block’s content using data from your custom fields. For example, you could populate a Heading block with information from a text custom field. Popular options here are Kadence Blocks Pro, Stackable Premium, and GenerateBlocks Pro.
- Page builder plugins – some page builder plugins include options to dynamically insert information from your custom fields in editor designs. Popular options here are Elementor Pro, Divi Builder, Beaver Builder + Beaver Themer, Oxygen, and some others.
Here’s a deeper look at the various methods…
Using PHP to Display Advanced Custom Fields Data
If you have knowledge of PHP, Advanced Custom Fields makes it easy to use PHP to insert data from your custom fields.
You can use PHP functions to insert data directly in the template files of your theme or you can use PHP to create custom editor blocks (whereas normally you would need to know JavaScript to create your editor blocks).
Here’s the basic PHP function to display a field’s data:
the_field('field_name')For example, to display the book’s author, it would look like this:
the_field('book_author')Advanced Custom Fields has detailed written documentation to help you work with PHP in more advanced ways.
Using Shortcodes to Display Advanced Custom Fields Data
If you just need a quick, non-technical way to grab data from your custom fields, you can also use shortcodes.
This method is more accessible to all users because it doesn’t require any knowledge of PHP. However, it can be a bit cumbersome to rely so heavily on shortcodes. It works fine in a pinch, but users who don’t feel comfortable using PHP will probably be better off with the next method of working with data.
The basic shortcode works like this:
[acf field="field_name"]Using Third-Party Plugins to Display Advanced Custom Fields Data
The last approach, and the most flexible option for non-technical users, is to use a third-party design plugin that lets you dynamically insert data from custom fields.
Again, you have two common options here:
- Plugins that add dynamic data support to the native WordPress editor.
- Plugins that offer their own visual, drag-and-drop interfaces with dynamic data support.
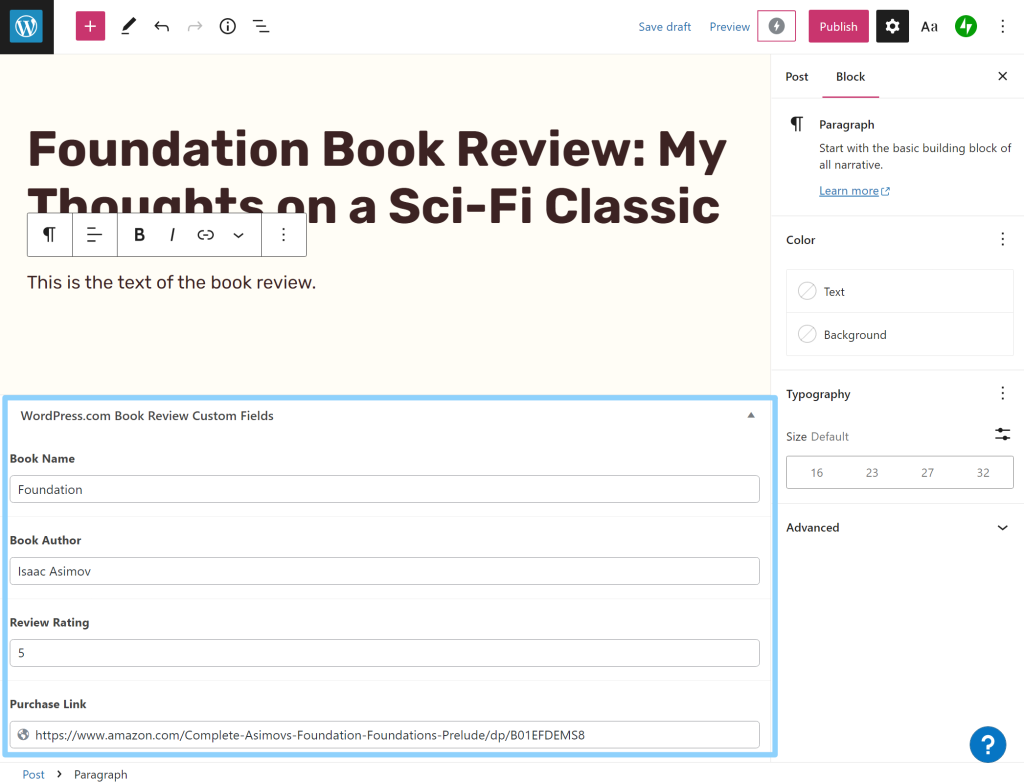
For example, if you purchase the Kadence Blocks Pro plugin, you’ll get a new dynamic data option that lets you populate editor blocks with information from your custom fields.
For example, with the Advanced Buttons block in Kadence Blocks Pro, you could populate the button’s link with the purchase link value from the custom field that you created with Advanced Custom Fields:

And just like that, you now have the ability to work with all of your custom data right from the editor – no code or PHP knowledge needed. Pretty cool!
Advanced Custom Fields Pricing
Advanced Custom Fields comes in both a free version and a paid version that adds more features.
In general, the free version will be fine for most use cases. It already gives you access to all of the “core” custom field types, along with the ability to display that information on your site.
If you need more functionality, the Pro version adds some new advanced field types, as well as some new features that might come in handy in some situations.
In terms of new form fields, you get the following options:
- Repeater field – this lets you create a set of sub-fields that can be repeated as many times as needed. For example, consider that you want people to add information for each person in their group (which can be any number of people). You would just set up the “personal information” fields one time and then people could “repeat” those fields for as many group members as needed.
- Flexible Content field – this lets you create content layouts using sub-fields. You can use it as a kind of pseudo builder interface.
- Gallery field – while the free version lets you add a single image field, the Pro version lets you create a field that accepts multiple image uploads to create image galleries.
- oEmbed field – this lets you embed content from other sites such as YouTube or Twitter.
You also get a number of new features:
- ACF Blocks – create custom editor blocks using a PHP-based framework (rather than JavaScript).
- Options pages – add custom pages in the WP Admin to edit field data. For example, you could create a WP Admin page where users can edit the custom data in their header.
- Clone field – easily clone any field to save time when reusing existing fields or field groups.
- New form locations – add custom fields to comments, widgets, and pretty much any user form.
- Improved relationship fields – create stronger relationships between fields.
There are also other smaller features – you can check out the Pro feature page to learn more.
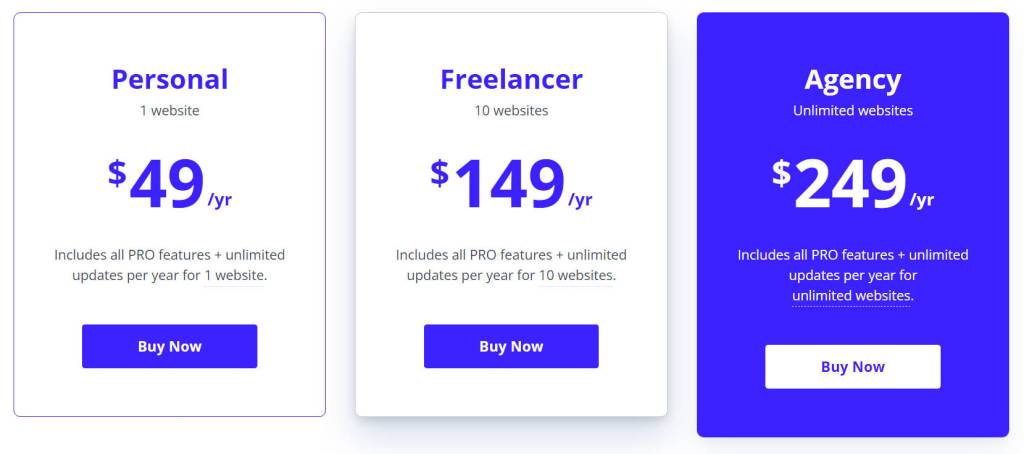
If you need those extra features, Advanced Custom Fields Pro starts at $49 for use on a single site and one year of support and updates:
While Advanced Custom Fields used to offer lifetime pricing options, that is no longer the case. For new customers, you’ll need to renew your license every year if you’d like to continue receiving support and updates.
Advanced Custom Fields Review: Who Should Use It?
Advanced Custom Fields is a great option for anyone who wants to work with custom metadata on WordPress.
It’s the most popular WordPress custom fields plugin for several reasons:
- It supports a wide array of field types that let you connect any type of information. Again, you get 31+ free field types and 4+ Pro field types.
- You get useful features such as conditional logic and field group location rules.
- It offers flexible, well-documented code functions for developers to work with field data.
- The Pro version can help you build custom editor blocks using PHP instead of JavaScript.
- Because it’s so popular, many third-party design plugins offer integrations to help you work with data from your custom fields. This opens up a lot of flexibility without requiring knowledge of PHP, such as dynamically populating regular blocks with data from custom fields or using a page builder plugin.
- Beyond design plugins, you can also find hundreds of other plugins that add new field types and features to Advanced Custom Fields.
One thing to consider, though, is that Advanced Custom Fields doesn’t help with other custom content structures, such as custom post types or custom taxonomies.
If you want these abilities, you could pair Advanced Custom Fields with a free plugin such as Custom Post Type UI. Or, you could consider an Advanced Custom Fields alternative with a more all-in-one approach (some examples below).
Another thing to consider is that, with its core functionality, Advanced Custom Fields assumes that you have at least some basic knowledge of PHP when it comes to displaying the information from your custom fields on the frontend of your site.
If you don’t have much knowledge of PHP, you have two options:
- You can use a design tool that lets you access custom fields data without code. For example, a block plugin such as Kadence Blocks Pro or a third-party website builder such as Elementor Pro or Divi.
- You can use a different custom fields plugin that gives you some less technical design options. Popular options are Toolset (which offers a block-based builder) and Pods (which offers a simpler HTML templating system) – more on them below.
Overall, though, Advanced Custom Fields is an excellent solution for working with custom metadata on WordPress.
Popular Alternatives to Advanced Custom Fields
While Advanced Custom Fields is one of the most popular solutions for working with custom fields on WordPress, it’s not the only high-quality option in this space.
Here are some popular Advanced Custom Fields alternatives that might better fit your needs in certain situations.
Pods

You can use it to extend the existing content types on your site or create completely new content types.
There are a few main reasons why you might want to choose Pods over Advanced Custom Fields:
- Pods is 100% free for all field types and functionality.
- Pods goes beyond just custom fields and also lets you work with custom post types and taxonomies, too.
- Pods includes a simple HTML templating system for working with field data, which is nice if you know the basics of HTML, but you don’t feel comfortable using PHP.
You can also pair Pods with Advanced Custom Fields, as the two work well together. In this setup, you could use Pods to manage custom post types and taxonomies, while still using Advanced Custom Fields to manage custom fields.
Meta Box
Unlike Pods, Meta Box uses the same general approach as Advanced Custom Fields and focuses specifically on custom fields and meta boxes.
There is an add-on that lets you create custom post types and taxonomies, but it’s not the main focus of the plugin.
While there are certainly small differences between Meta Box vs Advanced Custom Fields, the two serve very similar purposes and offer a lot of the same functionality.
However, one non-feature advantage that Meta Box has is that it still offers a lifetime pricing option. If you’re the type of user who places a lot of value on a lifetime pricing plan (rather than annual renewals), this might be a reason to choose Meta Box over Advanced Custom Fields.
Toolset

You can use it to set up custom fields, custom post types, and custom taxonomies – basically everything you need to work with custom content on WordPress.
Unlike Advanced Custom Fields, Toolset only comes in a premium version. However, it also offers a lot of features that go beyond what Advanced Custom Fields offers.
For example, one big advantage that Toolset has is that it lets you create your own custom templates using the editor and special dynamic blocks. If you don’t have the technical knowledge to code your own templates with PHP, this makes it a lot easier for you to display the data from your custom fields on the frontend of your site.
You also get other useful features such as frontend content submission forms, access controls, and a maps integration that lets you display custom content on Google Maps.
Overall, this one can be a good alternative for users who want an all-in-one solution for custom content sites, rather than just a solution for custom fields.
It starts at $69 for one year of support and updates.
Final Thoughts on Advanced Custom Fields
Overall, Advanced Custom Fields is one of the top options if you want to work with custom data on your WordPress site.
If you have a solid understanding of PHP, you can use Advanced Custom Fields’ well-documented field API to work with field data in all kinds of useful ways.
However, even if you don’t know PHP, you can still get value from Advanced Custom Fields thanks to its many integrations with third-party design plugins.
Plugins like Kadence Blocks Pro or GenerateBlocks Pro let you work with custom fields data inside the native editor, while many third-party page builder plugins also support inserting dynamic data from custom fields.
If you’re already on the WordPress.com plugin-enabled plan, you can install the Advanced Custom Fields plugin today and start building.
If you’re using the WordPress.com Free or Starter plan, upgrade to the plugin-enabled plan today to access the ability to not just install Advanced Custom Fields, but also all of the other plugins that can help you improve your site and work with custom fields data in new and interesting ways.

