
Creating a website from scratch can be intimidating. This is especially true if you have never designed one before and your time is tight. When you have other things to do (like running your business or pursuing the passion you’d like to share), it may feel like an insurmountable task.
Fortunately, WordPress.com makes building websites simple. It offers power, flexibility, and ease of use to bring your digital dreams to life, no matter what your needs are, or how much experience you have. With some basic knowledge and planning, there’s nothing you can’t do.

Stick with us and we’ll walk you through the entire process from beginning to end. Plus, we’ll even share some simple tips that’ll make you feel like a website design pro. It all starts here.
- Let our experts build your custom WordPress.com website.
- Step 1: Determine Your Website Needs and Goals
- Step 2: Research Websites Similar to What You’d Like to Build
- Step 3: Determine Which Pages Your Site Needs
- Step 4: Plan a Basic Website Branding and Content Strategy
- Step 5: Write an Outline for Each Page on Your Site
- Step 6: Create a WordPress.com Account and Choose Your Website’s Name
- Step 7: Choose Your WordPress.com Design
- Step 8: Update Homepage, Create a Menu, and Add Pages
- Step 9: Write Your Content in the WordPress Editor
- Step 10: Launch Your New Website
- Additional Reading
- Now You’re Ready to Launch Your Website
Step 1: Determine Your Website Needs and Goals
What would you like to achieve with your new website? This is the first question you should answer before moving forward. Here are some examples:
- Attracting customers to your brick-and-mortar business
- Selling products with an online store
- Sharing your thoughts with a blog or magazine-style publication
- Building a portfolio for creative work
- Generating new subscribers for a newsletter
No matter what type of website you’d like to create, you can make it happen with WordPress.com. We’ll get into that more in a little bit.
Step 2: Research Websites Similar to What You’d Like to Build
You can learn a lot from analyzing what others have done before you. So, do some simple Google searching to find websites in your industry, market, or niche.
Here are some specific things you should look for:
- What types of pages do their websites include?
- What types of content are they publishing?
- What types of images or design elements do they feature?
If there’s anything that seems interesting or noteworthy about their websites, document it so you can borrow inspiration later on.
Step 3: Determine Which Pages Your Site Needs
Planning which pages you’ll need to create will save time later on. Building a simple sitemap and planning your site structure will also keep you feeling in control once it’s time to actually create your website.
Here are some examples of basic pages that most websites will need:
- Home Page
- About Page
- Product and Service Pages
- Testimonials Page
- Blog
- FAQ Page
- Contact and Customer Service Pages
Consider this list to be a simple starting point. These pages will go in your site menu.
Once you have determined which pages you’ll need to create, set up a spreadsheet, and put together a basic sitemap. This will make it easy to keep organized as you create content and set up each page. It could look something like this (note that it’s nothing complicated):

Step 4: Plan a Basic Website Branding and Content Strategy
Next, it’s time to set guidelines for the content that will populate your pages. This includes basic branding and design elements that will ensure your new website looks and sounds its best.
Give Your Website a Voice
Your website content should sound like an extension of yourself or your company (depending on whether you are building a personal or business website). It’s meant to promote you to the world, right? Let’s help put your best foot forward by establishing a basic voice for your website.
You can do this quickly by following a simple “We are [BLANK], but not [BLANK]” exercise. Here are some examples:
- We (or I) are (or am) lighthearted, but not goofy.
- We (or I) are (or am) funny, but not offensive.
- We (or I) are (or am) helpful, but not bossy.
Even if you don’t think you’re a skilled writer, this easy exercise will help your website sound the way you want to sound.
Establish a Basic Color Scheme
If your company already has a visual identity, then your website should match it. Otherwise you may need to determine which colors should be used in your website design and graphics.
Don’t have a graphic design background? No need to worry. There are only a few things you’ll need to understand here:
- Choose colors that work well together. Select colors that look good together and convey the emotional sentiment you want visitors to feel. You can get started by reading this detailed guide to color psychology from CoSchedule.
- Document the hex color codes for your chosen color palette. Hex codes (or HTML color codes) are six-digit color codes that can be pasted into color picker tools. Color-hex.com makes it easy to find hex codes that you can copy and paste into website and image design tools (such as WordPress.com).

- If you’re building a website for an existing business, match the colors you’re already using. Your website should be immediately identifiable as your business or brand.

Once you’ve grasped the basics here, you can use what you’ve learned about color psychology and hex codes to create email and social media content that match your website too (but we’ll worry about that at another time).
Decide Which Types of Visuals Your Website Will Need
Your site is going to need some graphics. It’s a good idea to figure out what those graphics will be before you start building the website. Here are some common examples:
- Hero spots and banner images. These will go at the top of your website pages.
- Photography. This includes product images, photos of your business, and staff headshots.
- Designed images. Think charts, graphs, and infographics.
You might already have some of these assets on hand. Others you may need to create.
If your website will need any photos (such as images of your business, a portrait of yourself, or maybe a quick snap of your dog), then gather them together now. Consider organizing them in folders, with one folder for each page of your website.
If you will need designed images (logos, charts, graphs, and so forth), and do not already have them created, then basic design services like Canva can make image design easy. No artistic ability required. Other options include Infogram, Piktochart, and Venngage.
Step 5: Write an Outline for Each Page on Your Site
Before you start creating content for your website pages, you should determine what information those pages will need to include. You can do this by drafting simple outlines for the structure of each page.
Each outline should include:
- The header or title for each page
- The subheads for each page
- A description of the information each section and subsection of website copy should include
Keep it clear and simple. You’ll have time to refine and polish your website copy later on.
Step 6: Create a WordPress.com Account and Choose Your Website’s Name
Now let’s set up your WordPress.com account and decide what your website will be called. Naming your new website is one of the first things WordPress.com will ask you to do:

Next, you’ll choose your domain. The default option will be [yourwebsitename].wordpress.com. You’ll also see several more paid options if you’d like to get creative (and take advantage of one free year with a premium domain). If you already own a domain, you are also welcome to use it.

Step 7: Choose Your WordPress.com Design
Now it’s time to choose your homepage design. WordPress.com provides tons of options to control the appearance and structure of your homepage.

The easiest option is to choose one from a pre-built template (or theme). Themes control the visual style and design of your site. WordPress.com offers dozens of different themes to suit all types of websites. Some themes are free, while others are paid.
If you’d like to flex some creative muscle (and if you know a little bit about what you’re doing), you can start with a blank canvas. Choosing this option allows you to choose the exact functionality you need and get a customized WordPress.com built to suit you.
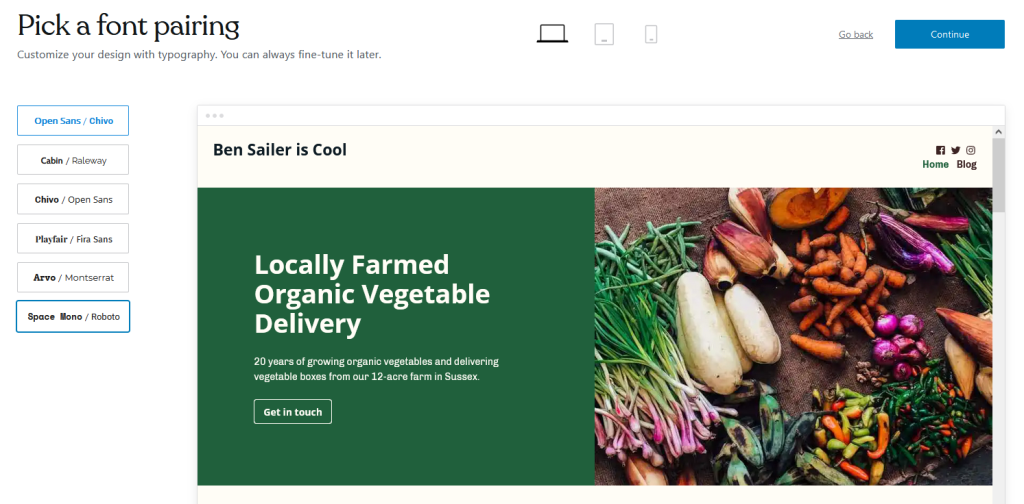
Next, it’s time to choose a font pairing from a list of options. There’s no need to stress over which option to choose. Pick a pair you like and you can always change it later:
Then you’ll be given the option to choose which features and functionality you need. If you’re unsure, feel free to skip this section, and return later when you know what you need. That’s why you’re reading this blog post, right?

Lastly, it’s time to choose your pricing plan. WordPress.com offers several pricing plans to help you get started:
- Free: Create a beautiful, simple website in minutes.
- Personal: Best for a personal site.
- Premium: Best for freelancers.
- Business: Best for small business.
- Ecommerce: Best for ecommerce.
- WordPress VIP: For enterprise websites.
Step 8: Update Homepage, Create a Menu, and Add Pages
Once you’ve completed the previous step, it’s time to add pages to your website, and import your content. Since you’ve planned out which pages you need and have content ready to go, this step will be easy.
At this point, WordPress.com will prompt you to update your homepage. That’s a logical place to start, so let’s do this first:

Once your homepage looks presentable, customize your site menu next. This is how you’ll begin to add top-level category pages to your website. When you click into this section, you’ll be given the option to view a tutorial, which will help you set up the menu the best way.

This video shows how to create a menu in more detail:
Lastly, add any extra pages your site will need. You can do this by finding the Quick Links section underneath Site Setup, then clicking Add a page.
You’ll then have the option to choose page templates (which are organized by type) or start with a blank canvas to design pages that look exactly the way you want (even without coding skills).

This video explains how to add pages in a bit more detail as well:
Step 9: Write Your Content in the WordPress Editor
You know which pages you’ll create, what should go on those pages, and how you’d like the navigation to be structured. Now, it’s time to actually write and design your content. How you approach this will depend on your budget and resources.
If you’re launching your website yourself, there are just a few things you’ll absolutely need to keep in mind:
- Follow basic web writing guidelines. Keep sentences under 25 words. Use no more than three sentences per paragraph. This will ensure your website is easy to read.
- Remember your voice. Your website should sound like you.
- Write enough copy to cover the needs of each page. The common advice here is to write at least 300 words of text per page. However, you should include as much text as you need to serve the purpose of each page.
You can keep your copy simple for now and make changes later if you’d like. For more website copywriting guidance, follow these five tips.

In addition to written content, it’s also easy to add images to your website. This video will show you how:
Step 10: Launch Your New Website
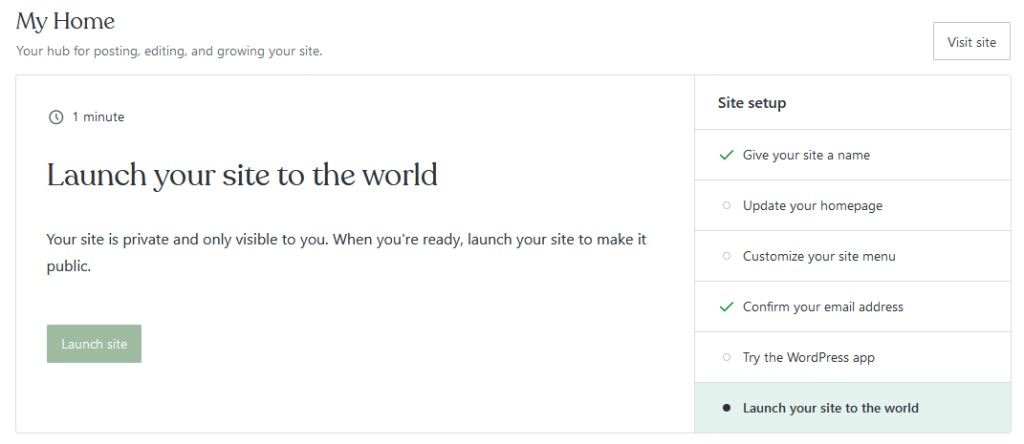
There’s much more work you can do to maximize the potential of your new website. But now that you have all the basic elements in place, you’re clear to show it to the world. Navigate to the home section of your dashboard, find “Launch your site to the world” under Site Setup on the upper right side of your screen, and click Launch Site:
Additional Reading
From here, there are no limits to where your website can go. Need some help figuring out your next steps? Here’s a short list of helpful articles on how to improve your design, make your site easy to find, and analyze your traffic:
- Website Design Best Practices and Tips for Non-Designers [Infographic]
- Essential SEO Tips for WordPress
- Web Analytics Basics: What Do You Need to Know?
If you’d like to find more helpful resources from us, here are some quick links:
- WordPress.com tutorials to complete all kinds of tasks.
- More tips and guides on website building.
- In-depth blog posts on web design to improve your site’s appearance and user experience.
Now You’re Ready to Launch Your Website
You’ve learned everything you need to know about setting up a new website with WordPress.com. Sure, there’s a lot left to learn about running a successful website, but we’ll be here with you every step of the way. Now, there’s only one question left to ask. What will you achieve next?

