In this article
Stunning imagery is a key component of any successful website. Whether you run a blog or an e-commerce site, images can make your content more engaging and digestible for visitors. Therefore, it’s important to know how to display and optimize photos effectively on your site.
Fortunately, WordPress gives you several options when it comes to image sizes. By learning how to apply a few key customizations to your content, you can ensure that the pictures you use on your website are crisp and neatly placed.
In this post, we’ll look at the default WordPress image sizes and when to use them. We’ll also show you how to control and change these settings, and cover how to add custom image sizes to your site. Let’s get started!
How to Upload Images in WordPress
Before we dive into the range of image sizes available in WordPress, let’s quickly look at how to upload photos to your site (and how to access them). As you may already know, you can insert photos straight into your posts and pages thanks to the user-friendly Block Editor:

All you have to do is click on the plus sign (+) on any page or post and select the Image block. You can then choose Upload to select a file from your computer, or click on Select Image to use an existing image on your site.
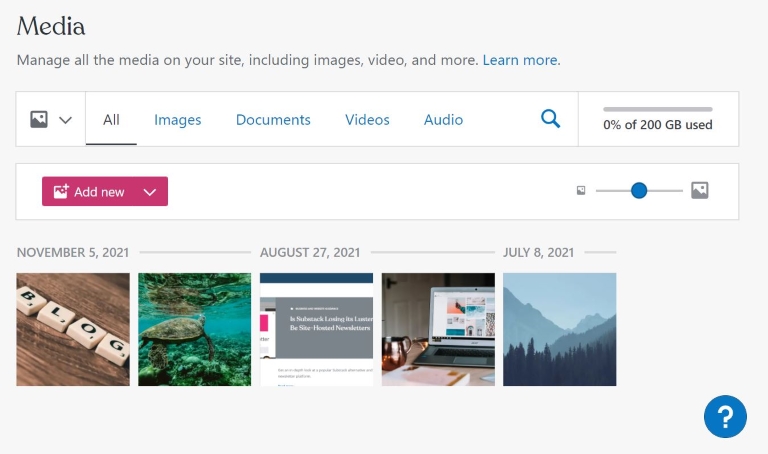
Alternatively, you can upload images directly to your Media Library. Navigate to Media in your WordPress dashboard and simply click on Add new:

This option can be particularly useful if you know what photos you want to use on your site, but you’re not yet sure which posts or pages you want to place them in. It also enables you to upload photos in bulk.
Every photo you upload to your site will be stored in your Media Library (even if you add it via the Block Editor). This means you don’t have to sift through your posts to look for a photo that you want to edit or crop. You can simply access it from the Media page.
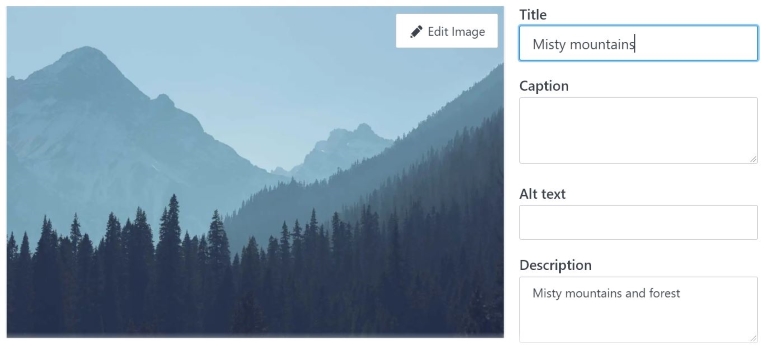
We recommend using descriptive names for your image titles. You may also want to write a description:
If you’re a prolific blogger, your photo inventory will likely continue to grow. Giving your images identifiable names will make it easier to search for them on your site.
Finally, if your image upload attempts fail, resulting in error messages, the solution is usually simple to apply, following these image upload troubleshooting tips.
How to Use the Default WordPress Image Sizes
Every time you upload a photo to your site, WordPress will automatically generate different sizes for it. These are the default sizes for every site:
- Thumbnail: 150px square
- Medium: Max width and height of 300px
- Large: Max width and height of 1024px
- Full Size: The original size of your image
You can view these options when you upload a photo into a post. Select the image, then locate the Image size option in the settings panel and click on the drop-down menu:

Depending on the theme you’re using, you may see a few additional image size options in the menu. However, we’ll be focusing on the default WordPress sizes listed above.
Let’s start with thumbnails. These are the tiny images that you normally see in your blog feeds:

When you set a featured image for a post, that image will appear as a thumbnail next to (or above) the post’s title in the blog feed. However, you may also use the thumbnail version of an image within your post.
For instance, you might want to display a few small photos in a row:

However, in most cases we recommend that you opt for larger images in your posts. This can make your content more visually appealing and help to break up long blocks of text. If you’re showcasing your own work, using large image sizes can also help you draw attention to the details in your photographs.
When you want your visuals to really stand out, you can choose between the Large or Full Size options. The latter serves your images in their original sizes, preserving their quality.
In fact, images that are displayed in their original sizes tend to be slightly sharper than those set to a Large image size:

You may also want to consider using large and full size images in your headers and banners. Meanwhile, you could use the Medium size option if you want to display smaller photos in your posts (or if you want to avoid weighing down your site with too many ‘heavy’ image files):

The size options that are available may seem a bit limited. However, you can always crop images to your exact desired sizes. Let’s take a quick look at that process.
Cropping Your Images in WordPress
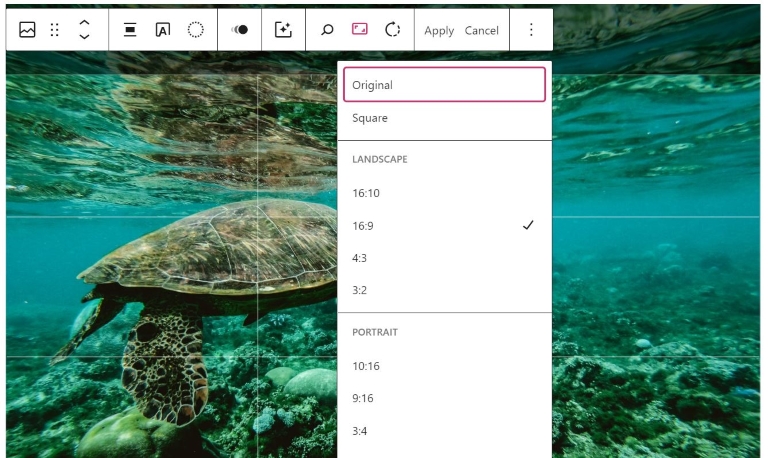
To get started, select an image in your post or page, and click on the crop icon in the toolbar:
You can then select the aspect ratio icon to choose a different size for your image:
You can also define custom dimensions for your image. Simply locate the Image Dimensions section in your settings panel, and make your adjustments:

Alternatively, you can edit an image from the Media Library. Go to Media, then select the image and click on the Edit button:
You will see a new popup window. Click on Edit Image to proceed:

You can then crop the image to your liking by dragging the corners of the frame:

If you select the Crop option, you can choose a ratio size for your image. When you’re ready, click on Done. Note that these changes will overwrite the original image.
Cropping photos can be a time-consuming process. Therefore, you’ll be pleased to know that WordPress enables you to customize the default image sizes. In the next section, we’ll take a look at how to adjust these settings.
Want more tips? Get new post notifications emailed to you.
How to Adjust the Default Image Sizes
As we’ve seen, WordPress automatically generates different sizes for each image that you upload to your site. It does this to help you ensure that the right image is used in the right location (e.g., thumbnails in blog feeds, large images in headers).
However, you might choose to customize these image sizes so they better suit your needs. If you’re constantly cropping your uploaded images, changing the default sizes can save you a lot of time and effort.
To do this, navigate to Settings > Media in your WordPress dashboard:
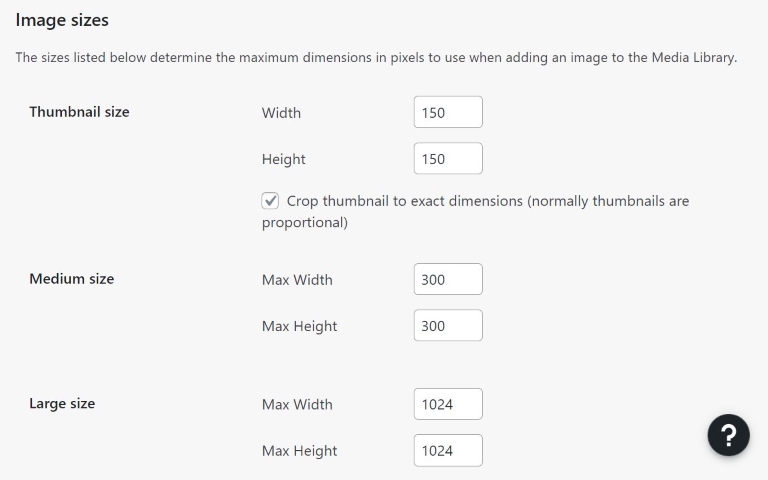
Here you can see the default dimensions for each available size. If you want to change any of these settings, all you have to do is enter your own dimensions in the Width and Height fields.
For instance, you may want the thumbnails to be slightly smaller or larger:

When you’re happy with your new image sizes, click on the Save Changes button at the bottom of the page. Now, every time you select a default size for your image (e.g, medium or large), WordPress will serve it in the dimensions you’ve just set.
How to Add More Image Sizes to WordPress
To recap what we’ve covered so far, WordPress comes with four default image sizes, which you can adjust as needed. You can also crop images to your preferred sizes. Moreover, your current WordPress theme may offer some additional image sizes that you can use.
However, if your website is media-heavy, you may find that having four default sizes to choose from is not enough. Perhaps you’d like to add more options, so you don’t need to crop your images manually every time you want to use a different size.
Fortunately, it is possible to add more image sizes to your site. The easiest way to do this is to use a plugin. We recommend Image Regenerate & Select Crop:

This plugin enables you to manage more advanced settings for your photos, and create new custom image sizes. It’s also free to use. Note that if you have a WordPress.com site, you’ll need the plugin-enabled plan or higher to install plugins.
To get started, install and activate the plugin on your site. When you’re ready, go to Image Regenerate & Select Crop > Additional Sizes:

Start by entering a name for your new custom image size. Then set the desired dimensions in the Max Width and Max Height fields. You can also choose whether you want WordPress to automatically crop your images to those exact dimensions.
When you’re ready, click on Save Changes. You can create as many custom sizes as you want. However, bear in mind that these will take up space in your server storage. Moreover, having too many image sizes can slow down your site’s performance.
If you want to remove a size you’ve created, go to Settings > Media and find your custom image size:

Then erase the text from the Image Sizes Name field, and click on Save Changes. We recommend that you only keep the sizes you need. If there are any options you’re not using, you may want to delete them to free up some storage space.
You can also remove a default image size from your website. However, this process requires a bit of technical expertise, including some coding knowledge. In addition, some themes or plugins may expect the default image sizes to exist, and may break functionality if they don’t. Therefore, we think removing default image sizes should be avoided in most cases.
The Perfect Featured Image Size
One of the most common WordPress image size questions is, “What size image should I use for my featured images”?
Unfortunately, there is no one-size-fits-all answer. The perfect size for your site’s featured image may differ from someone else’s site. This is primarily because different themes use different layout widths, so each theme may have a custom size that works best within its layout. Check your theme’s documentation to see if it recommends a particular size.
In addition, if you’ll be sharing your posts on social media, each service has its own “perfect image size”, and of course, none of them tend to scale well with the others.
Because themes and social media sites all prefer different sizes, you’ll need to experiment to determine the best featured image size for your needs.
Here are some suggested featured image sizes to try.
- 1920×1080 – This is the largest image size we would recommend. This size will often work best for most themes and social media sites, but keep in mind that some areas of the image may get cropped.
- 1200×630 – This size will work best for many classic themes and for sharing to Facebook.
- 1024×512 – This size should be considered if you plan to primarily share to Twitter.
No matter which size you choose to use, try to keep the main focus of the image near the center, with ample space above, below, and to the sides of that focus, whenever possible. Since most services crop the edges, leaving the center of the image displayed, you won’t have to worry about cropping out important parts of the image.
Conclusion
Images can make your content more interesting and digestible for your readers. WordPress comes with a few default sizes for your images, ranging from thumbnails to large photos. You can also display images in their original sizes, or crop them to your desired dimensions.
If you’re looking for additional options, you can use a plugin like Image Regenerate & Select Crop to add more custom image sizes. However, if there are any custom images sizes that you’re not using, we recommend that you delete them from your site to make more room in your storage and improve your site’s performance.
You might also like: How to Sell Art Online with WordPres.com

