A quick tutorial on enhancing your site with widgets.

Getting Started: When logged into your account, click on My Site → Customize → Widgets. Here, you can select the section of your site where you’d like to add a widget, click on Add a Widget, and search for and activate an assortment of widgets.
The widgets on WordPress.com can help you personalize your blog or website. Let’s zoom in on several ways to enhance your site’s sidebar or footer with some of the most popular ones.
Personalize widget titles
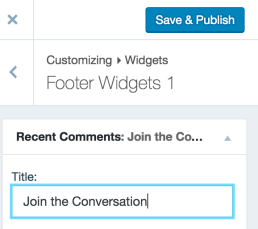 You can create custom titles for many widgets. If you have lively discussions on your blog, for example, title the Recent Comments Widget with “Join the Conversation.” Or if you want a more playful title for your Twitter Widget, consider something like “What the Birds are Chirping,” “Thinking Out Loud,” or “Momentary Musings.”
Also, be consistent with your blog’s theme. If you have a food blog focused on desserts, create widget titles related to baking and cooking. How about “Sweet Tweets” for your Twitter Widget? Or “What’s Cooking?” for your Calendar or Upcoming Events widgets? You can even spice up the seemingly mundane Search Widget with “Search the Cupboard.”
Get creative with text widgets
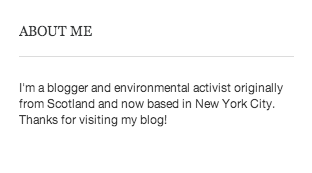 Text Widgets are simple but versatile. With a Text Widget, you can insert text into your sidebar. An “About Me” section at the top of a sidebar is common: a welcome message, a short version of your bio, or an elevator pitch of your site.
A clear and simple example of a Text Widget is on the left. But you can do so much more with a Text Widget: display a combination of text, links, images, and HTML to make your sidebar colorful and more graphic.
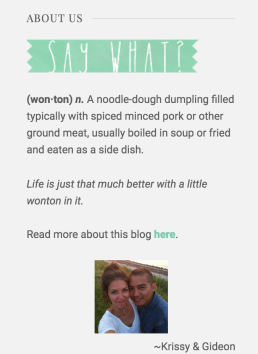
Wild Wonton Text Widget
Let’s take a peek at the travel blog Wild Wonton. Its background is clean and white, with splashes of sage green in the header, tagline, and sidebar. Krissy and Gideon spruce up their sidebar with a Text Widget: they use an image — a small, green “Say What?” banner — in place of a widget title; place some of the text in bold and italics for emphasis; and end with a friendly sign-off with their names.
The copy itself is also clever: a definition of “wonton,” which playfully refers to the name of the blog as well as its focus on travel and living abroad in China.
So, how did they create this Text Widget? In the Customizer (My Site → Customize → Widgets), they selected the section of their site where they wanted to place the widget (sidebar), clicked on Add a Widget, and searched for and selected the Text Widget (“Text”). Then, they inserted an image at the top, some text about wontons, a link to their About page, and a bit of HTML to create the effect:

If you know basic HTML, play around with the Text Widget — it’s a flexible and powerful feature. For those who want a primer, poke around on an HTML tutorial.
Use the “image grid” option

Top Posts & Pages Widget
Some widgets, including the Top Posts & Pages and Blogs I Follow widgets, add nice visual touches to your sidebar. The Top Posts & Pages Widget showcases your most viewed posts and pages. You can display it as a simple text list, an image list (post titles with images, as seen on Vincent Mars’ blog, Boy with a Hat), or an image grid, as shown to the right.
To display the Top Posts & Pages Widget:
- In your Customizer (My Site → Customize → Widgets), select the section of your site where you’d like to add the widget, click on Add a Widget, and search for and select “Top Posts & Pages.”
- Specify the number of posts to show (for example, “6”).
- Order the posts by likes or views.
- Under “Display as,” be sure to choose “Image Grid,” which activates the display of square images, as seen on the right.

Blogs I Follow Widget
The Blogs I Follow Widget works similarly and displays linked images for the blogs you follow:
- In your Customizer (My Site → Customize → Widgets), select the section of your site where you’d like to add the widget, click on Add a Widget, and search for and select “Blogs I Follow.”
- Give it a fun title (“Reading Material,” “Stuff I Like,” “My Favorites,” “Fellow WordPressers,” etc.).
- Select the number of blogs to display (up to 50).
- Choose “Grid” under “Display as.”
Once saved, you’ll see an image grid of gravatars from the blogs you follow, similar to the one on the left. The widget not only enhances your blog visually but offers a glimpse into the community you’ve built on WordPress.com.
Edit your images for a different effect
When activated, the Image Widget displays an image in your sidebar. If you’d like to spruce up the look of your images but don’t have much Photoshop experience, edit an image by changing its shape or adding a border. Here’s how:

Image Widget
Change an image’s shape: A circular image, which you’ll see built into themes like Spun, is a playful alternative to square or rectangle-shaped images. It’s pretty simple to create a custom circle image with a photo editor like PicMonkey (use the “Rounded Corners” option under the “Frames” tool). Then, follow the steps to upload the image and create the Image Widget.
Add a border: Another way to transform an image is by adding a border. PicMonkey and Pixlr offer the option to add a border to an image, as well as other effects (a vintage Polaroid frame, frayed or burnt edges, a film strip effect, etc.). Depending on the look and feel of your blog, there may be a particular visual effect that’s appropriate.
If you’re not sure what kind of images to use, read this post on visual identity. If you’d like, continue on with “Widgets 201,” “Widgets 301,” and a more in-depth tutorial on creating a custom Image Widget for non-designers.
Currently blogless? You’re a click away from sharing your story.
Create your blog at WordPress.com


me encanta ha sido posible obtener el widget de Facebook venir correctamente. editar las imagenes y los efectos diferentes 🙂
LikeLike
Okay, I’ve tried following the instructions of every option you have for following instructions for uploading an image to either an image widget or a text widget from my computer. I’ve uploaded the picture via New Media, and via a New Post and Add Images, and tried copying the image url with into the image widget or copying the image url into a text widget with the <img src= etc, and none of it works. I can put an image form the web on an image or text widget, no problem, but not my own. Couldn't you just have the option in an image widget to upload from computer, like with the header pictures?
Other than that, I love you guys.
LikeLike
For image widget you don’t need the library click the image you want. then under file URL click inside the box.
press ctrl and A to select all out the link. then copy and paste into the widget.
hope that helps.
LikeLike
No, to be honest. I get the picture in the widget. It says that if I leave the size empty, it will figure out the best size. Then what it does is make it so big that only a small corner, but hugely enlarged, is visible as the image.
LikeLike
I love widgets! They can give your blog a bit more of an interactive feel and are an easy way to customize your site. I love wordpress and always have lots of comments from friends. I have set up numerous blogs for friends because of how user friendly the dashboard and customizations are to navigate! Keep up the good work, I am hooked. 🙂
LikeLike
Super !!!
LikeLike
Fantastic tutorial. Thank you!
I just added some pic and text to my sidebar. Any idea how I can get rid of the hyphenation in the text?
http://ahappylass.wordpress.com
LikeLike
Where’s the hyphenation? I looked for it!
LikeLike
There are only two of them. In the text of the sidebar on the right. Directly under my photo. Hypenates the words “pas-sion” and “de-sign.” Maybe you can’t see them though, maybe only my browser is doing it.
LikeLike
Reblogged this on The Prose of Lauren Rose and commented:
I often get asked about how to “spruce up” a blog site or make it your own through domain purchasing and original headers. Something I’ve never really talked about though is widgets.
I think The Daily Post has this topic covered!
LikeLike
This is a great post! I use widgets but I had wanted to get *more* creative with them. Thanks for posting!
LikeLike
never knew you can edit an image’s shape
awesome work wordpress 😀
LikeLike
I think this is a ready great way too meet and talk to other people around the world , from different country . i hope to learn a lot from this site.
LikeLike
I need help in this area! I want to add more widgets to Wiley’s Wisdom, but I think that means I will need a new theme/background…advice/suggestions welcome.
http://wileyschmidt.wordpress.com/
LikeLike
This is a really helpful post and I was quickly able to set up the Top Posts & Pages widget using an image grid. It worked really well til this weekend when, instead of displaying the image from the respective popsts, it just displays a grid of my avatar. Similarly, when I publish a post and it is automatically shared to FB, it now just uses my avatar pic for the thumbnail instead of an image from the post. I haven’t played with any other settings so am a little baffled…
LikeLike
http://sjponeill.wordpress.com/
LikeLike