This guide explains an advanced setting for managing logins to your site using WordPress.com’s secure authentication. While most sites won’t need to adjust this setting, it’s commonly disabled on websites with membership functionality added via a plugin.
This feature is available on sites with the WordPress.com Creator and Entrepreneur plans, and the legacy Pro plan. For sites on the free, Starter, and Explorer plans, upgrade your plan to access this feature.
In this guide
WordPress.com Log In, also referred to as Secure Sign-On (SSO), connects your WordPress.com dashboard and WP Admin dashboard to use the same log-in information. It ensures you can quickly and securely access all your site’s dashboard settings without needing a separate login for WP Admin.
WordPress.com Log In is managed by our Jetpack plugin. Among other features, Jetpack communicates between the WordPress.com dashboard and the WP Admin dashboard.
You can disable SSO, creating two types of authotized users:
- WordPress.com Users: People who log in via WordPress.com to access your site after you grant them access.
- Local Users: People who log in via
yoursiteaddress.com/wp-adminafter you create their user account (either manually or by a plugin.) Learn more about local users.
If you invite a WordPress.com user, a local user account will automatically be created for them when they accept the invite. However, if you create a local user, it will not automatically create a paired WordPress.com account. Instead, you’ll want to invite them to create their own WordPress.com account directly from the All Users page in your site’s dashboard.
In most cases, leaving the WordPress.com Login (SSO) feature enabled. One common exception is for sites using membership plugins that require members to log in to your website.
The WordPress.com Log In feature is enabled by default. However, if you (or a plugin) disabled the feature you can follow these steps to turn it back on:
- Visit your site’s dashboard.
- Navigate to Settings → Security (or Jetpack → Settings → Security in WP-Admin).
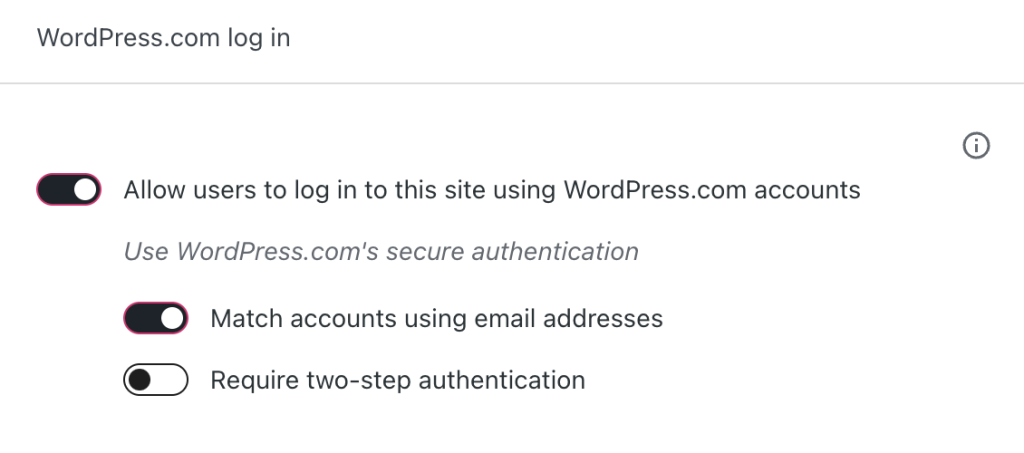
- Scroll down to the “WordPress.com Log In” section:

- Switch on the toggle labeled “Allow users to log in to this site using WordPress.com accounts.”
- Adjust the following settings that will apply to other users you have approved to log in to your site:
- Match accounts using email addresses: Keep this setting on to ensure WordPress.com can match any local accounts on your site that use the same email address as a WordPress.com account.
- Require two-step authentication: Improve security by forcing Two-Step Authentication when users log in via WordPress.com. Any user who hasn’t set up two-step authentication in their account yet will be prompted to configure it first before they can log in.
Turn off WordPress.com Log In if you need a separate login for the WP Admin dashboard.
For example, if your site has a custom membership plugin, you might have to disable WordPress.com Log In for the plugin to function correctly.
Follow your plugin’s setup guide to create a sign-in page. If you set up a login and it redirects you to the WordPress.com login screen instead of your plugin’s, you most likely need to disable the WordPress.com Log In as outlined in the steps below.
By default, WordPress.com Log In is enabled. Therefore, you will never be asked to log into WP Admin because we automatically recognize your WordPress.com account.
However, a membership plugin may require WordPress.com Log In be disabled in order to function properly. Before you disable WordPress.com Log In, set up a unique password for WP Admin following these steps:
- Ensure WordPress.com Log In is enabled.
- In your dashboard, click on Users.
- Click the “View” tab in the top right corner and set this to “Classic View“.
- Hover your mouse over your username and click the “Edit” link.
- Scroll down to the “Account Management” section.
- Click the button that says “Generate Password” or “Set New Password“. Your new password will be provided, which you can change if you wish.
- This password does not affect your WordPress.com account’s password.
- Save the password somewhere safe!

To disable WordPress.com Log In, ensure you have saved your WP Admin password and then take the following steps:
- Visit your site’s dashboard.
- Navigate to Settings → Security (or Jetpack → Settings → Security in WP-Admin).
- Scroll down to the “WordPress.com Log In” section.
- Switch off the toggle labeled “Allow users to log in to this site using WordPress.com accounts.”
- You can now use the password you set for WP Admin to log into your site’s admin area.
In some cases, members may not be able to log in, even after you disable WordPress.com Log In. In this case, you may need to disable Jetpack Protect by going to Settings → Security in Default View and turning off the “Prevent and block malicious login attempts” setting, or to Jetpack → Settings → Security in WP-Admin View and turning off the toggle under “Brute force protection.”
In rare cases you may need to disable Jetpack Protect after you set up your membership plugin. If members still cannot log in after you turn off WordPress.com Log In, go to Settings → Security in the Default View and switch off the “Prevent and block malicious login attempts” setting. Alternatively, in WP Admin View, visit Jetpack → Settings → Security and turn off the option under “Brute force protection.” Jetpack Protect is designed to protect your site from malicious activity, so disable it only as a last resort.
If your site requires WordPress.com Log In to remain switched off, your administrators and other members will log in through /wp-admin, independent of a WordPress.com login.
You can create a local WP Admin account on your website by following these steps:
- Visit your site’s dashboard.
- Navigate to Users.
- In the upper right corner, click the “View” tab and select “Classic view“.
- Click the “Add New User” button.
- Fill in the username, email address, and other necessary fields for the new user, and click the “Add New User” button to create the new user.
- Your administrator will then receive an invite email with instructions to set their password and log in.
Since this is a local user account only, be aware that:
- These user accounts work only with WordPress.com Log In switched off.
- WP Admin users can’t access the WordPress.com dashboard.
If you turn WordPress.com Log In back on, you must invite your administrators and other team members through the WordPress.com dashboard, where they must create a WordPress.com account.
In rare cases, you may encounter one of the following issues with WordPress.com Log In:
“I logged into my WordPress.com account, but when I try to edit anything, I’m prompted to log in again, and it does not recognize my username or password.”
When SSO is turned off, you and your other local users will need to log into the WordPress.com dashboard and WP Admin dashboard separately. Your credentials for each login may be different, depending on what you originally set up.
If you do not recall the WP Admin password you set up when you disabled SSO (Login with WordPress.com) you have a couple of options for resetting your WP Admin password.
Option 1: Manually Reset Password
You can manually reset the WP Admin password by temporarly enabling the WordPress.com login, which will restore your access to the WP Admin dashboard. Follow these steps:
- Log into your WordPress.com dashboard.
- Navigate to Settings → Security (or Jetpack → Settings → Security in WP-Admin).
- Scroll down to the “WordPress.com Log In” section.
- Switch on the toggle labeled “Allow users to log in to this site using WordPress.com accounts.”
- Then, update your WP Admin password, and turn the WordPress Log In back off.
Option 2: Use WP Admin’s Lost Password Link
- Visit the page that is prompting you to log in.
- Click the “Lost Your Password?” link on the login page.
- Enter your username or the email address on file for that account.
- Check your account email for further instructions.
- Once you are logged in, be sure to change your password to something secure and memorable.
“I have multiple administrators/users on my website, but for some reason, they cannot see the website while I can see it! What happened, and what should I do?”
This usually happens when the Jetpack connection is broken on the website and has been reconnected. In some cases, other administrators or users (Editors, Authors, etc.) cannot see the website because they are not yet connected to it from their WordPress.com accounts.
To resolve this situation, please follow the steps below:
- Ensure WordPress.com Log In is active under Settings → Security (or Jetpack → Settings → Security in WP-Admin) as detailed above.
- Ask your users to:
- Log in to the site’s dashboard using their WordPress.com username and password.
- Open a new browser tab and visit the WP Admin address of the site (for example,
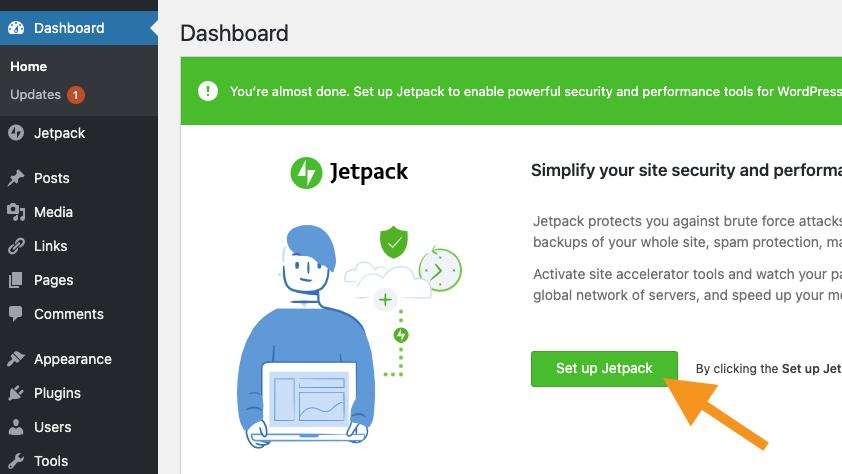
mywebsite.com/wp-admin). - Click the “Set up Jetpack” button and then the “Approve” button:

This will connect Jetpack to their WordPress.com account so they can now access the site as normal in their WordPress.com account.