
Not sure how to use WordPress plugins?
For a lot of WordPress sites, WordPress plugins can add essential functionality that’s not in the core WordPress software. Plugins can help you make “big” changes, like using WordPress to create an online store or membership website, as well as “small” things, like improving your admin processes, adding a new block to the editor, and more.
But if you want to unlock all that flexibility, you need to understand how to use WordPress plugins, which is what this post is all about.
Below, you’ll learn everything that you need to know about using WordPress plugins on your site, including the following:
- What WordPress plugins are.
- Where to find WordPress plugins.
- How to install, manage, and update WordPress plugins.
- How to configure WordPress plugins.
- Best practices for using WordPress plugins on your site.
By the end, you’ll know exactly how to use plugins to enhance your WordPress website.

What Are WordPress Plugins?
A WordPress plugin is a piece of installable software that adds new functionality to your WordPress site.
You can kind of think of plugins as “apps” for your WordPress site. For example, just like you might install a new iOS app to add a certain feature to your iPhone, you might install a new WordPress plugin to add a certain feature to your WordPress site.
Plugins can make small changes to your site, such as adding a new block that you can use in the editor. Or, they can make big changes, such as turning your WordPress site into a fully functioning online store.
Whether or not your WordPress site needs to use plugins depends entirely on what functionality your site needs.
If you make your blog or website with WordPress.com, WordPress.com already gives you access to many helpful features without needing to install plugins, such as newsletters, visitor stats, social media sharing, and more. Access to these built-in features might mean your site doesn’t need any plugins.
However, some sites might need more flexibility, which is where plugins can be handy. For example, if you want to create an eCommerce store, you’ll probably want the WooCommerce plugin – more on that next.
If your site does need access to plugins, the WordPress.com Business plan gives you access to thousands of plugins via the WordPress.com plugin directory, as well as the ability to install custom plugins that you download directly from the developer.
To show you what WordPress plugins can do, let’s take a look at two examples.
Example 1: WooCommerce

WooCommerce is a popular WordPress plugin that turns your WordPress site into a fully functioning eCommerce store to sell physical products, digital products, subscriptions, and more.
Here are some of the key features that the WooCommerce plugin offers:
- You can add and manage unlimited products.
- Users can browse and add products to their shopping carts.
- Users can check out and pay online using credit/debit cards or other methods.
- You can manage and fulfill orders from your WP Admin.
It’s a great example of how a WordPress plugin can make big changes to your site to unlock powerful new functionality.
Here are some of the things that you can use WooCommerce for:
- Create an eCommerce store for physical or digital products.
- Power payments for your website, such as handling the payments for your online course.
- Accept payments from clients, such as adding an invoice system to your site.
If it involves selling products and/or processing payments, WooCommerce can probably help you do it.
Example 2: Jetpack

Jetpack is a feature-packed plugin that can improve all different areas of your site. It uses a modular approach, which lets you pick and choose which features you want to use.
Here are some of the main ways in which Jetpack can enhance your site:
- Secure your site with a variety of protections, including firewalls and spam protection.
- Back up your site to further secure your data.
- Improve your site’s performance, including serving images and static files from a global content delivery network (CDN).
- Automatically publish blog posts to social media networks like Facebook, Tumblr, and LinkedIn.
- Collect payments or donations via Stripe or PayPal.
If you build your website with WordPress.com, you’re already benefiting from the features in Jetpack, so there’s no need to install the Jetpack plugin separately.
However, if you use your own web hosting for WordPress, the Jetpack plugin can help you access a lot of the same helpful features that WordPress.com users get.
How to Find and Choose the Right WordPress Plugin
If you’re using WordPress.com Business or eCommerce plans, the easiest way to find plugins is to search for them in the WordPress.com plugin directory.
You can access all of these plugins directly from your WP Admin. Here’s how:
- Open your WP Admin.
- Click on the Plugins menu in the sidebar.
- Use the search box to search for plugins by keyword or name. Alternatively, you can also browse different categories of plugins.

To view more details about a plugin, you can click on its name.

In the next section, you’ll learn how to install and activate a plugin. But first – here are some tips for how to choose high-quality WordPress plugins:
- Read the reviews and ratings to check other users’ experiences with the plugin.
- Check the last update date to ensure the developer is still actively working on the plugin.
- Look for any compatibility details, such as whether it’s compatible with your theme and/or the latest version of WordPress.
- Check active installations to see how popular the plugin is. As a rough rule, popular plugins are more likely to receive regular attention from the developer.
- Read about the plugin developer to see its reputation. You can search Google or read reviews for other plugins from that developer.
You can find most of this information on the plugin listing page.

How to Install and Activate a WordPress Plugin
Once you’ve chosen a plugin you want to use on your site, you must install and activate it. Once you activate the plugin, you can access all of its features and functionality from your WP Admin.
To be able to install plugins on your WordPress.com site, you’ll need to be using at least the WordPress.com Business plan.
If you’re already using one of those plans, you’re ready to install your first plugin. On the other hand, if you’re using the free WordPress.com plan, the Personal plan, or the Premium plan, you’ll want to upgrade to at least the Business plan before continuing.
How to Install a WordPress Plugin
How you install a WordPress plugin will depend on the source of the plugin:
- For plugins listed in the WordPress.com/WordPress.org plugin directory, you can install them entirely from your WP Admin
- You’ll need to upload a zip file for custom plugins that you purchase/download directly from the developer.
The basic process is the same either way, but we’ll cover both approaches because of a few small differences.
How to Install a WordPress Plugin from the WordPress.com Plugin Directory
The easiest way to install a plugin is to choose one of the thousands of free or paid plugins that are available in the WordPress.com plugin directory.
Once you’ve found the plugin that you want to use, here’s how to install it:
- Open your WP Admin.
- Go to Plugins → Add New.
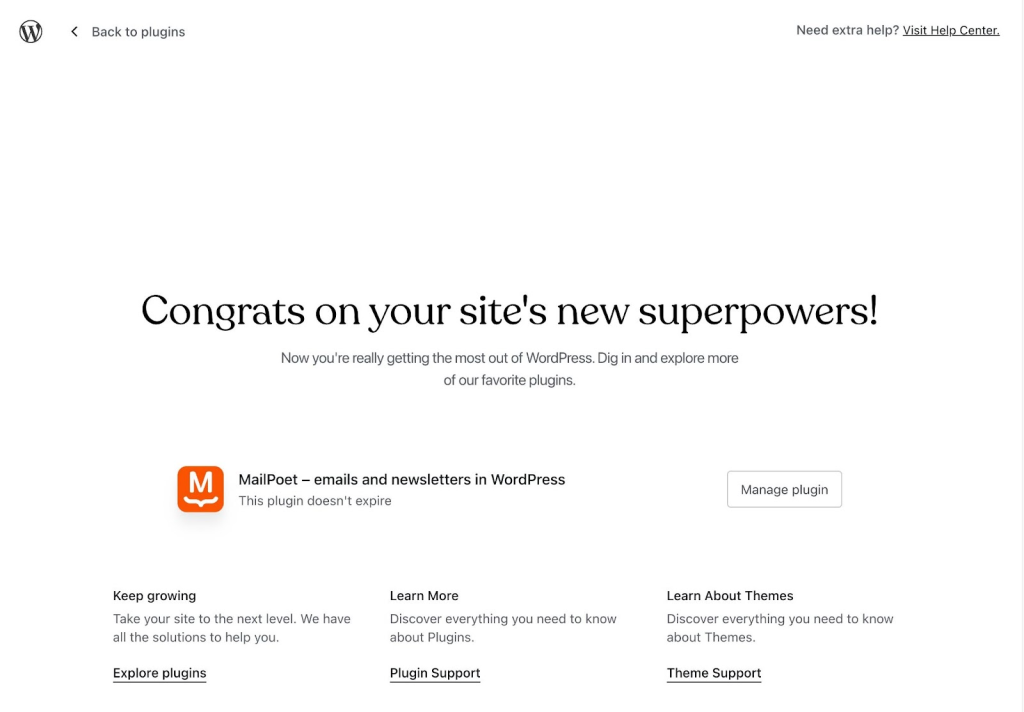
- Search for the plugin by name. For example, to install the MailPoet email newsletter plugin, you would search for “MailPoet”.
- Click on the search result for the plugin that you want to install.

This will open the listing for that plugin.
To install it on your site, all you need to do is click the Install and activate button.

WordPress.com will install the plugin for you and activate it so you can start using it immediately.
The installation process should only take a few seconds. When it’s finished, you should see a success message that looks something like this:
We’ll cover how to configure your newly installed plugin in a second. But first, let’s go over the other method to install WordPress plugins, along with how to deactivate a plugin you no longer want to use.
How to Install a WordPress Plugin By Uploading a Zip File
If you purchased/found a plugin that’s only available via the developer’s website, the installation process would be slightly different.
To start, the developer should provide you with a Zip file that contains the plugin. If you’re unsure where to find this Zip file, we recommend consulting the developer’s documentation or contacting them for help.
Here’s an example of what the process might look like at a typical WordPress developer:

Here’s what to do once you have the Zip file for your plugin:
- Open your WP Admin.
- Go to Plugins → Add New.
- Click the Upload button in the top-right corner.

Then, drag the Zip file into the file upload box on the next screen:
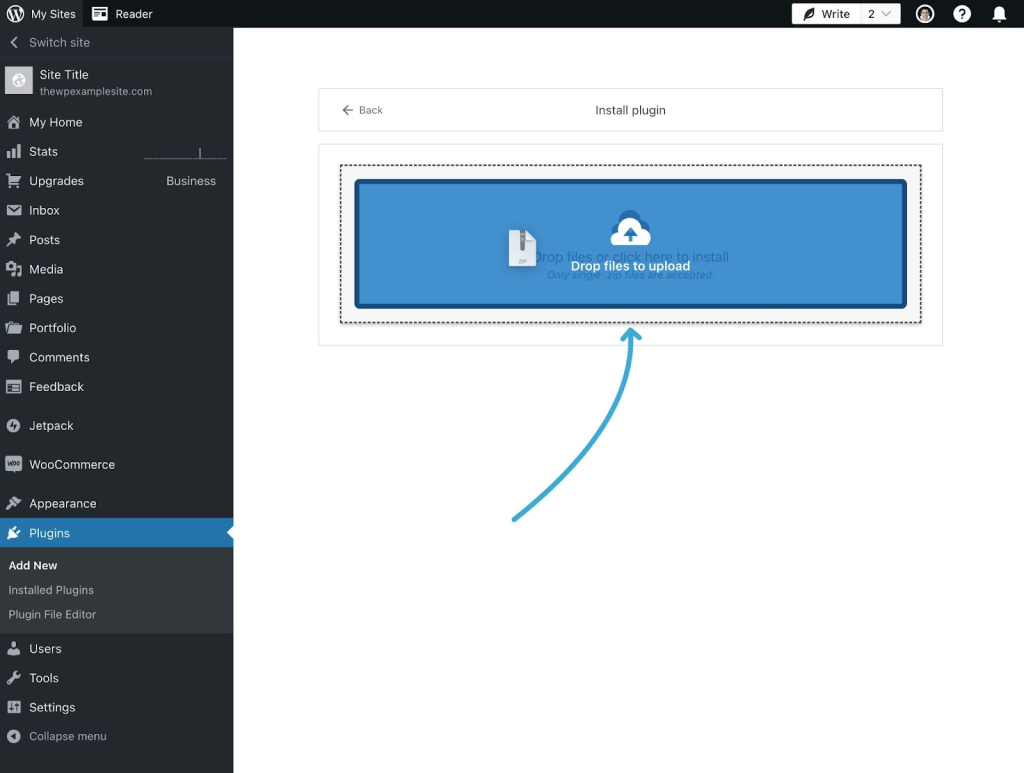
And that’s it! After uploading the Zip file, WordPress.com will automatically install and activate the plugin for you.
You’ll be able to manage it just like a plugin that you installed using the previous method.
How to Deactivate a Plugin
If you decide that you no longer want to use a certain plugin, you should deactivate it. This will disable all of its code from running on your site.
If you want to use the plugin again soon, you can leave it installed (but deactivated). However, if you plan to never use that plugin again, you should delete it after deactivating it.
Here’s how to deactivate a plugin on your WordPress.com site:
- Open your WP Admin for the site with a plugin you want to deactivate.
- Go to Plugins → Installed Plugins.
- Click the Deactivate link underneath the plugin that you want to deactivate.
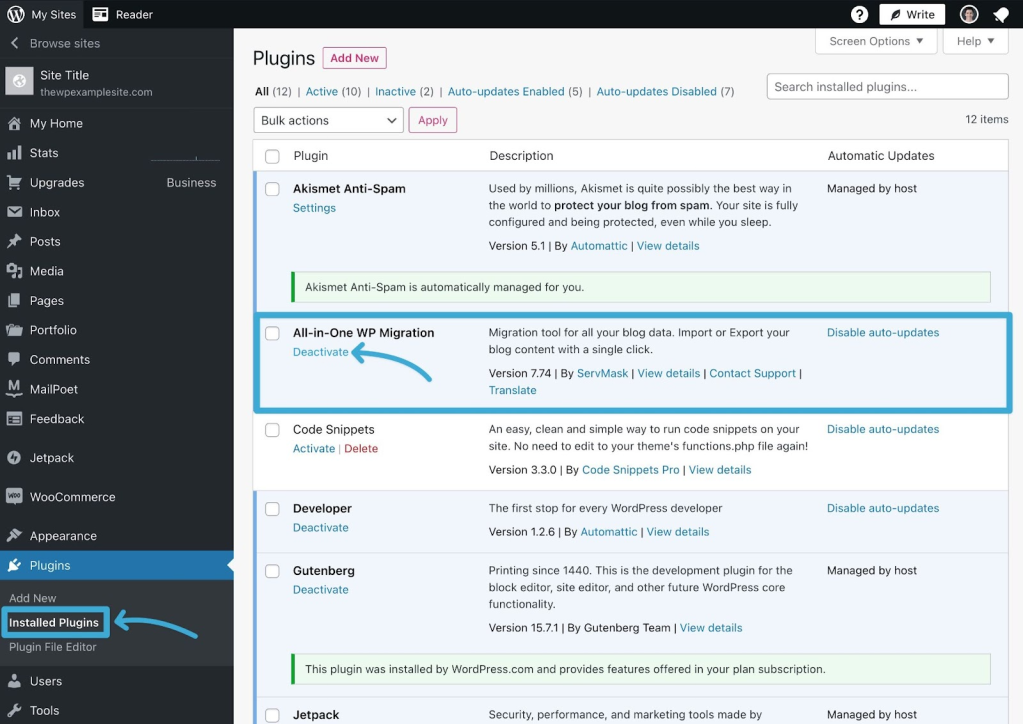
If you want to permanently delete a plugin after deactivating it, click the red Delete link.
Note – you cannot delete a plugin that’s still active on your site, so you won’t see the Delete link until after you’ve deactivated it.
How to Configure a WordPress Plugin
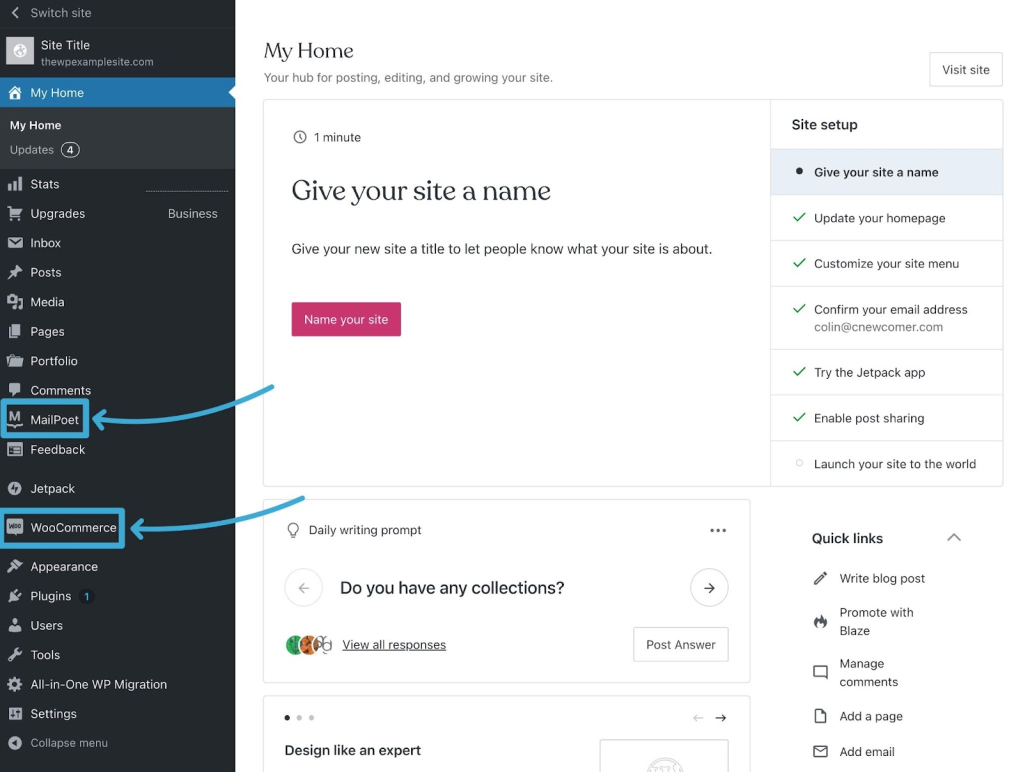
Once you install and activate a plugin on your site, you can start using and/or configuring its functionality.
How you do this will depend on the actual plugin that you installed, as each plugin does things a little differently.
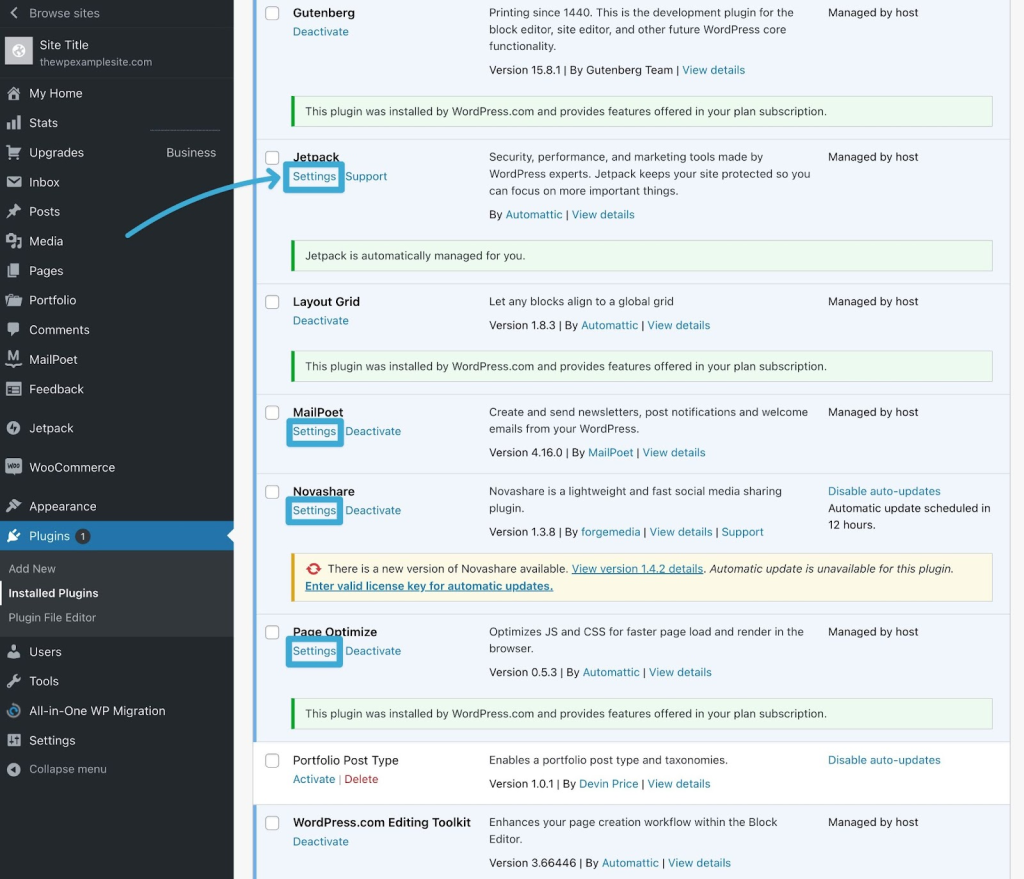
You might get one or more new menu options for some plugins in your WP Admin sidebar. For example, the WooCommerce plugin adds a new “WooCommerce” menu and the MailPoet plugin adds a new “MailPoet” menu.
For other plugins, you might find the options in a sub-menu underneath an existing menu in your WP Admin. For example, the Novashare plugin adds its settings under the existing Settings menu.

Finally, some smaller plugins might not add any dedicated options areas in your WP Admin.
For example, if you installed a plugin that adds a single new block to the editor, the plugin probably won’t include a dedicated settings area. Instead, you would just start using the plugin by adding the new block to one of your designs.
If you’re struggling to find the plugin’s settings, here’s a tip that often works:
- Go to Plugins → Installed Plugins in your WP Admin.
- Browse the list of plugins to find the plugin that you want to configure.
- Click the Settings link underneath the plugin’s name – it should take you straight to that plugin’s settings area.
While this will work for many plugins, it won’t work for every plugin. Some developers opt not to add the settings link, even if the plugin does have a settings area.
If you still can’t find your plugin’s settings area after trying these tips, we recommend contacting the plugin’s developer for help.
How to Update a WordPress Plugin
To keep your site secure and functioning, you’ll want to regularly update your WordPress plugins so that your site is using the latest version of each plugin.
If you installed a free or paid plugin via the WordPress.com plugin directory, WordPress.com will automatically apply plugin updates for you by default, so there’s no need to apply updates manually.
However, if you installed a custom plugin by uploading a Zip file, you might need to manually apply updates on your site.
If your custom plugin supports automatic updates, WordPress.com can still automatically apply updates for you. For custom premium plugins, this typically means you’ll need to activate the plugin with a license key.
For example, in the screenshot below, you can see that WordPress.com is able to detect that there’s a new update for the premium Novashare plugin. However, because we haven’t added an active license key on our example site, WordPress.com cannot automatically apply the update.
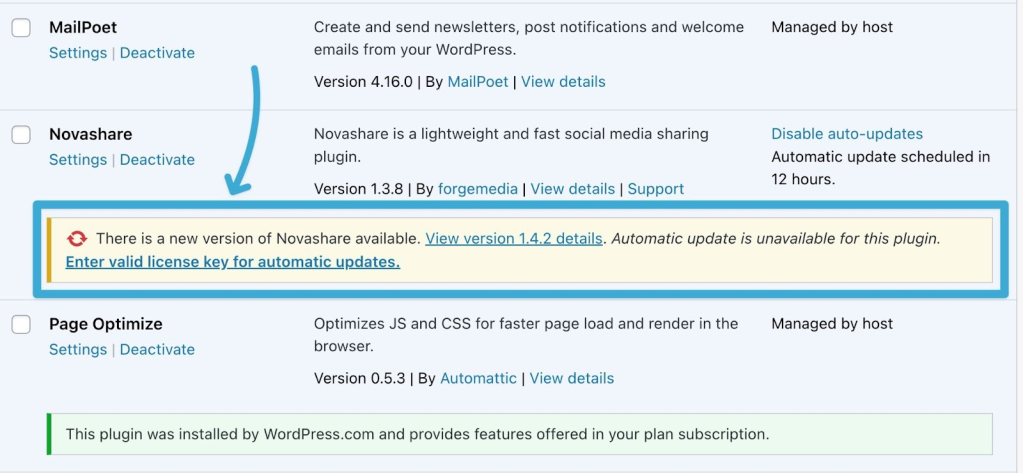
If you were to add a license key, WordPress.com would then start automatically applying updates, just like for other plugins.
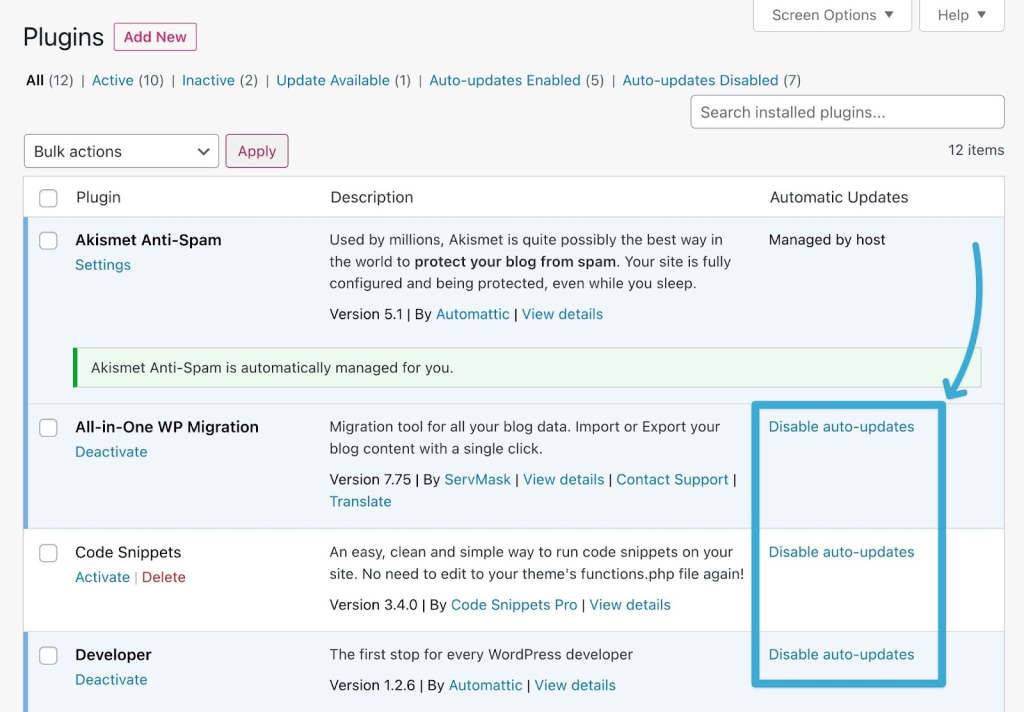
If you don’t want to use automatic updates for a certain plugin, you can disable them by clicking the Disable auto-updates link in the Installed Plugins area of your WP Admin.
If you disable automatic updates, you must manually check for updates and apply them.
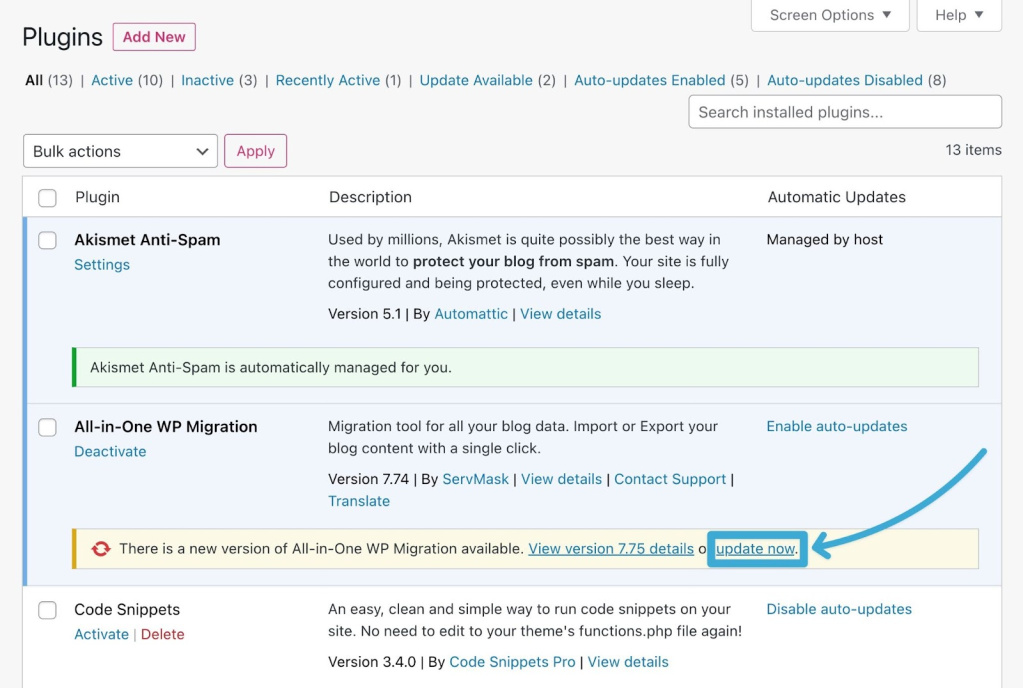
For most plugins, you should see a notice in the Installed Plugins list that alerts you to the update.
To apply the update, you just need to click the update now link.
If you’re using a custom plugin that you installed via a Zip file and that file doesn’t support automatic updates, you can also manually update a plugin by installing the new version.
Follow the instructions above to install the plugin by uploading a Zip file – just like you would install a brand-new plugin. Don’t worry – you will not lose any of your existing settings or data in the plugin.
When WordPress.com installs the plugin, you’ll see a prompt that tells you the plugin already exists. Click the Continue button to advance.
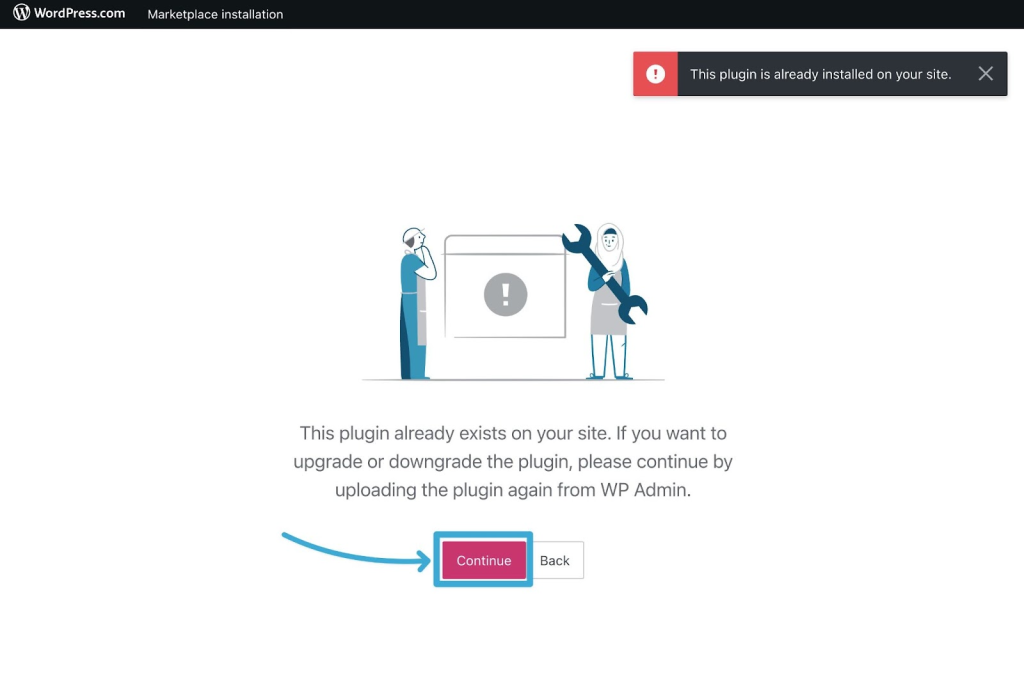
On the next screen, use the Choose File button to select the Zip file for the new version of the plugin. Then, click Install Now.

On the next screen, you’ll see a summary of your site’s current version of the plugin and the new version you’re uploading.
If the version numbers look correct, click the Replace current with uploaded button to finalize the update.

And that’s it! WordPress.com will now replace the older version of the plugin with the new version.
And again – you will not lose any of your plugin data or settings. Everything will be the same as before – just with the new version of the plugin.
Best Practices for Using WordPress Plugins
To finish things out, let’s review some best practices for using WordPress plugins on your site.
Only Use Plugins That Add Value to Your Site
When talking about how many WordPress plugins to use on your site, there can be a lot of confusion out there.
For example, one of the most common things you’ll see is that “using too many plugins will slow down your site”.
This type of statement is actually not entirely true. It’s more about the quality and impact of each plugin, rather than the number. You could use 30 performance-optimized plugins without affecting your site’s speed, but one poorly optimized plugin could cause a big slowdown.
With that being said, it can still be a good rule of thumb to try to limit how many plugins you use on your site. This is especially true if you’re unsure how to assess a plugin’s performance impact, as doing so requires more advanced technical knowledge.
Beyond performance, using fewer plugins also generally simplifies your life and helps you avoid potential compatibility issues between different plugins.
Rather than focusing on a specific number – e.g. “try to use fewer than 20 plugins” – we recommend instead focusing on whether or not the plugin will actually add value to your site:
- If the plugin will make a meaningful improvement to your site by adding essential functionality, go ahead and use it.
- If you think the plugin’s benefit will be very small and not essential, it’s usually better to just skip it.
Using this framework will ensure that you can benefit from the huge library of WordPress plugins while avoiding adding unnecessary plugins to your site.
Regularly Review Your Plugins and Remove Unused Plugins
Tying with the point above, you’ll want to periodically go back and review your plugins to see if you still think the plugin is providing value to your site.
Maybe you thought the plugin’s functionality would be important when you installed it, but three months later, you find that your site isn’t benefiting from the plugin.
If that’s the case, you should deactivate and delete the plugin.
You can keep your site as lightweight as possible by periodically checking in and doing some housekeeping.
Promptly Apply Plugin Updates If Needed
Quality plugin developers will regularly release new updates for their plugins to stay on top of emerging security threats, ensure compatibility with the core WordPress software (and other extensions), and sometimes add new features.
To ensure that your site benefits from these releases, it’s important to promptly apply updates for all of the plugins you’re using.
Again, if you’re using WordPress.com, WordPress.com will automatically apply updates for you by default.
However, you can disable automatic updates according to your preferences. If you do that, you’ll want to ensure you’re regularly checking your WP Admin to see if updates are available. You can do this by going to My Home → Updates in your WP Admin.

Check Plugins for Security Issues to Protect Your Site
Because WordPress plugins add code to your site, they can also introduce potential security vulnerabilities.
While WordPress.com implements a lot of security protections to secure your site against different threats, you should still try to pay attention to any potential security vulnerabilities in the plugins you’re using.
Here are some tips to help you keep your site secure while using plugins:
- Read a plugin’s reviews to get a sense of other users’ experiences.
- Check the “last updated” date to ensure that the plugin still receives regular attention from the developer.
- Use tools like WPScan to check for unpatched* vulnerabilities.
*Note – if a plugin has had a security vulnerability in the past, that doesn’t necessarily mean it’s a “bad” plugin. Security vulnerabilities can and do happen to any software. What’s important, though, is that the developer acts quickly to patch any vulnerabilities before those vulnerabilities can be exploited by malicious actors.
If you make your site with WordPress.com, WordPress.com will automatically check for newly discovered plugin vulnerabilities, which can help you quickly detect issues. These scans are powered by WPScan, which we mentioned above.
If you’re using your own web hosting for WordPress, you can add plugin vulnerability scanning to your site with the paid Jetpack Scan service.
Get Started With WordPress Plugins Today
WordPress plugins are one of the best parts of building your site with WordPress, so learning how to use WordPress plugins is essential if you want to get the most value from your website.
If you create your site with the WordPress.com Business plan, you’re able to install any WordPress plugin, whether that’s one of the thousands of plugins in the WordPress.com plugin directory or a custom plugin that you purchased directly from the developer.
If you’re already using the Business or eCommerce plans, install a plugin today to start experiencing how WordPress plugins can enhance your site – here are some must-have WordPress plugins to start you off.
If you’re not using one of those plans yet, upgrade your WordPress.com plan today to start installing plugins on your site.
Want more tips? Get new post notifications emailed to you.

