
There are dozens of commenting plugins out there, but Disqus’s unique engagement features and robust analytics capabilities separate it from the pack. That’s why it’s used by the likes of CNN, Rolling Stone, Bloomberg, The Atlantic, and many others.
Learn how you can add Disqus to WordPress and take advantage of the same features that these world-class publications rely on to engage with their readers.
Disqus empowers users and site owners
Website owners looking to build online communities will be pleased by Disqus’s intuitive interface, streamlined appearance, and robust analytics capabilities. Disqus helps site owners establish a sense of community by encouraging visitors to interact with content through voting, Gravatar support, social sharing buttons, and the ability to upload images and videos.
Add Disqus to your WordPress.com website
Begin by going to Disqus.com and clicking on “Get Started.” After you enter the information required to create an account, click “Sign Up.” On the next screen, select “I Want to Install Disqus on My Site.”
Then, enter your website’s name, designate the type of website it is, and click “Create Site.”
Then, select your desired plan.
Now, return to your Disqus account, click settings, and choose “Admin.”
Click “Settings” from the top menu. A popup screen will appear where you’ll need to click the name of the website that you entered earlier.
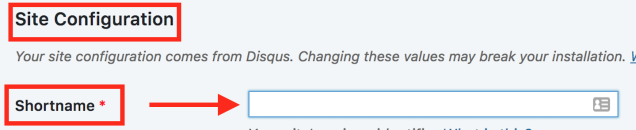
This will direct you to the “Configure Disqus for Your Site” page, where you’ll see “Shortname” near the top. Copy the shortname so that you can paste it in later.
Now comes the WordPress.com part of the installation. First, navigate to your WordPress.com site.
On the left-hand menu bar, go to Plugins and click Manage. Note: plugins are only available to WordPress.com plugin-enabled plan users.
Then, click Add New and type “Disqus” in the Search Plugins field. Once you find it, click Install.
Now, when you return to your Plugins section, you should see Disqus.
Click Disqus to find the plugin settings page. Within Disqus’s plugin settings, click the Site Configuration tab.
Scroll down to click the lockbox that says Click to Make Changes, then scroll back up and paste the shortname that you copied earlier.
Scroll down, click Save, and you’ll have a beautiful, new commenting section.
When you add Disqus to WordPress, you’re giving your site a personal touch that can help your community grow. Be sure to keep track of your website analytics to get a feel for how your engagement rates change over time.

