Whether you run a blog or sell products on your WordPress site, translating your content can help you reach a wider audience and drive more conversions. However, this task can seem unattainable if you only speak one language.
Fortunately, you don’t need to be a polyglot to create a multilingual site or multilingual blog. There are several tools you can use to make your content available in different languages. Moreover, you can choose between using automatic machine translation or hiring a professional to help you out.
In this post, we’ll take a closer look at the benefits of having a multilingual WordPress site. We’ll then show you how to translate your content using a plugin. Let’s get started!
The Benefits of Having a Multilingual WordPress Site
A multilingual site can make your content more accessible and offer a better user experience. If a visitor doesn’t speak your site’s default language, they can simply view the content in their native language with a simple click:

This eliminates the need to use a third-party translator, and enables visitors to interact with your site without any issues. At the same time, this accessibility can also help you reach a wider audience, which may result in higher conversions.
Moreover, having your content available in multiple languages can help boost your traffic. This is because you may start ranking in Google searches for queries in languages other than your primary one.
Finally, a multilingual website projects a professional image, and can help you build credibility with your audience. Many visitors will appreciate the fact that you’re tailoring your services to their needs, which could encourage them to make a purchase from your site. It could also help you retain clients and build a loyal customer base.
Deciding How to Translate Your Website
There are two main ways you can translate your website. First, you can hire a professional translator. This method can help ensure that your translated content is accurate, and follows the nuances of the language as it is normally written.
However, hiring translators can be very expensive, especially if you have a large site. Plus, every time you add new content, you’ll need to pay for the translating service again.
Another option is machine translation. This method involves the use of programs like Google Translate. Whether you run a blog or an e-commerce site, these tools can help you translate your content efficiently without having to spend a lot of money.
For many site owners, machine translation is a more viable and cost-effective option. You can simply enable translations of your pages by using a powerful WordPress plugin. Moreover, you’ll be able to add multiple languages to your site with the same translation tool. This means you can save money while making your content more accessible.
How to Create a Multilingual WordPress Site Using a Plugin
In this section, we’ll be using TranslatePress to show you how to create a multilingual site. This freemium plugin helps you instantly translate your content into different languages.
Note that if you’re a WordPress.com user, you’ll need the Business or eCommerce plan in order to install plugins on your WordPress site.
Step 1: Choose Your Languages
Start by installing and activating TranslatePress on your site. When you’re ready, navigate to Settings > Translate Press in your WordPress dashboard.
First, you’ll choose the languages you want to add to the site:
The free version of the plugin only lets you add one language other than your own. This won’t be an issue if you’re only looking to create a bilingual site. However, if you want to translate your site into multiple languages, you’ll need to upgrade to the premium version.
There are other changes you can make under the General settings. For instance, you can choose to display languages in their native names:
For example, “Spanish” would appear to your visitors as “Espanol”.
You can also choose whether you want to display the default language name in your site’s URL, as in example.com/en. This setting will be automatically applied to your secondary languages (e.g. example.com/es), but you may also wish to enable it for your main language to ensure consistency.
Finally, you’ll be asked whether you want to change the custom links for translated languages. We recommend that you set this option to Yes, to ensure that your links remain SEO-friendly.
When you’re ready, click on the Save Changes button. Next, we’ll show you how to create automatic translations of your site.
Step 2: Set Up Your Translations
One of TranslatePress’ best features is automatic translation. This tool saves you the hassle of manually translating every element on your site.
To access this feature, go to Settings >TranslatePress in your admin area, and then click on the Automatic Translation tab:
Locate the Enable Automatic Translation field, and select Yes. As you can see, you get two options for this service: Google Translate and DeepL.
However, if you’re using the free plugin, you can only access Google Translate. DeepL is offered as a TranslatePress Pro add-on. This means you’ll have to upgrade to the Developer or plugin-enabled plan in order to access it.
Note that whichever translation service you opt for, you’ll need to create an account with the provider and get an API key. To get a Google Translate API key, you’ll need to have a Google Cloud account.
DeepL offers free API access, which lets you translate up to 500,000 characters per month at no cost. If you think that that won’t be enough, you’ll need to purchase an API key for DeepL.
Once you’ve obtained your license key, return to Settings >TranslatePress > Automatic Translation in your site’s admin area. Then enter your key in the relevant field:

While you’re on this page, make sure that the Block Crawlers box is ticked:

This will stop crawlers that index your site from triggering automatic translations of your pages. You can also set a limit for the number of automatic translations you want the software to generate per day. This will help keep your translation costs low.
Finally, you can enable logging for machine translation queries. We recommend using this option only if you’re testing and debugging your content. Otherwise, it might have a negative impact on your site’s performance.
When you’re done, save your changes. Your site will now be automatically translated when a user selects their preferred language.
While you’ll need to pay for this automatic service (with pricing depending on the service you choose), you’ll be pleased to know that TranslatePress helps you minimize your costs. It does this by storing your translations in a database, so each page only needs to be translated once.
Step 3: Edit the Language Switcher
The language switcher is the element on your site that will enable your visitors to switch to another language. Therefore, it’s important to ensure that users can easily see and access it.
To view and edit this feature’s settings, return to Settings > TranslatePress > General, and scroll down to Language Switcher:

There are three options for displaying the language switcher on your site. You can add it as an item in your menu, display it as a floating drop-down menu, or use the shortcode to place the switcher on any page you want.
For each option, you can select your switcher’s appearance. For instance, you might want to use flags instead of language names, or show both:

If you’re adding a floating drop-down menu, you can choose the color and location for the switcher. We recommend adding it to the top of your page, where it is more easily viewable.
Step 4: Edit Your Translations
You can also translate elements on your page manually. Alternatively, you might want to edit some of the automatic translations. Fortunately, TranslatePress lets you do this straight from the live editor, making it easy to navigate across different pages while translating your content.
To get started, click on the blue Translate Site tab in the TranslatePress Settings page. This will take you to the live editor, where you can select the page you want to start with:
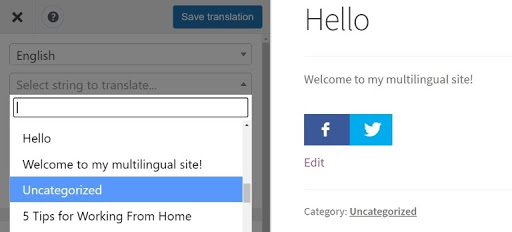
Next, choose the string of text you want to translate or edit. You can either click on it or select it from the drop-down menu:
Then define the language you want to translate this text into, and enter your translation in the accompanying field:
When you’re ready, click on the blue Save Translation button. The plugin will now automatically generate translations for that selected text wherever it appears on your site. For instance, if you translate the title of a particular article within the post itself, the title of that post will also be translated in the blog feeds.
This automatic feature also applies to other elements of your site. For example, if you translate the name of your site on the home page, it will also be translated on the rest of your pages. Thus, you won’t need to visit every page and post to translate the name.
Another handy feature you’ll get access to is translation blocks. This lets you group multiple strings of text so you can translate them at once.
For instance, if you have a link within a paragraph, that section of text will be split into two. However, you can merge a particular string with its parent paragraph by hovering over the text and clicking on the green arrow button:
This will automatically connect all of the separate strings into one block. The selected content will appear in the translation panel in HTML format. You can then type in your translation or edit the existing one:
As you can see, this feature saves you a lot of time. This can be particularly useful if you tend to use a lot of links within your posts.
Note that you can also access the translation editor from the front end of your site, by clicking on Translate Page in your WordPress menu:
It’s also worth noting that if you upgrade to a plugin-enabled plan, you’ll be able to translate the SEO elements on a page. The SEO Pack add-on will help you automatically translate each page’s meta description and title, image alt tags, and URL slug.
Conclusion
Creating a multilingual WordPress site can be an effective way to reach a wider audience and boost your traffic. It improves your site’s user experience, makes your content more accessible, and helps you rank for queries in other languages.
Fortunately, you can use a powerful tool such as the TranslatePress plugin to quickly translate your content. Let’s recap the main steps for creating a multilingual site with this plugin:
- Choose the languages you want to translate your content into.
- Set up automatic machine translation, using either Google Translate or DeepL.
- Edit the language switcher so users can easily switch languages.
- Edit your translations or manually insert your own, using the live editor.

