
Whether you blog for business purposes or to express yourself creatively, you undoubtedly want to keep readers on your site for longer periods of time. After all, if they check out more of your content, they may turn into loyal followers.
But how do you keep their attention after they’re done reading the post that led them to your site in the first place? This is where WordPress.com’s Related Posts feature comes in handy. This article explains why you should use Related Posts, how to enable the feature, and how to customize its appearance on each post.
How does Related Posts work?
Related Posts pulls relevant content from your blog and displays it under each individual post. The posts that appear are generally related to the original post being read by a site visitor, and encourages that visitor to discover more of your content.
Displaying related content under individual posts increases the chances of your visitors spending more time on your site, and clicking through to your other posts. This helps to decrease your bounce rate (the rate at which people leave your site) while increasing your page views. By suggesting that your viewers read additional content, you help them to connect with your brand, encouraging them to become customers or subscribers.
Enable Related Posts to get started
Related Posts can be enabled on any WordPress.com site. However, it needs to meet a few requirements before you can get started:
-
You need to publish at least 10 posts.
-
Each post must contain at least 100 words.
-
You can’t use the following themes, as they have a Related Posts feature built in: Expound, Traveler, Opti, and Currents.
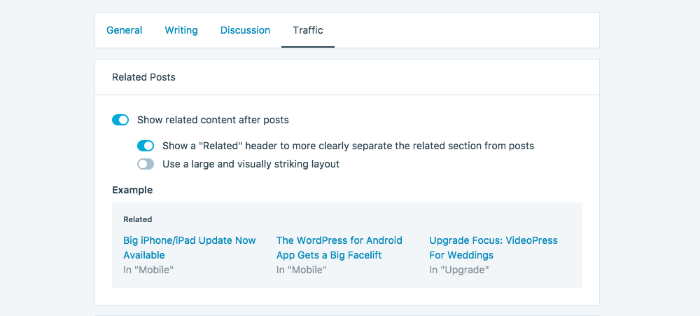
Once your site meets these requirements, you can use Related Posts. To do this, go to the Settings page and select your site. Click on the Traffic tab and toggle the Show related content after posts to “on.” Scroll down and click Save Settings to apply these changes.
Customizing the appearance of Related Posts
You can enable a few additional settings to customize how related content displays underneath your posts.
Toggle “on” the option to display a “Related” header so that it’s easier for visitors to distinguish between related content and the original post. You can also enable an option to display images that are pulled from the featured image that you set for your post (or another related image, such as an attached image or gallery). The thumbnails will resize to show uniform widths and heights.
Displaying images along with Related Posts
According to HubSpot, visual content performs better and helps visitors remember more about what they read. If you use images in your posts and want Related Posts to look visually appealing as well, enable the option to use and display images alongside them.
If you’re worried that your images won’t be relevant or that they might slow down your site, you can disable the option. In the end, it comes down to your personal preference, and you can always turn it “on” or “off” if you change your mind.
Keeping your readers engaged
Increasing your site traffic is not an easy task, but it’s even harder to keep visitors on your website for an extended period of time. Use the Related Posts feature and give your readers the chance to explore more of your content — and keep them engaged.

