It’s easy to tailor your images to your post’s specific needs.

We recently covered some handy, quick fixes to better integrate images into your posts. There’s always more to learn, though — here are four additional tricks to consider. From resizing to adding borders, you get to display your images exactly the way you want.
Customize your image size
Looking for alternative ways to insert photos into your posts? Here are a few to consider.
Once you’ve added an image to your post, it’s fine-tuning time.
When you first selected the image, you chose between different standard sizes:
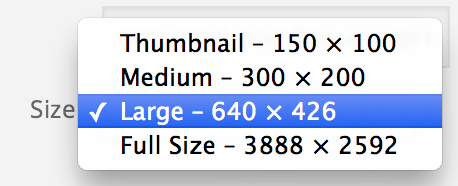
But what if none of these sizes work for you? What if the image is either too small or too big, or makes the text break up in a way you’d like to avoid? Easy: create a custom-sized image!
In the Visual Editor, click on your photo, then on the pencil symbol. Welcome to the Image Details screen!

Look at the middle of the screen: when you open the drop-down Size menu, you’ll now see one extra option: Custom Size. Select it, and you’ll be able to tweak the size of your image as you see fit — and the editor will automatically adjust the size to keep a correct scale.
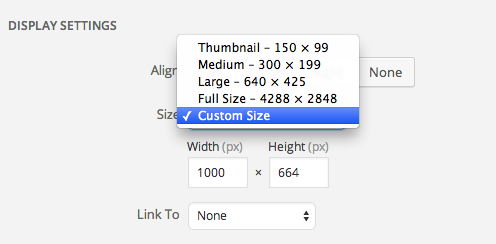
It might be a good idea to take a look at the post preview to make sure the new size fits into the post the way you intended it to; if not, quickly re-tweak the size, and you’re all set.
Turn your image into a custom link
Images add color and texture to your posts, and can give your reader a needed visual break between blocks of written text. Sometimes, though, they can help you direct traffic and clicks to other destinations on your site (and beyond).
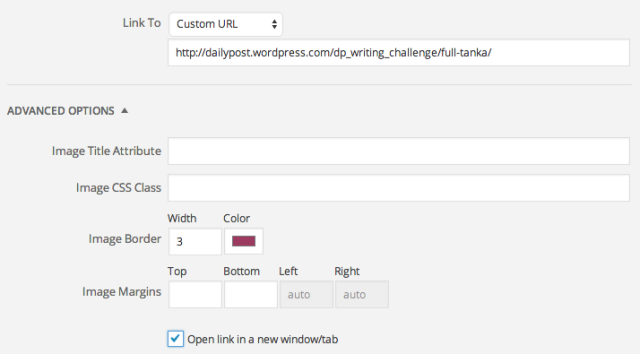
By default, the images you insert into your post are linked to their respective media files. But changing the “Link to” setting in the image editor lets you turn the image into a big, colorful, highly clickable link to… anywhere you want. Just return to the image editor (via the pencil symbol on your image), enter the desired URL in the text box, and your image link is created:

This can be a great way to lead your readers to other posts or pages on your blog, or to a different site altogether — for example, a post about a charity you’re passionate about can feature an image link that takes visitors to that organization’s donations page. Or, if you’re using a Creative Commons-licensed image, linking to the photographer’s site or Flickr profile could be a nice way to give credit and acknowledge the artist’s generosity.
Keep your visitors where you want them
I can hear you objecting already — “Wait! I don’t want my readers to leave my post before they even finished reading it.” Nor should you — look down the Image Details screen, and right there, at the bottom of the Advanced Options section, you’ll see a checkbox: “Open link in a new window/tab.”
Check this box, and all clicks on your image will do just that — keeping your post in your readers’ browsers, waiting for them to return as soon as they’ve explored the site to which your image led them.
Make your images stand out
Crisp, light-colored backgrounds keep your posts readable, and your visitors’ eyes fresh. They can be tough, though, when it comes to using light-colored images. The image and the background might bleed into each other, diluting the effect you create by alternating between text and image.
You should always consider the overall visual balance of your post when making changes to your images’ appearance.
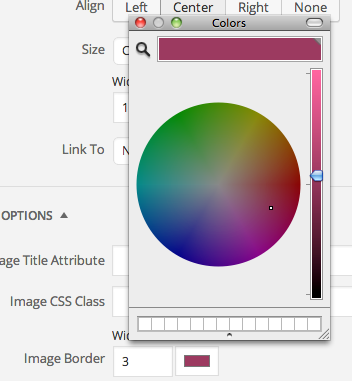
There’s an easy solution here, too — still in the Advanced Options section of the image editor, head to the Image Border setting:
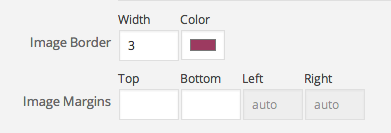
You can choose whichever border width and color you wish — clicking on the color box will make the color picker pop out — so that the image fits perfectly with your blog’s color palette and other design features. (Take a look at this post — many of the screenshots I’ve used required a subtle border to set them apart from the background.)
While it’s better to use borders sparingly, on occasion they can make a real difference in how effective a given image is.
Do you have any other image-editing tips to share? Let us know what they are in the comments.
Currently blogless? You’re a click away from sharing your story.
Create your blog at WordPress.com


Thank you so much for this informative post. I just started up a photography blog about a month ago and these tips will really help with presenting my images exactly how I would like them to appear.
Cindy Garnett
CindysEverydayPhotography.wordpress.com
LikeLiked by 2 people
Aha! Tricks of the trade! Thank you! But “Trading tricks?” I don’t know any to offer (sorry!) but am lapping these up. I do notice in my stats that people are always clicking on my images (but as you mentioned it just takes them to the original file) but I always thought it was just to enlarge it to see more detail? I had no idea they might have expected the image to actually take them somewhere?! I would still be worried, even if it opened up in a new screen that they would never come back to finish my post. If they are anything like me, (ADD) it would be like “Oh look, shiny!” And then “Hey, Squirrel!” And then “Original post? What post??”
LikeLiked by 5 people
I completely understand. One other option to consider — it’s the one I usually choose for posts on The Daily Post — is simply to have no link; in other words, make the image un-clickable.
LikeLike
@Little Miss Menopause
This is an extremely helpful post that many confused bloggers posting to the support forum find useful http://wpbtips.wordpress.com/2009/04/26/images-the-three-link-options/
LikeLike
Is the problem by any chance still occurring that when border is selected of let us say 5 pixels the backdrop with the caption is still the same size as the pictures and not the 10 pixels bigger since one added a border?
To which the border sort of gets out of line or bounds.
This is an observation and a honest question.
Other than that the custom size is a great addition to the tools. I enjoy very much.
LikeLiked by 1 person
I haven’t encountered this issue recently, so I’m honestly not sure. If this does happen to you and a border you’ve added clashes with a caption, I’d strongly recommend taking a quick screenshot of the offending image and reach out to our support team, here:
https://wordpress.com/support/contact/
LikeLike
I thank you for the quick and helpful reply. I am as I am typing this looking at one of my borders. Like that. Though it is an old border.
Again thank you.
LikeLike
I’ve recently started using the editing app on my phone to “doll up” a faded or too wide shot before adding it to my posts. And when it comes to photos, for me…the bigger the better. I’m always clicking to enlarge 🙂
LikeLiked by 1 person
I’m the exact opposite. I only click thumbnails to enlarge them. When images fill the blogging post space then they are that big enough for me so I don’t click to enlarge them.
LikeLiked by 1 person
Extremely helpful. I’ve also found that using the “set featured image” has led to more pictures staying connected to the correct post without worry about “programming” language as I’m using the most basic wordpress because I have no html or css skills (yet!)
LikeLiked by 1 person
Thanks a lot ! I was struggling to overcome these issues.
LikeLiked by 1 person
I have been thinking about how to improve in this area for a while now……..imagine my joy when I landed on this article! Have I said thank you yet? Thank you!
LikeLiked by 2 people
My suggestion is a simple one. Optimize your images for the web, and pre-size your images to fit into the spaces you intend to use them in, prior to uploading them. Then you will have the best images quality, you will not be wasting your free media storage space, and you will not be in the support forums asking for help with troubleshooting images.
LikeLiked by 3 people
Thanks for the post! I just started my blog yesterday and I wanted to add a picture into the text and wrap the text around it. Is there a way to do this?
LikeLiked by 1 person
Yes — you can easily have the text wrap around images by aligning your images left or right. You can find out more details here:
https://wordpress.com/support/images/image-alignment/
LikeLike
Why, when I move my image to a different place in the post, does the link disappear? I have to keep putting links back. Unless I change to text and cut and paste all the html for the image.
LikeLike
Hi Clare — I haven’t managed to reproduce the issue you’re describing (i.e. when I move images around in my test blog, the link stays intact). I’m not sure what might be causing this (html gremlins?), so I’d suggest alerting our support team, who might be able to better assist you:
https://wordpress.com/support/contact
LikeLike
Oh, that’s interesting, it is not doing it now.
It started at the time images were changed, to remove the box for a “Title”- much whingeing about that one- and permit users to drag the corner of the image, and thereby reduce or increase its size. It last irritated me about a week ago.
The question that really gets to me is that why would anyone imagine that the alternative way of posting is an “improved posting experience”? When first introduced, there was not even a way to save drafts, and now it still has fewer features than the Edit Post screen I use. I started using hardly any of those features, and explored them as I went along, and now use most of them, changing font now and then with html rather than with a paid upgrade. Do you feel too many features put people off?
LikeLike
I’m glad to hear the link isn’t disappearing any longer.
As for the new option for posting, we’d like to offer a publishing experience that is smooth and easy to use intuitively, while maintaining the vast majority of features — especially those that are frequently used and loved by many bloggers. It will take some tweaking, but it’s a goal towards which we’re working constantly.
LikeLike
Thank you so much, a great post. I was thinking the other day that it would be useful to change some of my photos into links so I’ll give it a try now 🙂
LikeLiked by 1 person
Very helpful Ben, but what if the option to choose an image border doesn’t open when the width or colour box is clicked in Advanced Options, as is the case with my theme McKinley? Thanks
LikeLike
Hi Andrew! The image editor doesn’t change from one theme to the other — and the option to add borders is available on all current themes, including McKinley (I just confirmed this by switching my test blog to McKinley and adding a border there).
I’m not sure I understand what you mean by “the option… doesn’t open” — for width, you need only enter the number of pixels you wish for the border. The color picker should pop up when you click on the color box — like in the image in the post, above. As long as one clicks “update” after deciding on those details, the border should appear the next time you preview the post. Let me know if I’ve misunderstood the issue you’re describing!
LikeLiked by 1 person
The colour picker doesn’t pop up after I put the pixel size in.
LikeLike
It’s not supposed to — the color picker should, however, pop up when you click inside the color box (where the default is black). If that doesn’t work, that would suggest a problem that calls for some further investigation.
LikeLike
Looks like it needs further investigation.
LikeLike
Just to follow up — we’ll look into this to try to find out what’s causing this issue for you.
LikeLike
Thanks Ben
LikeLike
Hello again, Andrew — after some digging, it appears that the color picker is supported in Chrome, Firefox, Opera, and the Android browser, but not yet in Internet Explorer and Safari. If you’re using one of these two browsers, the picker will be unavailable for now (it’s expected to be supported in Safari 8, which is still in beta). Thanks for your patience!
LikeLike
Thanks Ben. That explains it as I use Safari on my MacBook Pro. Appreciate the follow up. Best wishes.
LikeLike
Admiring the commitment you put into your website and detailed information you present. It’s nice to come across a blog every once in a while that isn’t the same out of date rehashed material. Fantastic read! I’ve bookmarked your site and I’m including your RSS feeds to my Google account.
LikeLiked by 1 person
clicking on the color box does not make my color picker pop out …it will let me put the image border width in. But offers no color wheel. I am not sure what I am doing wrong or not doing.
LikeLike
Actually there is no color box for me to click on. The box is empty.
LikeLike
Thanks for letting me know. We’ll look into this to try to find out what’s causing this issue.
LikeLiked by 1 person
Hello again — as I replied to Andrew above, after some digging, it appears that the color picker is supported in Chrome, Firefox, Opera, and the Android browser, but not yet in Internet Explorer and Safari. If you’re using one of these two browsers, the picker will be unavailable for now (it’s expected to be supported in Safari 8, which is still in beta). Thanks for your patience!
LikeLike
I just started my site a little over a week ago. I have been concentrating on content and I have to focus somewhat on design. I liked the suggestions you mentioned. Thanks.
Cre Crenshaw
Creative Technology Solutions
cre8tech1.wordpress.com
LikeLike
Thanks for the tips. When I use the title of the picture to link to its original source, I’d like to make it look like a clickable link. How can I make it blue and underlined?
LikeLike
You can easily turn your image caption into a link just like you would any other text. Once the caption is in place, just highlight it with your mouse, click the “Link” button in your toolbar, and enter the desired URL. That’s it!
LikeLiked by 1 person
So useful! Thank you for the info!! I had no idea I could set the link to open in different windows and select a color for the borders!
LikeLike
this is excellent! I found a lot of this on my own, but I was afraid of the “custom size” option until now
LikeLike
Hi there, is there still a way to put in box shadows around images?
LikeLike
Shadow effects are achievable via CSS, which you can use as part of the Custom Design upgrade (more information here: https://wordpress.com/support/custom-design/).
LikeLike
Is there someway to keep people from leaving comments on the photos? Because of spam, I’ve turned off comments on older posts and now they’re leaving the comments on the photos themselves.
Nancy
LikeLike
The easiest would be to make the images non-clickable. In the image editor’s “Link to” drop-down menu, select “None” — that should do the trick.
LikeLiked by 1 person
Thanks Ben!
LikeLike
Thanks for these tips. Now if I can only put them into practice!
LikeLike
It’s still taking me time to adjust to the new ‘new post’ section I can see how it’s more effective it’s just not all laid out. I love these tips, especially the size and border adjustments, thank you so much! 🙂
LikeLike
This is excellent! I have also always come across the problem of readers clicking the file and just landing on a different page with a larger picture. The comment about removing the link altogether makes so much sense!
LikeLike
Wow this is really great. Thank you, I usually just do an http link but now i will do it more professionally. Thanks!
LikeLike
Great post – thanks. I had never noticed the ‘open link in a new tab/window’ check box (der!). I always open have links open in new tabs, now can do the same for my images. Yay “-)
LikeLike
this article is really informative…thanks for giving such a useful information
LikeLiked by 1 person
beats耳機專賣店
http://monster.masmcalumni.org/
LikeLike
Thanks for the great advice. Kudos for posts like these that help us novices out.
I seem to have a problem gettting a menu against the advance options. Only a arrow icon up and down. Right click gives some options but nothing like is shown on your screen. Any suggestions ?
LikeLike
Today, while I was at work, my sister stole my apple ipad and tested to see if it can survive a 30 foot drop, just so she can be a youtube sensation. My iPad is now broken and she has 83 views. I know this is completely off topic but I had to share it with someone!
LikeLike
hi!,I love your writing very so much! percentage we communicate more about your post on AOL? I require a specialist in this space to solve my problem. Maybe that’s you! Looking forward to peer you.
LikeLike