Template parts are pieces of a layout that can be reused across multiple areas of your site. The site header and footer are common template parts typically included with your theme. This guide will show you how to create and control the template parts on your site.
In this guide
If your site uses a theme that supports the site editor, you can use template parts. A quick way to determine if your site uses the site editor is to check under Appearance in your dashboard. If you see Editor here, you can access your site’s template parts using the following steps:
- Visit your dashboard.
- Navigate to Appearance → Editor to open the Site Editor.
- Click Patterns.
- Scroll down below the pattern categories to view your site’s template parts.
Similar to patterns in your pages and posts, template parts can be reused throughout your templates — when you edit something inside of a template part, your changes will update everywhere on your site that uses that template part.
Your theme may include more than one header or footer template part. For example, it might include a header specific to your homepage and another version of the header for other pages.
This video demonstrates how to edit and create new template parts and insert them on your site:
When you activate a theme on your site, several template parts will be included for you to customize as needed. To edit an existing template part, follow these steps:
- Visit your dashboard.
- Navigate to Appearance → Editor to open the Site Editor.
- Click Patterns, then “Manage all template parts.”
- Click on the name of the template part, then click on the editing area on the right to open up the editor interface.
- Click on any block in the template part to edit it, or add a new block by clicking on the + block inserter icon (learn how to use the WordPress editor here!)
- Tip: Use List View by clicking the three horizontal lines icon at the top of your screen. This is helpful to see a list of all blocks in your template part to see how everything is laid out. Using List View, you can move, remove, and add new blocks as needed.
- Tip: If you’re unsure how you’d like to design a template part like a header or footer, browse block patterns to use one of our premade designs.
- Once you have finalized your changes, click Save. Your changes will appear on the site everywhere the template part is used.
The following video demonstrates how to edit a footer template part and give it a new design:
You can create a new template part to reuse across your site. One common reason to create a new template part is to create a different version of your header or footer to display on specific pages.
There are two methods you can use to create a template part:
To create a new template part, follow these steps:
- Visit your dashboard.
- Navigate to Appearance → Editor to open the Site Editor.
- Click Patterns.
- Click the + icon next to Patterns and then Create template part.
- Type a short name for your new template part that describes what it’s for.
- Select an area of your site for your new template part: General, Header, or Footer.
- Click Create.
- Click the + block inserter icon to insert any blocks or patterns you wish to have in your template part.
- Once you have finalized your design, click Save.
The new template part will now be available to insert into templates and pages.
- Visit your dashboard.
- Navigate to Appearance → Editor to open the Site Editor.
- Click on the right side of the screen to open the editing interface.
- Click the + Block Inserter icon and search for [“template part”]. Click to add it to the page.
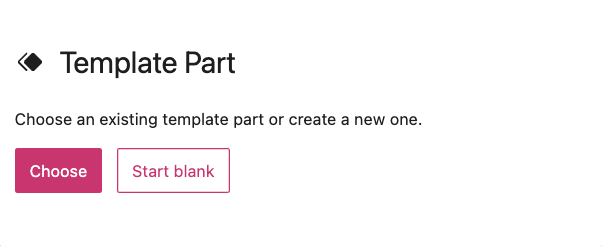
- You will then be presented with two options:
- Choose: Pick from one of the template parts that came with your theme, like the header and footer.
- Start blank: Create a new template part from scratch by giving it a name and clicking the Create button.

- Click the + block inserter icon to insert any blocks or patterns you wish to use.
- Once you have finalized your design, click Save.
Once you have finalized the design of an existing or new template part as described in the previous sections, you can insert the template part onto your site. Here’s how:
- Visit your dashboard.
- Navigate to Appearance → Editor to open the Site Editor.
- Choose from:
- Pages to select a single page only.
- Templates to insert the template part onto a template used by multiple pages.
- or click on the editing area on the right side to open up the homepage template editor.
- Click the + block inserter and search for the name of your template part. Click to add it.
- Alternatively, search for “template part” and click to add this to your site. Then click Choose to browse through your site’s template parts.
- Click Save.
To restore a template part to its default state, undoing all edits you made, follow these steps:
- Visit your dashboard.
- Navigate to Appearance → Editor to open the Site Editor.
- Click Patterns, then Manage all template parts.
- Click on the name of the template part, then click on the editing area on the right to open up the editor interface.
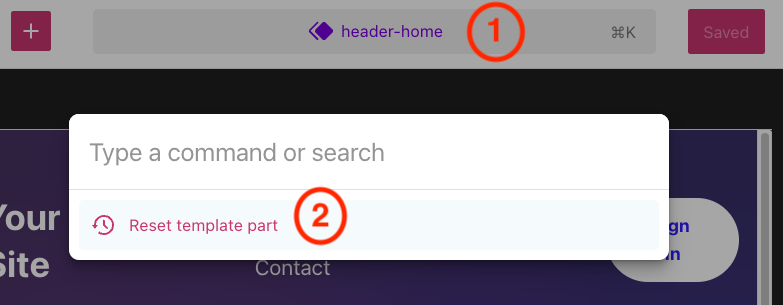
- Click on the name of the template part at the top of the screen to open the Command Center.
- Click Reset template part. If this does not appear, there are no changes to reset.
- Click Save.

