It’s easy to tailor your images to your post’s specific needs.

We recently covered some handy, quick fixes to better integrate images into your posts. There’s always more to learn, though — here are four additional tricks to consider. From resizing to adding borders, you get to display your images exactly the way you want.
Customize your image size
Looking for alternative ways to insert photos into your posts? Here are a few to consider.
Once you’ve added an image to your post, it’s fine-tuning time.
When you first selected the image, you chose between different standard sizes:
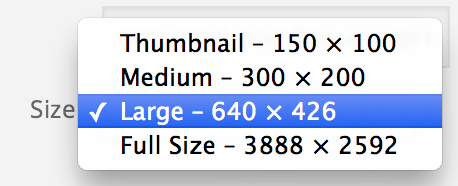
But what if none of these sizes work for you? What if the image is either too small or too big, or makes the text break up in a way you’d like to avoid? Easy: create a custom-sized image!
In the Visual Editor, click on your photo, then on the pencil symbol. Welcome to the Image Details screen!

Look at the middle of the screen: when you open the drop-down Size menu, you’ll now see one extra option: Custom Size. Select it, and you’ll be able to tweak the size of your image as you see fit — and the editor will automatically adjust the size to keep a correct scale.
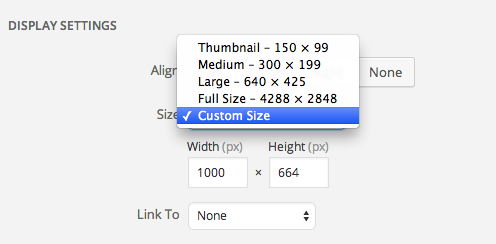
It might be a good idea to take a look at the post preview to make sure the new size fits into the post the way you intended it to; if not, quickly re-tweak the size, and you’re all set.
Turn your image into a custom link
Images add color and texture to your posts, and can give your reader a needed visual break between blocks of written text. Sometimes, though, they can help you direct traffic and clicks to other destinations on your site (and beyond).
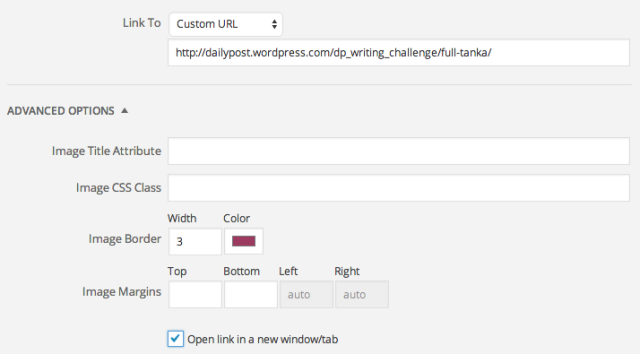
By default, the images you insert into your post are linked to their respective media files. But changing the “Link to” setting in the image editor lets you turn the image into a big, colorful, highly clickable link to… anywhere you want. Just return to the image editor (via the pencil symbol on your image), enter the desired URL in the text box, and your image link is created:

This can be a great way to lead your readers to other posts or pages on your blog, or to a different site altogether — for example, a post about a charity you’re passionate about can feature an image link that takes visitors to that organization’s donations page. Or, if you’re using a Creative Commons-licensed image, linking to the photographer’s site or Flickr profile could be a nice way to give credit and acknowledge the artist’s generosity.
Keep your visitors where you want them
I can hear you objecting already — “Wait! I don’t want my readers to leave my post before they even finished reading it.” Nor should you — look down the Image Details screen, and right there, at the bottom of the Advanced Options section, you’ll see a checkbox: “Open link in a new window/tab.”
Check this box, and all clicks on your image will do just that — keeping your post in your readers’ browsers, waiting for them to return as soon as they’ve explored the site to which your image led them.
Make your images stand out
Crisp, light-colored backgrounds keep your posts readable, and your visitors’ eyes fresh. They can be tough, though, when it comes to using light-colored images. The image and the background might bleed into each other, diluting the effect you create by alternating between text and image.
You should always consider the overall visual balance of your post when making changes to your images’ appearance.
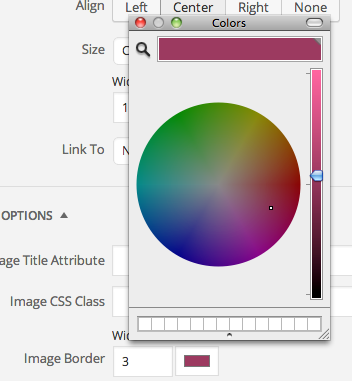
There’s an easy solution here, too — still in the Advanced Options section of the image editor, head to the Image Border setting:
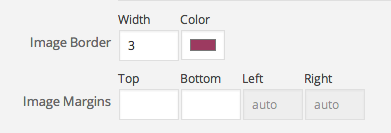
You can choose whichever border width and color you wish — clicking on the color box will make the color picker pop out — so that the image fits perfectly with your blog’s color palette and other design features. (Take a look at this post — many of the screenshots I’ve used required a subtle border to set them apart from the background.)
While it’s better to use borders sparingly, on occasion they can make a real difference in how effective a given image is.
Do you have any other image-editing tips to share? Let us know what they are in the comments.
Currently blogless? You’re a click away from sharing your story.
Create your blog at WordPress.com


This post was actually helpful..thanks!!
LikeLike
I like the new “advanced” image editor a lot, especially the custom size option. It makes it easier to align three photos in a horizontal row. I hadn’t thought of using the “Link to” option — I wasn’t even sure what it did! — but now I can see some new possibilities. Thanks for a very useful post.
LikeLike
This was VERY helpful! Gracias!
LikeLike