Photographer Wenjie Zhang introduces exposure and three elements of photography: shutter speed, aperture, and ISO.

We’ve talked about the philosophy of photography and offered a two-part overview of the craft, and now we’re ready to dig deeper. As Ming Thein discussed in his posts, light is crucial to this process. No light, no photograph.
Wenjie Zhang, the photographer at A Certain Slant of Light, is passionate about architecture, landscape, still life, and travel photography. Here in part one, Wenjie introduces exposure and three elements: shutter speed, aperture, and ISO. Next week, he’ll wrap up our light lesson and discuss the quality and direction of light, and more. Much of what’s covered below applies to those of you with SLRs and dSLRs and cameras with manual modes, but we’ll sprinkle in tips for those with cameraphones and point-and-shoot cameras, too.
Introducing Light
At the heart of every photo is a story, and like ink and paper, many elements come together to tell that story. One of these key ingredients is light. Whether it sets the mood, creates depth, or highlights a subject, the light around you and how you respond to it can often make or break a photo.
The fundamentals of seeing light:
Exposure: The amount of light captured in a photograph, and how to control it.
Quality: How “soft” or “hard” the light is, and the difference between “warm” and “cool” light.
Direction: The position of the light source relative to the scene.
Shadows and highlights: The darkest and brightest regions in a photo, where details become obscured.
Exposure
Exposure is essentially the amount of light that falls on film or the sensor of your camera, resulting in the overall lightness or darkness of a photo. It is common to hear exposures being discussed using stops, or exposure values (EV). On modern cameras, you’ll see a scale that reflects these values, typically over 6 to 9 stops, with 0 EV being the balanced value as judged by the camera. The difference between each stop is pretty noticeable, if you look at this sequence of the ArtScience Museum:


ArtScience Museum, from -3 EV to 3 EV.
Exposure is controlled by the “holy trinity” of photography: shutter speed, aperture, and ISO speed.
Shutter Speed
Shutter speed is the length of time the shutter of the camera remains open. All other factors constant, the longer this is, the more light is captured, and the blurrier moving subjects become. While walking on the streets of Shibuya, Tokyo, the brightly lit signboards and the bustling crowds caught my eye. To capture the buzz, I used a shutter speed of 1/10s, and the sense of movement in front of the signboards became pronounced.

Shibuya street scene. f6.3, ISO 200, 1/10 sec.
Aperture
Aperture is the size of the hole of the lens through which light travels, and is measured in f-stops. When the aperture opens up (lower f-stops: f1.4, f2, f2.8, f4), more light enters the camera, resulting in more light being captured. When it’s reduced (higher f-stops: f16, f22, f32), less light enters. More importantly, aperture also affects how blurred or sharp certain areas of the photo are, also known as the depth of field.
For a uniformly sharp image — especially in shots of landscapes or architecture — a higher f-stop is used. This keeps both the foreground and background of the image in focus. However, because the aperture is reduced, you’ll require a much longer shutter speed to capture the same amount of light, so that your photo does not get too dark.
Consider the picture of the Sydney Harbor Bridge below. Because I’d wanted to keep both the bridge and the Opera House in focus, I used an aperture value of f16. As a result, the shutter had to be left open for 15 seconds to achieve a good exposure:

Milsons Point. f16, ISO 100, 15 sec.
At this point, you may be wondering why anybody would use the lower f-stops. After all, sharpness in an image is always welcome. Lower f-stops are useful when you’d like to isolate the subject from everything else. This results in “buttery” images you may have seen before, like the shot below. And because the aperture is increased, less light is required to achieve a balanced exposure, making lower f-stops very useful in low-light situations.
In the picture below of the golden ceremonial crown, using a f2.8 aperture causes the surrounding details of the figurine to be blurred in an aesthetically pleasing way. As an added bonus, the light reflected off the crown creates interesting circles, also known as specular highlights, which typically are associated with lower f-stops:

Peranakan Ceremonial Crown. f2.8, ISO 800, 1/40 sec.
Cameraphone users: You may notice that popular photo apps mimic the blur effect described above. Experiment with Instagram’s tilt shift tool, which forces the focus of an image and a shallow depth of field.
Point-and-shooters: In online photo editors like PicMonkey and Pixlr, you can experiment with blurring and forced focusing in post-production with various smudge, brush, haze, and other effects.
ISO
The last member of the trinity is ISO, or light sensitivity. With all other factors constant, a low sensitivity (ISO 100 to 800) results in darker images, while higher sensitivities (ISO 3200 onwards) result in brighter images. High ISO pictures are often “noisy,” in that they become grainy or contain discoloration. As a rule of thumb, ISO is set to the lowest possible value that can achieve the desired shutter speed and aperture.
Putting it all together
Now that you have an understanding of the trinity, let’s put everything together! The exposure of an image is a combination of shutter speed, aperture, and ISO. Unfortunately, there’s no single correct combination that guarantees the perfect exposure, and behind every photographer’s image is a carefully calibrated balance between the three.
Tips for getting the right (or desired) exposure:
It requires discipline. Always plan your shot and what you want to convey.
Decide on a setting. It helps to first decide on a primary setting, whether it is shutter speed (for movement) or aperture (for depth of field).
Experiment. Then, experiment with the other two elements of the trinity to see how the photo changes. In the example below, the shot is underexposed at -1 EV, and we can either (a) opt for a longer shutter speed or (b) use a lower f-stop or (c) use a higher ISO, at the expense of image quality.

Underexposed by one stop.
Over time, balancing this trinity will become easier, leaving you to focus on the other aspects of photography.
Get outside and start shooting!
Here are a few simple exercises to put these techniques to use:
For those with (d)SLRs and cameras with a manual mode: Put your camera into manual mode and select any ISO. Set the aperture (the f-stop) to f4, f8, and then f16. At each setting, adjust the shutter speed until you get the correct exposure. What relationship do you see?
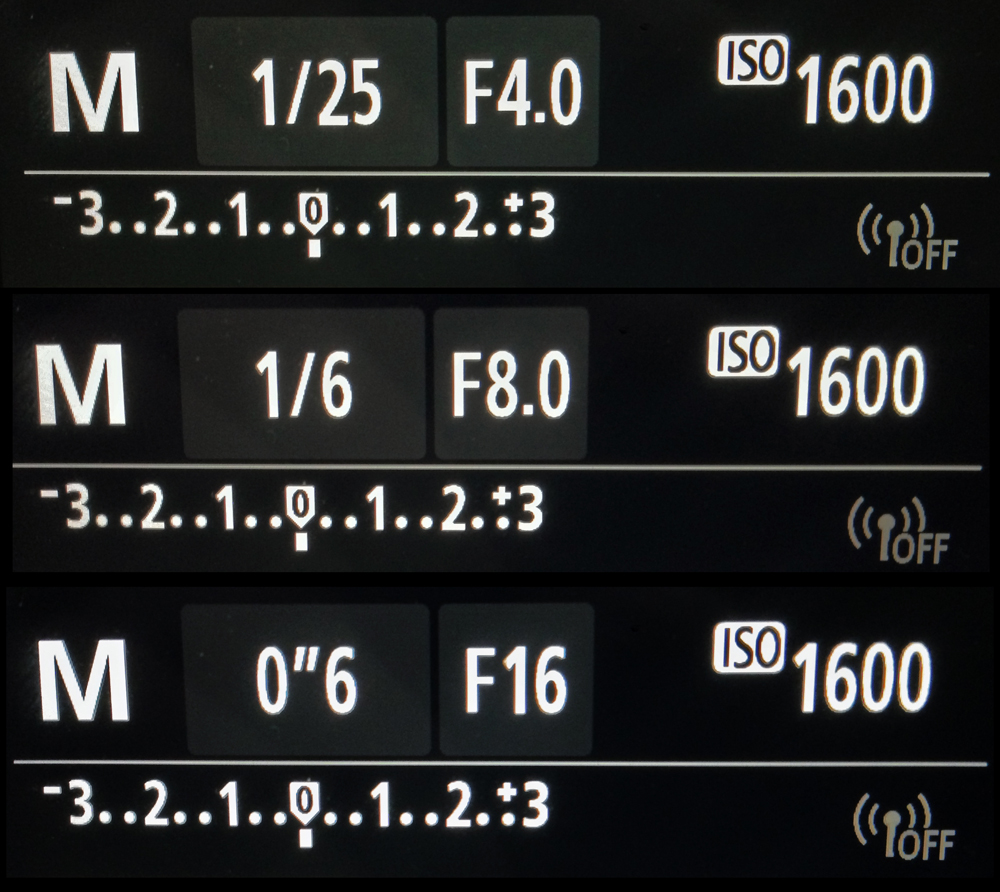
Now, set your aperture to f8, and adjust your shutter speed to 1/15 sec, 1/8 sec, and 1/4 sec. What exposure readings are you getting? Why?

Exercises for all cameras, including cameraphones, from The Daily Post editors:
Consider apps that mimic these effects. Apps like Slow Shutter Cam for the iPhone or Camera FV-5 and other “slow shutter” apps for the Android add dSLR-like manual controls to your cameraphone. To capture movement, other apps like Fast Camera shoot a sequence of photos the instant you launch the app — imitating an SLR’s ability to “freeze” motion.
Play around with the focus. On some cameraphones, you can achieve an out-of-focus photo by placing an object super-close to your lens, which may create blurry, unexpected, yet interesting images. You can often focus on something by tapping it on the screen, too — experiment with the focal point and see what kinds of effects you can create.
Next week, we’ll continue talking about light — from quality and direction, to shadows and highlights.
About Wenjie Zhang
I bought my first DSLR in January 2009, and have not looked back since. I have moved on to a full frame camera, and have the assorted backaches to show for it. My favorite subjects are typically landscapes, architecture and close-ups — basically well-behaved things that won’t develop the tendency to give me the middle finger (Charlie Chaplin mime, Rome, don’t ask). My job keeps me chained indoor most of the time, where I tap on the keyboard all day and work on developing the fairest complexion known to humankind. Since I don’t get go on photo trips and experiment as much as I would like to, my blog has evolved from lofty aspirations into a travelogue of sorts.
Previous posts in our Photography 101 series:
- Philosophy of Photography
- Viewing the World with a Photographer’s Eye, I
- Viewing the World with a Photographer’s Eye, II
Currently blogless? You’re a click away from sharing your story.
Create your blog at WordPress.com


Reblogged this on Life, Captioned.
LikeLike
Reblogged this on მაგიური სამყარო.
LikeLike
Reblogged this on Sex-Anzeiger Ostschweiz (Bodensee-Toggenburg and commented:
Wow this ist a reality 101-Photo?
LikeLike
My software and digital capabilities have made me a very lazy photographer. I remember the days I wrote my specs down when taking pictures with my 35mm.
LikeLike
Reblogged this on brandonpurplewave and commented:
purpleskybridge.com …
LikeLike
Reblogged this on keyfocusblog and commented:
I really like you picture.
LikeLike
Reblogged this on wongmangchungalexblog.
LikeLike
Reblogged this on Linda Terrelonge and commented:
Ah, so beautiful
LikeLike
Reblogged this on adminlamdongonline and commented:
http://lamdongonline.com.vn/PlaceDetail.aspx?id=10006#.UeEXH9K8CDo
LikeLike
Reblogged this on 31-ICT-Battalion.
LikeLike
Reblogged this on Marina's Zone.
LikeLike
Reblogged this on Scribe's Corner.
LikeLike
Reblogged this on Photography Period 2 and 3.
LikeLike
Reblogged this on laurenhunt03's Blog.
LikeLike
Reblogged this on laurenhunt03's Blog.
LikeLike
Reblogged this on Renaissance Inc. and commented:
Light captured.
Okay!
LikeLike
Reblogged this on A Beautiful Epiphany.
LikeLike
http://chimericalchicanery.wordpress.com/
LikeLike
Reblogged this on firmansyahfahrizal.
LikeLike
Reblogged this on kearon1121 and commented:
…..
LikeLike
Reblogged this on Ryan Photography and commented:
Another great tip for understanding light, aperture etc.
LikeLike