Use the Video block to display video content on any post or page. This guide will show you how to add video to your site and adjust its settings.
This feature is available on sites with our WordPress.com Explorer, Creator, and Entrepreneur plans. If your site has one of our legacy plans, it is available on the Pro plan.
In this guide
To add the Video block, click on the + Block Inserter icon and search for “video”. Click it to add the block to the post or page.
💡
Using your keyboard, you can also type /video on a new line and press enter to quickly add a new Video block.

For more information, visit our detailed instructions on adding blocks.
When you first add the Video block to your post or page, it will look like this:
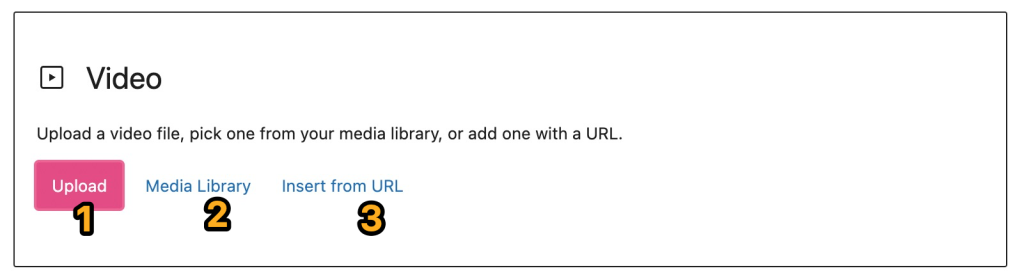
You can add your video by clicking into each of the corresponding numbered sections as explained below:
- Upload: Click to upload a new video from your computer into the Video block. See the supported file types you can upload.
- Media Library: Click to choose from previously uploaded videos in your site’s Media.
- Insert from URL: Click to insert a URL from a supported block type, such as YouTube. The Video block will automatically transform into a YouTube block.
After adding a video, you can type a caption underneath it.
Here is an example of what the Video block looks like:
After you have added a video to the Video block, you can resize it. Click the video to reveal the resize handles that look like dots around the video. Then, click on a resize handle and drag the video to your desired size:
When you click on the block, a toolbar of options will appear above it:

The Video block has the following options in its toolbar:
- Change block type.
- Drag the block.
- Move the block up or down.
- Change the block’s horizontal alignment or width.
- Add text tracks for captions, subtitles, etc.
- Replace the video with a different one.
- More options.
When you select a block, you will find additional block settings in the right sidebar. If you do not see the sidebar, you may need to click the Settings icon in the top-right corner to bring up the settings. This icon looks like a square with two uneven columns:
Click the Transform blocks to VideoPress button to convert the Video block to a VideoPress block for additional features. Learn more about VideoPress.
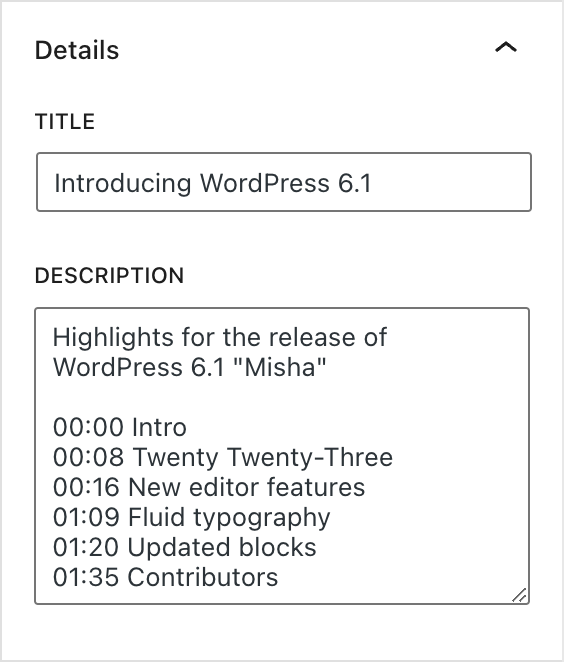
Give your video a title and add a description.
The description section can be used to describe your video or add Chapters for a quick way for viewers to navigate longer videos with clickable timestamps. See Add Chapters and Captions to a Video to learn how.
Toggle on or off the following video settings:
Autoplay: Toggle this option to play the video automatically when the page is loaded, but only if supported by the browser. Some modern browsers block this feature.
Loop: Make the video play again from the beginning as soon as it ends.
Muted: Play the video without sound.
Playback Controls: Give the viewer a play button, volume controls, HD mode, playback speed, picture-in-picture, and full-screen options.
Play Inline: Play the video inline instead of full screen on mobile devices.

The Preload options allow you to select how much of the video file is downloaded when the page or post is loaded. There are three settings:
- None: Nothing about the video file is downloaded automatically. The video file download only begins when your visitor clicks the Play button. This is the fastest setting.
- Metadata: Only basic info about the file will be downloaded automatically. Like the None option, downloading the video file only begins when someone clicks Play. This setting is also very fast, as the only thing downloaded is text.
- Auto: The entire video file is downloaded, regardless of whether the visitor clicks the Play button. This impacts your page or post’s load speed, especially with larger video files.
While it may be tempting to download the whole video file automatically, this can slow down your page’s load speed, especially if multiple videos are displayed on a single page.

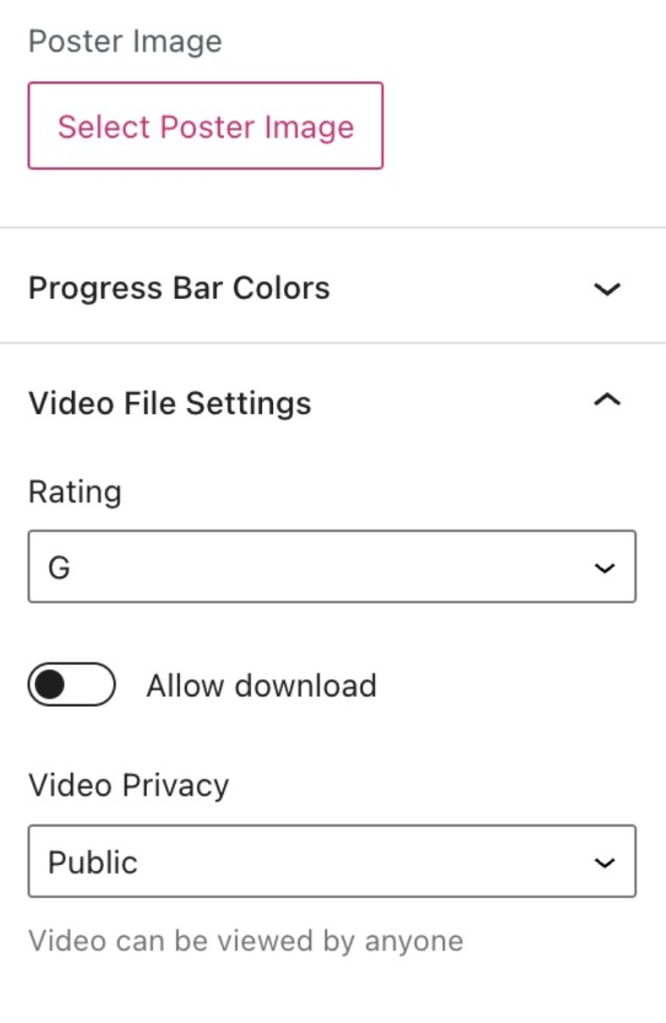
You can choose a poster image that will be displayed before the video starts to play. This can be useful if the first frame of the video isn’t necessarily appealing or indicative of the video content.
The progress bar is the area at the bottom of the video that shows how much has been watched and/or loaded.
If you enable the Match video option, the color of the progress bar will adapt to the dominant colors used in the video itself, providing an aesthetically pleasing experience for the viewer.
Here you can choose:
- A Rating for the video: General (G), PG-13, and Restricted (R).
- Allow download: With this setting enabled, viewers can download the video file via the share menu on the video player.
- Video Privacy: Choose if the video is Public, Private, or matches the Site Default (your site’s privacy setting at Settings → General).
The Video block also includes:

