Use the Table block to create structured content in rows and columns to display information. This guide will show you how to insert a table on your website.
In this guide
To add the Table block, click on the + Block Inserter icon and search for “table.” Click to add the block to a page, post, or template.
💡
Using your keyboard, you can also type
/tableon a new line and press enter to quickly add a new Table block.
For more information, visit our detailed instructions on adding blocks.
When you add the Table block, you’ll first select the number of columns and rows you want in your table:
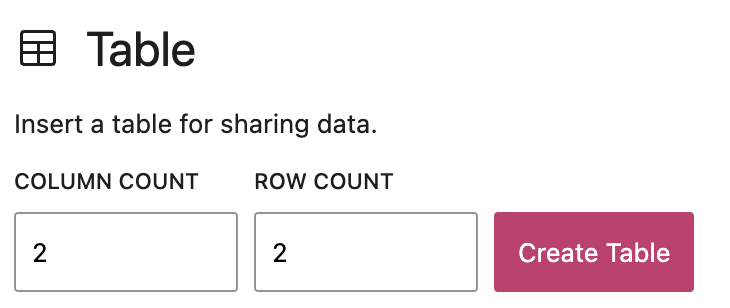
Specify the number of columns and rows in the boxes provided and then click the “Create table” button. Your table will appear, and you can begin typing in each cell of the table.
You can later add or remove columns and rows while working on a table. Here’s how:
- Click on an existing column or row in your table to select it.
- Click on the “Edit table” option in the block toolbar (the symbol looks like a table with four cells).
- Choose from one of the following options:
- Insert a new row immediately before the row you have selected.
- Insert a new row immediately after the row you have selected.
- Delete the currently selected row.
- Insert a new column immediately before the column you have selected.
- Insert a new column immediately after the column you have selected.
- Delete the currently selected column.
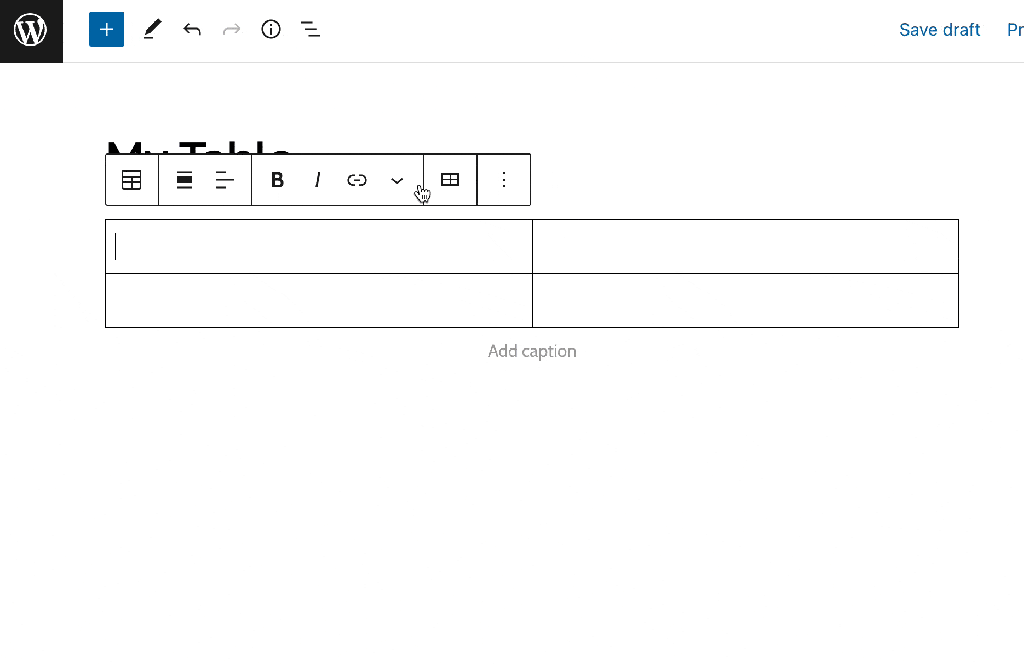
When you click on the block, a toolbar of options will appear above or below it:

The Table block has the following options in its toolbar from left to right:
- Change block type.
- Drag the block.
- Move the block up or down.
- Change table alignment.
- Change column alignment.
- Bold the text of your cell.
- Italicize the text of your cell.
- Add a link to the text in the cell.
- More text formatting options.
- Edit the table (described in the previous section of this guide.)
- More options.
When you select a block, you will find additional block settings in the right sidebar. If you do not see the sidebar, you may need to click the Settings icon in the top-right corner to bring up the settings. This icon looks like a square with two uneven columns:
You have the option to tell the table to use “fixed width table cells“, which means all columns will be equal in width rather than adapting the column widths to the content of the table.
The header section and footer section will each add an additional row to your table. The header section is typically used to add titles to the top of each row. The footer can be used to add an additional row at the bottom.
The Table block also includes Advanced settings.
In the block settings sidebar, click on the Styles icon to access the design settings for the block. The Styles icon is in the shape of a circle with half of the circle filled in:
There are two styles available for tables: Default and Stripes:
- The Default style has a plain background and borders around the cells.
- The Stripes style has alternating row background colors.
The final appearance of the table may vary depending on your theme.
More details on the standard block styles can be found in the following guides:
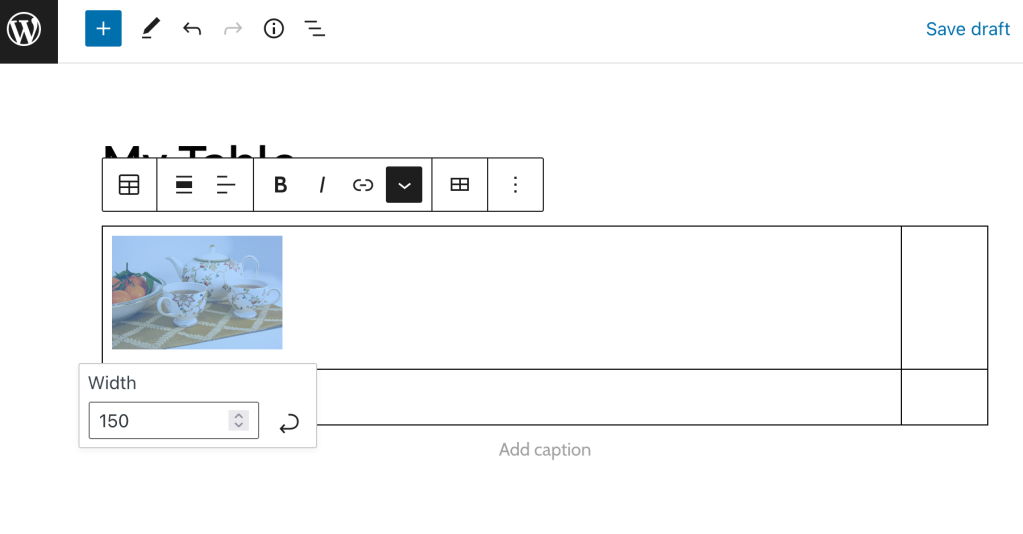
To add an inline image to a table, click on a cell in the table and then click the downward arrow and select Inline image. The Media Library window will open to allow you to select an image to add.
To change the size of an inline image, click on the image, type or select a number for the image width, and then use the curved arrow button to apply the changes: