In addition to our collection of themes, you can upload third-party themes to your WordPress.com site, including themes from WordPress.org, popular marketplaces like Themeforest, and even themes you have custom-made for your website.
This guide will show you how to upload any theme to your WordPress.com site.
This feature is available on sites with the WordPress.com Creator or Entrepreneur plan. If your site has one of our legacy plans, it is available on the Pro plan.
In this guide
To install a theme from WordPress.org, follow these steps:
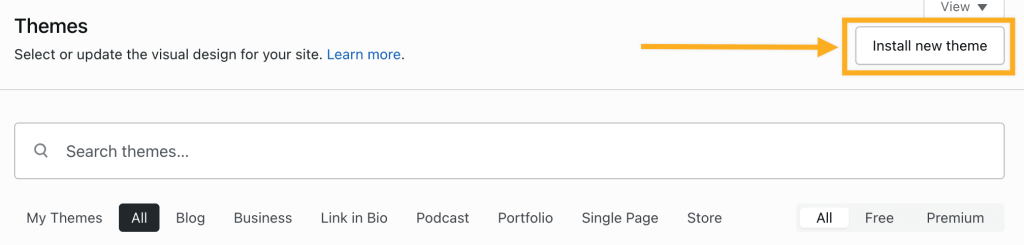
- Visit your site’s dashboard.
- Navigate to Appearance → Themes.
- Click the Install new theme button in the top right corner to view WordPress.org themes.
- Locate your chosen theme in the list or use the search function to find themes by name.
- Hover your mouse over your chosen theme and click the “Install” button.
- Click “Activate” to apply the theme to your live site.
- Set up your theme as discussed in this section.

If you have the files for your desired theme, you can upload the theme by following these steps:
Start by downloading the theme’s .zip file from wherever you purchased the theme. Do not unzip the file.
- For themes from WordPress.org, clicking “Download” on any theme will save the .zip file to your computer.
- If you (or a developer you hired) created your own custom theme, save it as a .zip file.
- For themes purchased through Themeforest/ Envato, you must choose the “Installable WordPress file only” option when downloading the theme:

Once you have the theme’s .zip file, follow these steps to upload it to your WordPress.com site:
- Go to Appearance → Themes in your site’s dashboard.
- Click on the “Install new theme” button.
- Click the “Upload theme” button and choose the file from your computer:
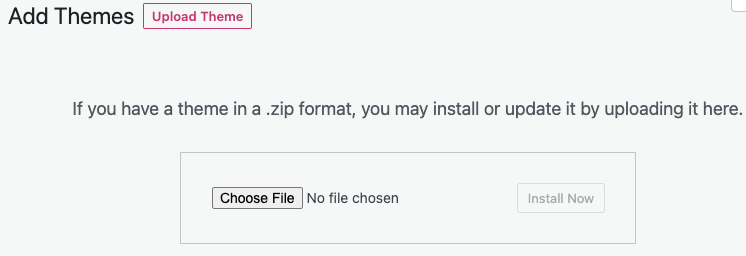
- Click the “Install Now” button.
If you see the error The theme does not have a style.css file, check the .zip file you are uploading does not contain other files (like documentation, for example). Make sure that you have downloaded the “Installable WordPress file only” and that it has not been unzipped/extracted automatically by your computer, as explained in the previous step.
If you’re ready to start using the theme right away, click the “Activate” link:

To preview the theme before activating it, click “Live preview,” if available. You may be able to adjust some theme settings before applying the theme to your site. Click “Activate & Save” when you’re done adjusting the settings and are ready to activate the theme.
After activating a theme on your site, you’ll want to set it up to look exactly how you want. Every theme is different, but these general tips will help you get started:
- Refer to your theme’s setup instructions. Any good theme will come with guides/ documentation that shows you how to use the theme.
- Sometimes a theme will require some plugins to be used with it. Go to Plugins → Installed Plugins and look for a notice at the top to install the theme’s recommended plugins, if any.
- Check for demo content you can add with your theme.
- Go to Appearance → Customize to check for any theme setup options you can customize.
Your third-party theme may include a method to import or install demo content. The most common methods to make your site look like the theme’s example or preview include:
- Import an XML file of demo content that came with your theme files. You can upload this to your site by going to Tools → Import and choosing the WordPress import option.
- Use a demo content importer plugin. Please consult your theme’s support guide/documentation or contact your theme’s support for help with this.
If you are using a theme that WordPress.com did not create, we are limited in how we can help you with it. We recommend that you contact your theme’s support service directly. They will be the most familiar with the theme and can offer expert support.
If you’ve already looked through the WordPress.com theme showcase, but haven’t yet found the perfect design for your site, there’s no need to worry – there are thousands of themes out there for every type of website imaginable.
First, read our advice on choosing the perfect theme.
Here is a list of popular places for third-party themes:

