You can personalize your site’s look and feel by giving it a background color or image. Follow the steps in this guide to learn how.
In this guide
Setting a background color or image can be a great way to show your personality and distinguish your site from others. Keep in mind these tips as you decide on how to customize your site’s background:
- Choose colors that complement each other, without clashing or making it difficult to read your website’s text.
- Depending on the image you use, a background image can make it difficult to read the text on top of it. For best results, choose a subtle image or plain pattern that won’t obscure your site’s content.
- Choose a high-quality image that will span the full width of your site without appearing blurry. Take advantage of our free photo library for high-quality images.
If your site uses a theme that supports the site editor, you can change your site’s background using this method. A quick way to determine if your site uses the site editor is to check under Appearance in your dashboard. If you see Editor here, you can change your site’s background by following these steps.
- In your dashboard, navigate to Appearance → Editor.
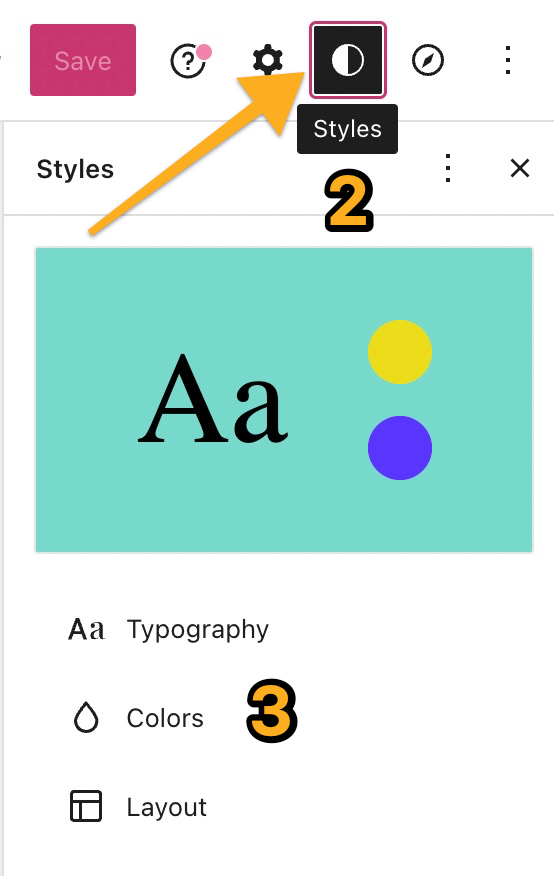
- Click on Styles on the left, or select the Styles icon as shown here. The icon looks like a black-and-white circle.
- Click on the Colors option.
- Click on the Background option.
- Select your desired color using the color picker. You can choose a solid color or define a gradient.
- Click the “Save” button.
To place a background image behind a page’s content, you can follow the method below to group all the content into one container (known as a Group block) and then add a background image to the container.
You can use this method to insert a background image behind a section of a page or to use it as a full-page background image that includes your site’s header and footer, the page title, and all other content.
To add a background image:
- In your dashboard, navigate to Appearance → Editor.
- Open whichever page (for partial background images) or template (for full page background images) you wish to add a background image to.
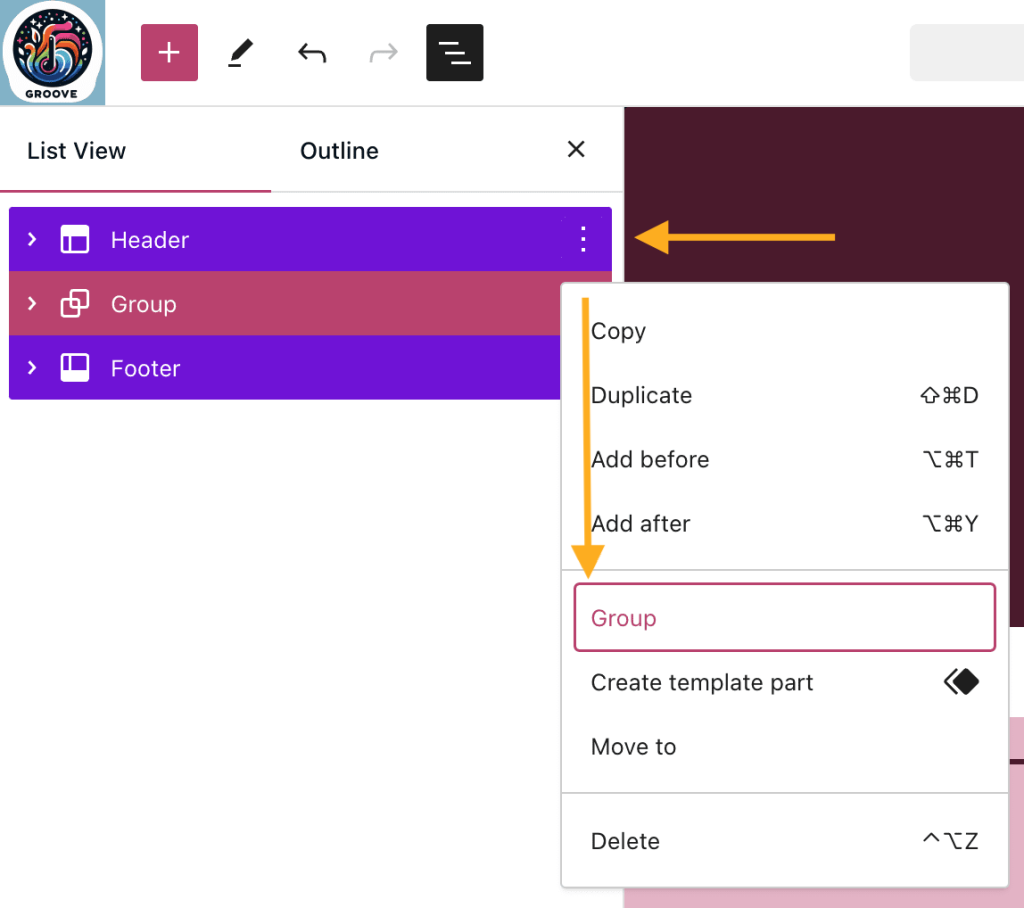
- In the upper left corner, select the List View icon (it looks like three horizontal lines) to view a list of all blocks on the page.
- Select all the blocks you wish to add a background image to. If you want a full-page background image, use the keyboard command CTRL + A on PC or CMD + A on Mac to select all blocks. Learn how to select multiple blocks here.
- Click the ellipses (three dots) to open up options for the selected blocks. Select the “Group” option to group all the blocks together:
- In the Group block settings sidebar on the right, click on the Styles tab.
If you do not see the sidebar on the right, click the Settings icon in the top right corner to bring up the settings. This icon looks like a square with two uneven columns:

- Under Background, click on “Background image” to select one of the following options for adding the background image to the block:
- Open Media Library: Select an existing image from your site’s Media.
- Upload: Add a new image from your computer or device.
- Reset: Remove the background image.
- After choosing a background image, you can click on the three dots menu next to “Background” to define the Size option for your image. Learn more about these options in the Group block guide here.
- Click the “Save” button to complete your changes.
In classic WordPress themes, you may find a background image setting in the Customizer. A quick way to check if your site has a classic theme is to check under Appearance → Customize in your dashboard. If you see Colors & Backgrounds here (not all classic themes include this option), you can change your site’s background by following these steps.
- Visit your site’s dashboard.
- Navigate to Appearance → Customize.
- Click on the Colors & Backgrounds tab.
- If you don’t see Colors & Backgrounds under Customize, your theme does not support changing the colors and backgrounds. We recommend switching to a site editor theme for full control over your site.
- On the next screen, view the Background setting. Customize your site’s background by clicking into each of the corresponding numbered sections as explained below:
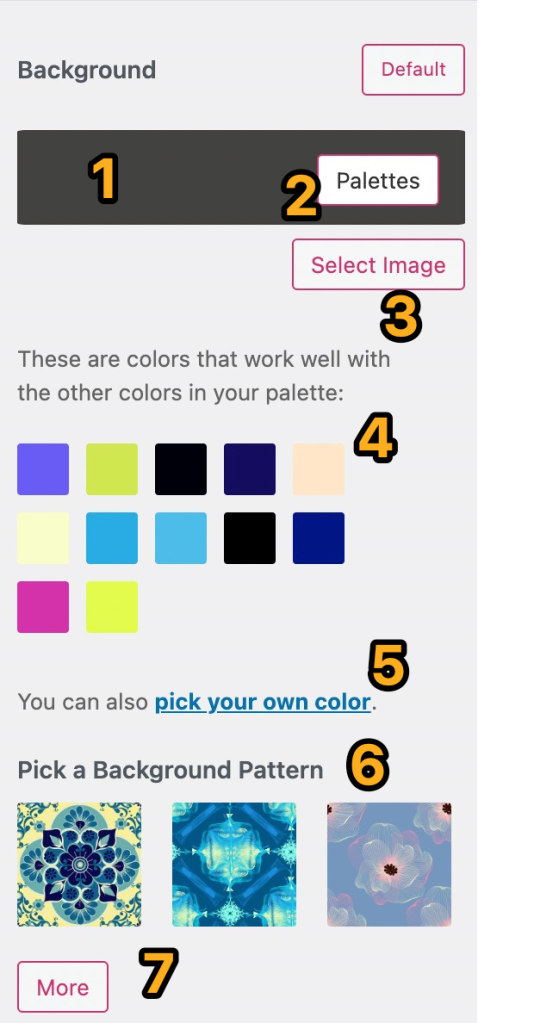
- Click into the colored box area to pull up the options available for customizing the background on your theme.
- Click on Palettes to select a new color palette for your site.
- Click Select Image to choose an image to use for your background. This option will only appear if your theme supports background images. Learn more about Background Image below.
- Click on any of the automatic color suggestions to use it for your site.
- Click on the pick your own color link to open up the color picker and use it to set a custom color for your background.
- Click on any pattern to use it as the background for your site.
- Click on the More button to load additional patterns to choose from. After you’ve clicked the More button once, a Back button will appear next to it. You can use it to load the previous patterns within the selection. Background patterns are provided by COLOURlovers.
After you’ve selected an image to use for the background of your site (see #3 above), an Options button will appear directly below it. Click on that, and you’ll see several settings to manage the display of your background image, as explained below:

- Click Select Image to choose an existing image from your media library, or upload a new one.
- Click Options to open up the additional settings for your background image display.
- Click on the icons to adjust the position of your background image.
- Position controls where the background image is aligned: left, center or right.
- Repeat determines if an image appears once, repeats vertically, repeats horizontally, or tiles.
- Fixed Position means the image stays fixed in place when you scroll up and down the page.
- Underlying Color is the color that loads behind the background image.
- Click into the colored box to open up the color picker, where you can select a different Underlying Color for your background.
- Click Hide background image to remove the current image and select a different one, or use a solid background color or pattern instead.
Once you’re finished making changes, click the Save Changes button at the top of the screen to save your background.