Testimonials on WordPress add credibility and a professional feel to your site. This guide will show you how to create and share positive comments from customers and clients on your website.

In this guide
To enable testimonials on your WordPress.com site, take the following steps:
- Visit your site’s dashboard.
- Navigate to Settings → Writing.
- Scroll down to the “Content types” section.
- Toggle on the switch next to “Testimonials“.
- Optionally, choose the number of testimonials you’d like to display on testimonial pages. (This setting may not apply depending on which method you later use to display your testimonials.)

To create your first testimonial, take the following steps:
- Visit your site’s dashboard.
- On the left side, click on Testimonials.
- Click the “Add new testimonial” button to open the editor screen.
- Type the testimonial author’s name in the title field at the top.
- If you would like an author photo or logo displayed, add it as a featured image to each testimonial.
- Adjust the remaining testimonial settings (described below).
- Click the “Publish” button in the upper right corner to make the testimonial live.
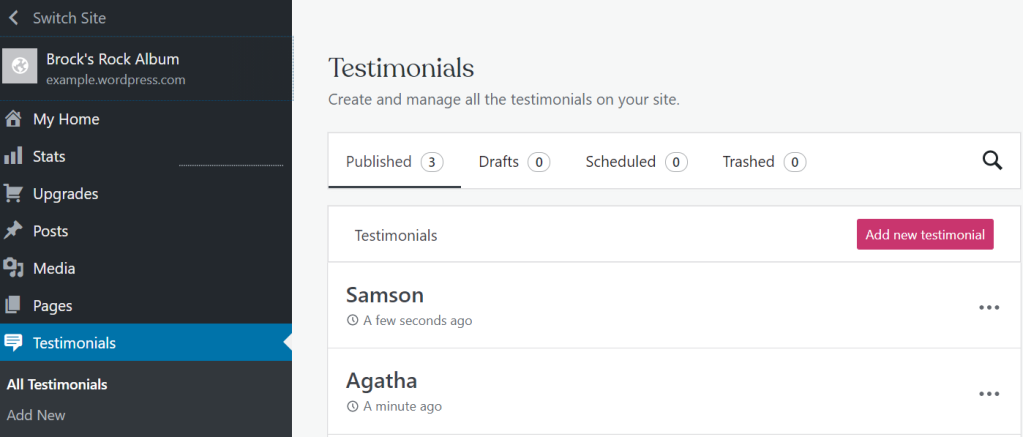
You can view and manage your site’s testimonials in the Testimonials section of your dashboard:
When working on a testimonial, you’ll find the testimonial settings in the sidebar on the right side of your screen.
If you do not see the sidebar on the right, click the Settings icon in the top right corner to bring up the settings. This icon looks like a square with two uneven columns:

You can control the following aspects of the testimonial here:
- Under Summary, you will find the following options:
- Use Visibility to make the testimonial public, private, or protected behind a password. Learn more.
- Set the testimonial to Publish immediately or choose a date and time in the past or future. Learn more.
- Select the Template that will control how the content of your testimonial is presented. The default template used for testimonials is Singe posts. Learn more about templates.
- See and change the URL of the testimonial. Learn more.
- Mark the testimonial as “Pending review” for other users of your site. Learn more.
- Click “Switch to draft” to revert an already-published testimonial to a non-public draft.
- Write an excerpt (a short summary) to describe the testimonial. Learn more.
- Revisions: Using revisions, you can restore previously saved versions of the testimonial. This option will appear only after you have saved some changes to the testimonial. Learn more.
- Choose a featured image to represent the testimonial. Learn more.
- Post Attributes: Designate an order number for the testimonial. Learn more.
By now, we recommend that you have created and published a few testimonials. Next, we’ll look at the different ways you can show your testimonials on your website.
After activating testimonials and publishing at least one, your site will automatically create a new page with your testimonials. To view this page, add /testimonial to the end of your website’s address like this:
https://yourgroovysite.wordpress.com/testimonial/
(replace yourgroovysite.wordpress.com with your site address.)
All of your testimonials will automatically appear on this page of your site in chronological order with the most recent first. If you wish to change the order, you can adjust the date the testimonial was published in the testimonial settings.
Themes that support the Site Editor can edit the layout of this page. To edit the layout of the default testimonial page, edit the All Archives template.
Pages are also created for each individual testimonial. You can view these pages using the following URL structure:
https://yourgroovysite.wordpress.com/testimonial/insert-name
(replace yourgroovysite.wordpress.com with your site address and insert-name with the title of your testimonial.)
You can design your own testimonial page from scratch. Take the following steps to create a new page for your testimonials:
- Visit your dashboard.
- Click on Pages on the left side.
- Click on the “Add new page” button.
- Optionally, choose a pre-defined page layout or click “Blank page” to create an empty page.
- Insert a Query Loop block and select “Testimonial” as the post type setting. This will automatically pull in the testimonials you created earlier.
- Using the WordPress editor, add any text, images, and any other content blocks you wish to display on your testimonial page.
- Click the “Publish” button in the upper right corner to make the page appear on your website.
You may add this page to your site’s menu for visitors to view your testimonials.
Although not commonly used, the [testimonials] shortcode can also display a list of your testimonials.
Add the [testimonials] shortcode to a post or page using the Shortcode Block. The shortcode will display testimonials in different ways, depending on how you use the following attributes to customize the testimonials shortcode layout:
Testimonials Shortcode Attributes (click to expand)
- display_content: display testimonial content. (full/true/false)
- image: display the featured image. (true/false) Defaults to true.
- columns: number of columns in shortcode. Defaults to 1. (number, 1-6)
- showposts: number of testimonials to display. Defaults to all. (number)
- order: display testimonials in ascending or descending chronological order. Defaults to ASC for sorting in ascending order, but you can reverse the order by using DESC to display testimonials in descending order instead. (ASC/DESC)
- orderby: sort testimonials by different criteria, including author name, testimonial title, and even rand to display in a random order. Defaults to sorting by date. (author, date, title, rand)
Here’s an example:
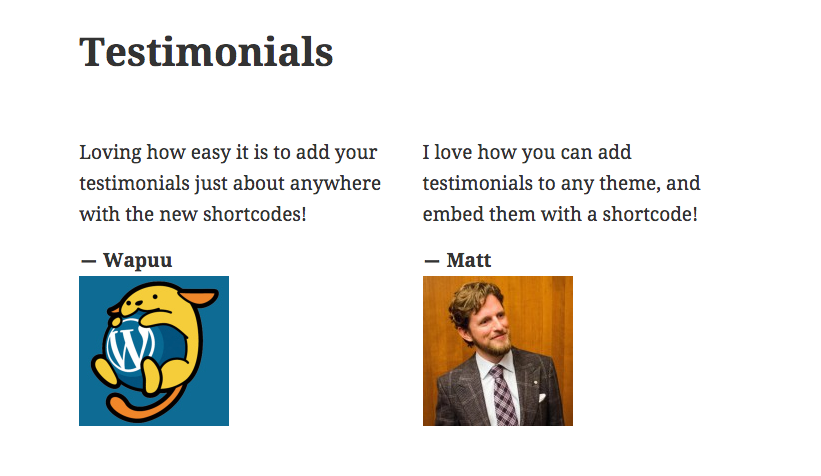
[testimonials columns=2 showposts=10 orderby=title]
The example will display up to ten testimonials in two columns, in ascending alphabetical order by testimonial title:
If any of the Testimonial page links result in a “Page Not Found” error, this can be fixed by disabling and re-enabling the Testimonial content type. Go to Settings → Writing and scroll down to the “Content types” section, uncheck the Testimonials option, save your changes, and then re-check the Testimonials option and save your changes again.

