Newsletter features allow readers to subscribe to your website or blog and receive email notifications about new posts you publish. This guide will show you how to send email updates to your readers.
In this guide
On WordPress.com, any reader can follow (subscribe to) your blog to receive an email whenever you publish a new post. To encourage readers to subscribe to your site, add the Subscribe block to your homepage, sidebar, footer area, or any post or page. You can also enable a pop-up notification in the Newsletter Settings to encourage visitors to subscribe.
You can make use of Block Patterns to easily add beautiful premade designs to encourage subscribers to sign up, like this example:

People logged into a WordPress.com account can also subscribe to your site by clicking the Subscribe button in their action bar. Readers without a WordPress.com account can click the Follow button and input their email address instead. For more information about this, see our Subscribe to Blogs guide. This feature is enabled on all WordPress.com sites by default, so there’s no action you need to take to activate it.

When you publish a new post, the notification email is sent automatically by WordPress.com. You can also schedule posts for a future date — the notification email will be sent soon after the post goes live on your site.
By default, your post will be accessible to everybody and emailed to all of your subscribers.
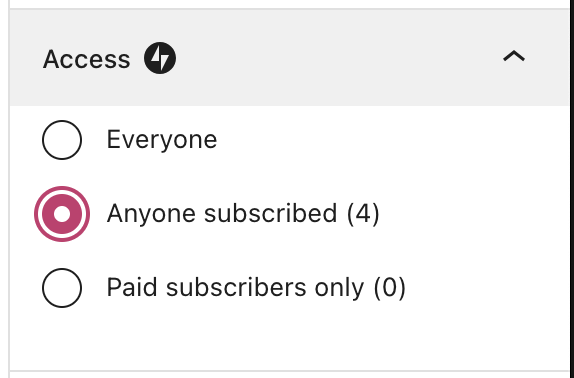
You can control who can view the post using the Access settings available when creating a post. You can choose one of the following options:
- Everyone: the post will be visible to everybody.
- Anyone subscribed: the post will be visible to your subscribers only. This includes free subscribers. Anyone who has not subscribed will see an option to subscribe to view the post.
- Paid subscribers only: the post will be visible to subscribers who have paid through a payment plan you have set up. See Create a Paid Newsletter for more.
Your subscribers can decide to receive an email each time you post or to receive daily or weekly digests of all of your new posts. They can also change their subscription to receive no emails but to read your blog only in the WordPress.com Reader.
WordPress.com will only send out notifications for new public posts. Publishing other content types (like pages or a custom post type) or updating an already published post will not send a notification e-mail. If your site is set to private, your subscribers will not receive any email notifications of your posts.
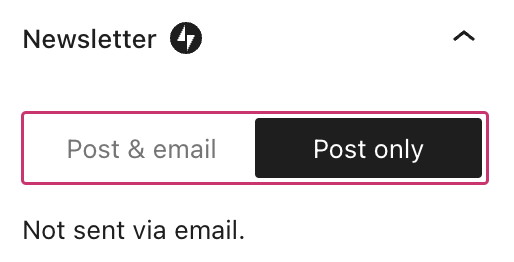
Sometimes, you may not want an email notification to go out for a new post. In that case, take the following steps:
- Click the “Publish” on a new post to reveal the pre-publish checks.
- Under the “Newsletter” section, select “Post only.”
- Click the “Publish” button again to publish the post without an email.
On plugin-enabled sites, you can stop all post notification emails by turning off the Jetpack Newsletter. Turning off the Newsletter also means new subscribers cannot subscribe to your blog. This cannot be turned off on sites that do not have plugins enabled.
To turn off the Newsletter:
- Visit your plugin-enabled site’s dashboard.
- On the side, click Jetpack → Dashboard.
- In the upper right corner, click the Settings button.
- Select the Newsletter tab.
- Disable the “Let visitors subscribe to new posts and comments via email” option.
The email notifications described so far in this guide are useful for site owners who wish to have emails sent automatically. However, you may wish to have more control over the appearance and schedule of emails sent to your subscribers. In that case, you can use a third-party newsletter service to create an email list, design custom email templates, and schedule emails.
With our plugin-enabled plans, you can design and send a custom newsletter on your schedule with the MailPoet plugin. MailPoet provides greater control over email design and delivery schedules. You can start with the MailPoet beginner’s guide.
You can also integrate other popular third-party newsletter services like Mailchimp, MailerLite, or any other newsletters with plugins.
Sites without custom plugins can use built-in Mailchimp block or MailerLite Classic integration.

