Post by Email is a way of publishing posts on your blog by email. Any email client can be used to send the email, allowing you to publish quickly and easily from devices such as cell phones. Please note you can only publish to one blog using one e-mail message at a time.
In this guide
- Generating a Post by Email Address
- Sending Emails
- Media and Attachments
- Shortcodes
- Providing a Post Title
- Changing The Post Status
- Specifying Categories
- Specifying Tags
- Changing Your Auto-Sharing Settings
- Inserting a Crowdsignal poll
- Delaying Your Post
- Geotagging
- Signatures
- Example Email with Shortcodes
- Additional Information
Before you can publish by email, you must generate a special email address. This address is unique to you and must be kept secret (anyone that knows the email address can publish a post to your blog).
- Go to your profile by clicking on your profile picture on the top right corner of WordPress.com.
- Click on the Manage Blogs option in the left-side menu.
- Locate the blog that you wish to post to and click Enable in the Post by Email column.
- You now have a special email address you can use for sending post by email.


- Go to Settings → Writing in the left sidebar of your site dashboard.
- Scroll down to the Publishing Tools section.
- Click the toggle next to Publish posts by sending an email.
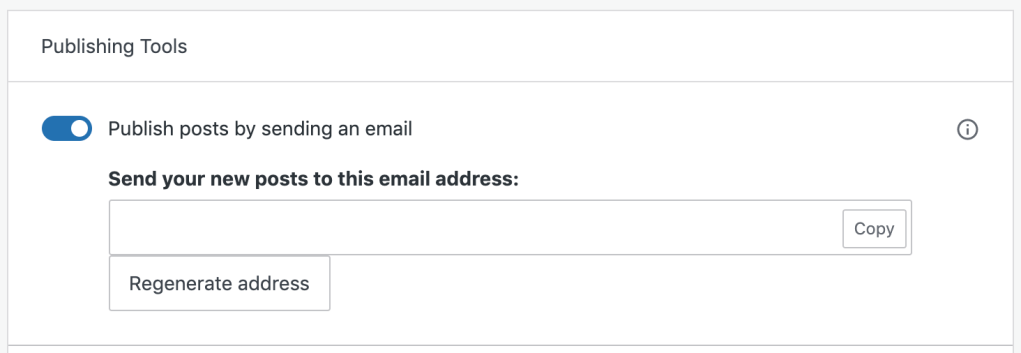
Once you have your Post by Email address, you can use that to publish posts to your site.

The email subject is used as your post’s title. The body is the post’s contents. A few minutes after sending your email, you should receive a notification email informing you of the published post’s details.
⚠️
Please remember to send the email to your secret email address, not the example given in the image above.
Your email can be plain text or formatted. As much formatting as possible will be retained, although the Post by Email system will strip unnecessary HTML tags so that your email is displayed correctly. Note that you will need to use an email client that supports rich text or HTML formatting in order to make use of this feature. Most email clients do support this. You may need to switch your client into rich text or formatted mode.
Image attachments will be included in your published post as follows:
- Single images will be displayed inline (a single image is defined as an image without an image immediately following it).
- Multiple images will be displayed as a gallery.
Multiple galleries and single images are allowed in the same post. Note that using the [nogallery] shortcode will disable all galleries.
You can also send attachments separately to: media+YOUR_SECRET_EMAIL@post.wordpress.com. Your attachments will just be stored in your account without creating a new post – the attachments will appear alongside your other media.
If you have purchased a paid WordPress.com plan, the following additional attachment types will be supported:
- Supported audio files (mp3) will be displayed using the WordPress Audio player.
- Supported video files (mp4, mov, wmv, avi, mpg, and m4v) will be displayed using the WordPress video player, available on specific plans.
- All other files (doc, PDF, etc) will be displayed as links to the attachment.
Special shortcodes can be embedded in your email to configure various aspects of the published post. The supported shortcodes are:
[title Your post title][slug your-post-slug][status publish | pending | draft | private][password secret-password][excerpt]some excerpt text[/excerpt][category x,y,z][tags x,y,z][delay +1 hour][comments on | off][nogallery]– disables the auto-gallery and displays all images inline[ slideshow ]– (use without spaces) replaces the auto-gallery with a slideshow[poll]questions and answers[/poll]– insert a Crowdsignal poll into your post (details below)[publicize off | twitter | facebook][geotag on | off]– override your geotagging privacy defaults to enable or disable the showing of geo information[more]– add a more tag[nextpage]– create pagination[end]– everything after this shortcode is ignored (i.e. signatures). Make sure it’s on its own line with a blank line above it.
We have provided further details on many of these shortcodes in the remainder of this guide.
The title of your published post is usually taken from the subject line of your email. In some instances, such as when sending an email from some cell phones or via a MMS-Email gateway, you may not be able to provide a subject. In this instance, you can set your post title directly inside the email:
[title My Fancy Post]
If you use both the email subject and the shortcode, the title specified in the shortcode will be used.
Sometimes you may want your post to be private, or to be reviewed by yourself or someone else at a later date before being published. To do this, you can use the [status] shortcode to set the post status.
[status private]
The category shortcode will match the start of category titles, as well as category IDs. For example:
[category Hol, Food, 1894]
Will match “Holiday,” “Food,” and the category on your site with the ID 1894. Note that categories must already exist on your blog and spaces between the commas are not important.
Any number of tags can be added to your post, each separated by a comma within the shortcode.
[tags one potato, two potato, three potato, more]
This will add four tags: “one potato”, “two potato”, “three potato”, and “more”. Note that your tags do not need to exist elsewhere in your blog and new tags will be created automatically.
Auto-sharing lets you notify other web services about your posts. With the [publicize] shortcode you can control this from emails.
[publicize off]– disable all notifications[publicize twitter]– only send a notification to X (formerly known as Twitter)[publicize twitter]my new post[/publicize]– only send a notification to X and set the X status to my new post
Note that your settings must have been previously configured.
You must first have created or imported a Crowdsignal account into WordPress.com before using this shortcode. Once setup you can insert a poll in an email as follows:
[poll]What is the worst movie of the decade?
* The Love Guru
* Fool’s Gold
[/poll]
Note how the poll question is added after the [poll] shortcode. Each answer is on a new line and starts with an asterisk. The poll must be finished with [/poll].
You can configure your poll by adding extra details to the [poll] shortcode:
type="single|multi|2|3"– how many times a vote may be registered (single by default)other="yes|no"– allow an ‘other’ response (no by default)
For example, to create a poll that allows up to three responses (including an ‘other’ response):
[poll other="yes" type="3"]What is the worst movie of the decade?
* The Love Guru
* Fool’s Gold
[/poll]
The delay shortcode will accept any time allowed by PHP’s strtotime. For example, you can:
[delay +1 hour]
[delay +2 days]
You can also schedule a post to be published at a precise time, as in this example:
[delay 2013-12-01 11:30:00 EST]
The shortcode above will schedule a post to be published on December 1, 2013, at 11:30 a.m. Eastern Standard Time.
If your email includes an image that contains appropriate GPS information (for example, as sent from iPhone), then this will be used to geotag your post. Information will only be shown to the public if you configure your blog to do so. You can override this on a per-email basis using the [geotag on] and [geotag off] shortcodes.
Emails sent from a SPOT GPS device will be automatically geotagged.
Post by email will automatically remove any email signatures that match the standard signature block pattern:
--
(that is dash dash space)
It will also remove anything after a <hr/> HTML tag and attempts to clean up cellphone network signatures.
If your email system attaches a signature that does not match any of these patterns then you can manually tell Post by Email to stop including text by adding the special [end] shortcode on its own line with a blank line above it. Anything after this will be removed from your post. If your cellphone network is adding a signature and you want us to remove it, then let us know the details and we’ll look into it.
The following email will be published in two days’ time to the “WordPress” category, with tags “announcement” and “WordPress”:
Welcome to Post by Email, the easiest way to blog!
[tags announcement, WordPress]
[category WordPress]
[delay +2 days]
- If you want to add the address to your address book, you can download it as a vCard. Click the vCard button in the My Blogs dashboard to save it to your device.
- The secret email address is per-user account, not per-blog. If you have a multiuser blog, each of your blog’s users can create their own Post by Email address, regardless of their user role.
- For users in the Contributor user role, any emailed posts will be saved as pending, rather than published. They will receive confirmation of their post with the post content in the email, but will not receive a second email when their post is approved.
- Clicking Regenerate or Regenerate Address will give you a new secret email to use.

