A permalink (i.e., permanent link) is the URL of your page, blog post, and other content on your site. Use the permalink to share a link to your content on social media, in an email, or anywhere else online. This guide will explain how to find and change the format of your site’s permalinks.
In this guide
This is an example of a permalink for a page:
https://yourgroovydomain.com/my-page
This is an example of a permalink for a blog post:
https://yourgroovydomain.com/2024/01/01/first-blog-post
In the above examples, the last part of the URL address (known as the ‘slug’) is my-page and first-blog-post. The slug is the part of the URL that refers to that specific page. WordPress automatically generates the slug when you give a page, post, category, or tag a title. For media items, the file name on your computer or device is used for the permalink.
If you create a page called ‘Home’ that is not set as your homepage, the page will receive a slug just like any other page, e.g., https://yourgroovydomain.com/home. Once you set this page as your homepage, the slug will be removed, and the URL will change to just https://yourgroovydomain.com.
No two pages, posts, or media items can share the same permalink address. If WordPress detects the same URL being used more than once, it will add a number to the URL to differentiate it.
For example, if you wrote a post titled “Happy New Year”, the permalink would use happy-new-year for the URL. If you were to write a similar post with the same title the following year, the permalink would be happy-new-year-2 to ensure that the two posts have unique addresses. You can change the number to something else by following the steps in the next section.
You can customize the last part of the permalink (i.e. the web address/URL) by following these steps:
- In your site’s dashboard, navigate to Pages or Posts.
- Click on the page or post you wish to edit.
- Open the settings sidebar.
If you do not see the sidebar on the right, click the Settings icon in the top right corner to bring up the settings. This icon looks like a square with two uneven columns:

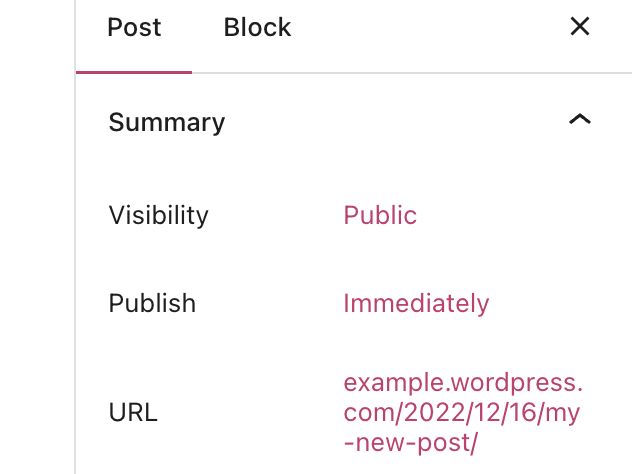
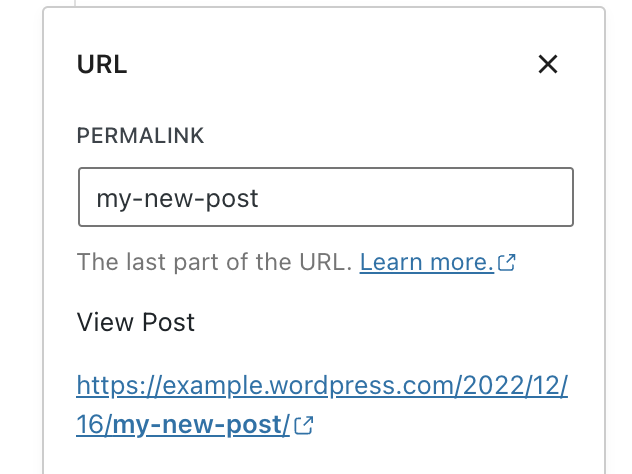
- Under the “Summary” section, locate the URL. Click on the link here to open a pop-over where you can change the permalink.
- Type the new text and click the X to close the pop-over. The permalink will update with the new text.
- Click “Update” or “Publish” to save your changes.
URLs cannot accept certain characters like spaces, punctuation marks, currency symbols, and anything else that isn’t a letter or a number. In those cases, the special character is either replaced with a hyphen ( – ) or omitted from the URL entirely.
Follow the steps below to view the URLs slugs for category and tag pages. On plugin-enabled plans, you can edit the slugs used for the URLs.
These instructions are referring to the WP-Admin interface. To view this interface, click the View tab in the upper right corner and select Classic view.
- Visit your site’s dashboard.
- Navigate to Posts → Categories or Posts → Tags.

- The Slug column will display the last part of the URL used for category and tag pages:

- Hover your mouse over a category or tag and click the “Edit” link.
- Look for the “Slug” field (plugin-enabled plans only)
- Type the new text for your URL.
- Click the “Update” button.
This section of the guide applies to sites with the WordPress.com Creator or Entrepreneur plan. If your site has one of our legacy plans, this feature is available on the Pro plan.
By default, WordPress creates post URLs with the date and name. You can customize this URL structure of your site’s web addresses/links (i.e., the permalinks) to adjust the aesthetics and usability of your post links.
Take the following steps to customize your site’s permalinks:
- Ensure your site has an eligible plan that has been activated.
- From your dashboard, go to Settings → Permalinks.
- Choose from one of the following permalink structures:
- Plain
- Day and name
- Month and name
- Numeric
- Post name
- Custom structure
- Click “Save Changes” at the bottom of the screen.
⚠️
If changing from the default “Day and name” permalink setting to “Post name”, posts will not automatically redirect from the old links. To set this up, use a redirection plugin.

You can also change the structure of category and tag URLs here. Furthermore, you may have additional options from plugins installed on your site. For example, if you have installed the WooCommerce plugin, you can change the permalink structure for product URLs.
Sometimes, you may encounter errors related to permalinks. A troubleshooting step you can take is to reset the permalinks by doing the following:
- From your dashboard, go to Settings → Permalinks.
- Under Common Settings, take note of your current permalink structure settings.
- Select a different permalink structure and click Save Changes.
- Reselect the permalink structure you initially had.
- Click Save Changes.
This action resets your permalinks.

