Do you already own a domain name? Follow the steps in this guide to transfer the domain from another provider to WordPress.com and use it with your WordPress website.
In this guide
Domain transfers typically take 5-7 days. If you want to use your domain more quickly, connect your domain first, then initiate the transfer from the company it’s registered with.
Never cancel your domain during a transfer. Your current provider will remove it automatically after the transfer to WordPress.com is done.
Your domain must meet the following criteria to be able to transfer it to WordPress.com. You can transfer a domain if it is:
- More than 60 days old.
- Has not been transferred within the past 60 days.
- On our list of TLDs that support incoming transfers (all major extensions supported, including .com, .net, and .org.)
If your domain is not eligible, connect it to your WordPress.com website now and transfer it to WordPress.com when it becomes eligible.
Our system will guide you through unlocking your domain and obtaining the transfer code (also known as an EPP code or auth code.) If you wish to transfer several domains simultaneously, click here to use our bulk domain transfer tool instead.
To transfer a domain to WordPress.com:
- Visit your site’s dashboard.
- Navigate to Upgrades → Domains (or Hosting → Domains if using WP-Admin).
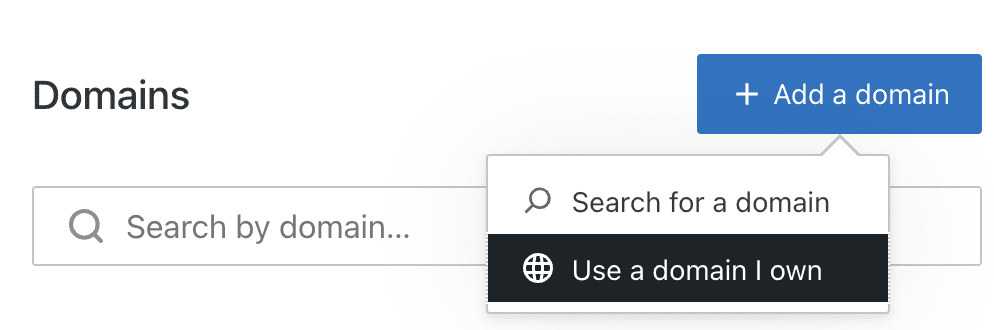
- Click the “Add a domain” button in the top right corner.
- Select “Use a domain I own“:
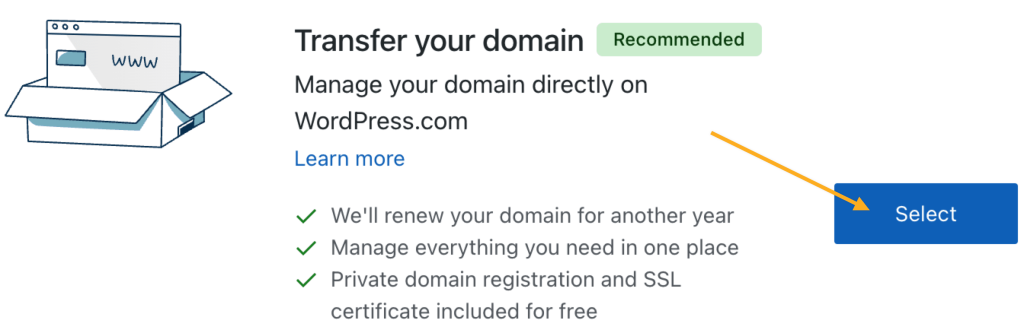
- On the next screen, type the domain name you wish to transfer and click the “Next” button.
- You will have two options: transfer or connect. Click the “Select” button next to “Transfer your domain“.
- Click the “Start setup” button to confirm that you want to begin transferring your domain from another provider to WordPress.com.
- Next, log into your account on your domain registrar’s website to take the following actions:
- Unlock your domain: Domain providers lock a domain as a security measure to prevent unauthorized changes like transfers. This is typically referred to as a registrar lock or transfer lock.
- Obtain a transfer code: This code is commonly known as an EPP code, but your domain provider might also refer to it as a transfer code, authorization key, or auth code.
Instructions for common domain providers (click to reveal)
These guides from popular domain companies will show you how to unlock your domain and obtain the transfer code:
If you don’t know where your domain is registered, look it up in the Site Profiler.
- Back on WordPress.com, enter the domain authorization code you received from your domain provider. The code is case-sensitive, so take care to copy and paste rather than type the code manually. Make sure no additional spaces are being added.
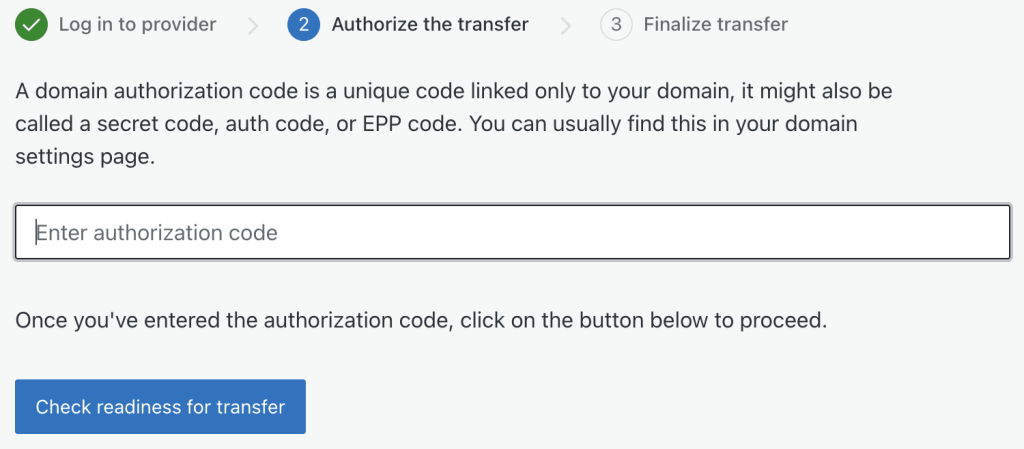
- Click the “Check readiness for transfer” button to validate the authorization code and ensure your domain is eligible for transfer to WordPress.com.
- On the checkout screen, verify your contact information and provide payment details. You will not be charged if you are entitled to a free domain (included with any annual plan).
Your current registrar may email your domain’s contact email address within 24 hours of initiating the transfer from your current provider. Check these emails, as some registrars may require you to click a confirmation link in the email to approve or expedite the transfer to WordPress.com.
At this point, your domain transfer to WordPress.com is now in progress and should be completed in five to seven days. When the transfer to WordPress.com is completed, your domain’s expiry date will be extended by an additional year (even if you recently renewed your domain.) If your domain has fewer than 12 months remaining until the maximum term (typically 10 years), it will be renewed only to the maximum allowed.
You will also receive an email from WordPress.com when the transfer to WordPress.com completes or fails.
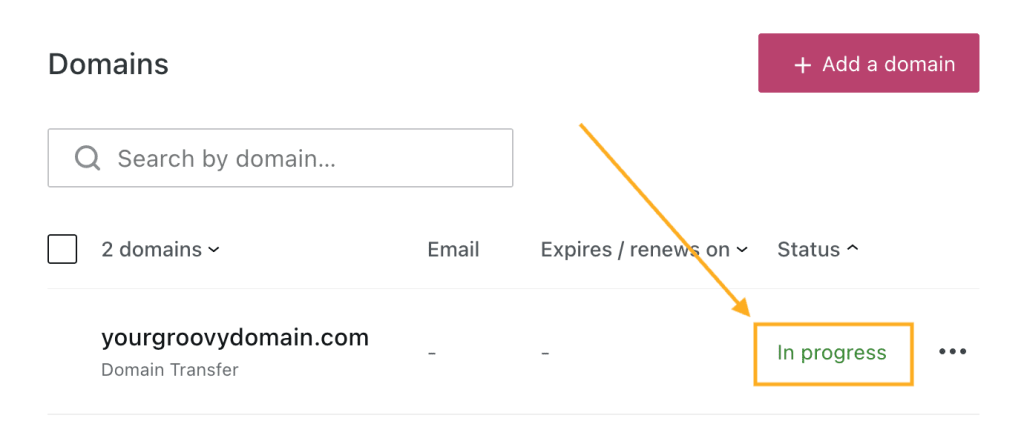
To check the status of your domain transfer to WordPress.com, visit your WordPress.com dashboard and navigate to Upgrades → Domains (or Hosting → Domains if using WP-Admin). Your domain will be listed here, with one of the following in the Status column:
- Waiting: You added a domain transfer but have not begun the transfer process. If you don’t start the transfer to WordPress.com within 14 days, the transfer will be removed from your account, and your payment will be refunded or your plan domain credit will be restored.
- In Progress: You have submitted the authorization code and confirmed the transfer to WordPress.com. You cannot change any domain settings during this time.
- Active: The transfer to WordPress.com is completed, and you can make any changes to your domain settings in your WordPress.com account.
- Failed: The transfer to WordPress.com cannot be completed. If the failed transfer isn’t restarted within 14 days of the original purchase, it will automatically be removed from your account and your payment refunded or your plan domain credit restored. A domain transfer can fail for the following reasons:
- You added a transfer while signing up to WordPress.com, but did not complete the steps to initiate the transfer within 14 days.
- If the domain expires, enters redemption, or is canceled after initiating the transfer, contact your current provider to reactivate it and restart the transfer to WordPress.com.
- If your current provider canceled the transfer to WordPress.com, consult with them and restart the transfer process.
- In rare cases, if your current provider disputes the transfer away from their service, it may be canceled.
Once the domain transfer to WordPress.com is successful, your domain may still point to your old website until you update the domain settings as described in the next section. Your DNS records, or the records used to configure different aspects of your domain, including important features like email hosting, are preserved during the transfer process.
After successfully transferring your domain to WordPress.com, you can connect it to your website by updating your DNS records with the following steps:
- Starting from your site’s dashboard, navigate to Upgrades → Domains (or Hosting → Domains if using WP-Admin).
- Click on your domain name.
- Click on the “Name Servers” section.
- On the next screen, ensure the option to “Use WordPress.com name servers” is in the ON position:

- Click on the “DNS Records” section and click the “Manage” button.
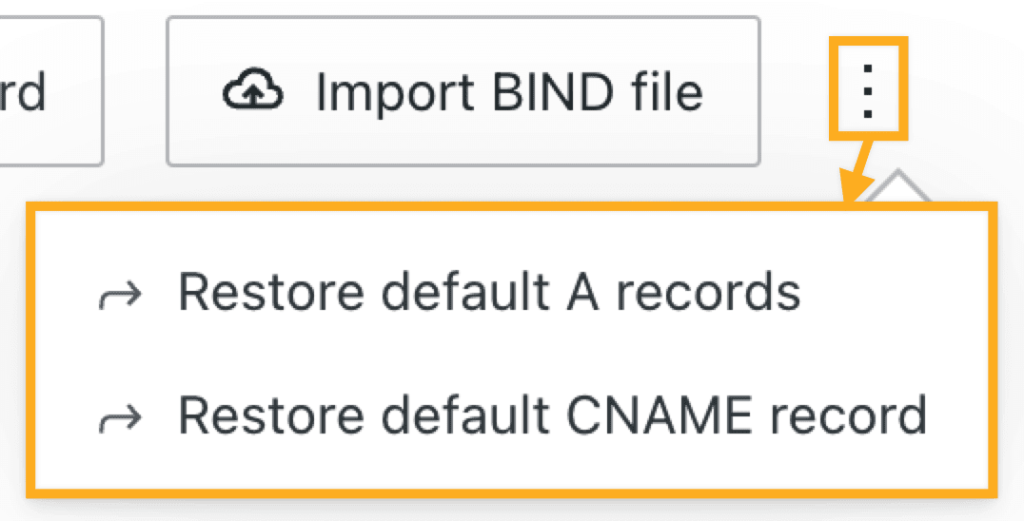
- To check that your domain’s A and CNAME records are set to the default values for WordPress.com:
- Click the ellipses (three dots) at the top right of your screen.
- Click “Restore default A records” and/or “Restore default CNAME record”.
Once you have completed these steps, your WordPress.com site will appear on your domain within a few hours (72 hours is the maximum time it can take).
If you have an existing email address with your domain, you’ll want to make sure to add the required DNS records for your email account.
After your domain starts showing your new site, you can set your domain name as your site’s primary address by selecting it from the dropdown at the top of the screen:

To cancel a domain transfer, use your current provider’s domain management settings. Upon cancellation, the domain transfer subscription on WordPress.com will be automatically refunded. If the domain transfer was done using a domain credit included with an eligible plan, canceling it restores the free domain credit for use with a different domain.
What does it cost to transfer a domain?
All annual WordPress.com plans include a free domain for one year, which you can use to transfer your domain to WordPress.com for free.
If your plan does not include a free domain (i.e., you have a monthly plan) or if you have already used your free domain offer, the transfer cost equals the standard renewal cost for the domain.
You can add as many additional domains to the same site as you like and pay for the additional transfers separately.
What about my pages, posts, and other content?
A domain transfer does not transfer a site’s content (pages, posts, media, etc.) to WordPress.com. If you wish to transfer your hosting to WordPress.com, start by importing your existing site’s content first, then transfer the domain to WordPress.com afterward.
How do I turn on Privacy Protection?
Privacy Protection is activated automatically for qualified domains during the transfer process. All domains registered at WordPress.com come with Privacy Protection free of charge. In some rare cases, Privacy Protection may not be available due to the policies of the respective registrar of record or registry.

