Optimize your site for search engines with additional SEO tools. This guide will explain how to use these options for more advanced control over your website’s appearance in search.
This feature is available on sites with the WordPress.com Creator or Entrepreneur plan. If your site has one of our legacy plans, it is available on the Pro plan.
In this guide
To enable SEO Tools, take the following steps:
- Visit your site’s dashboard.
- Navigate to Tools → Marketing (or Jetpack → Settings if using WP-Admin).
- Select the Traffic tab.
- Switch on the toggle that says “Enable SEO Tools to optimize your site for search engines.”
If your site is missing the options described in this guide, it is likely because:
- Your site is not on an eligible plan.
- You have activated an SEO plugin, such as Yoast SEO, which replaces these features.
- Jetpack blocks are disabled in the editor. To enable the Jetpack block options, visit your dashboard and navigate to Jetpack → Dashboard → Settings → Writing. Here, toggle on the Jetpack blocks option in the “Composing” section.
- You have a self-hosted (WordPress.org) website without the Jetpack plugin.
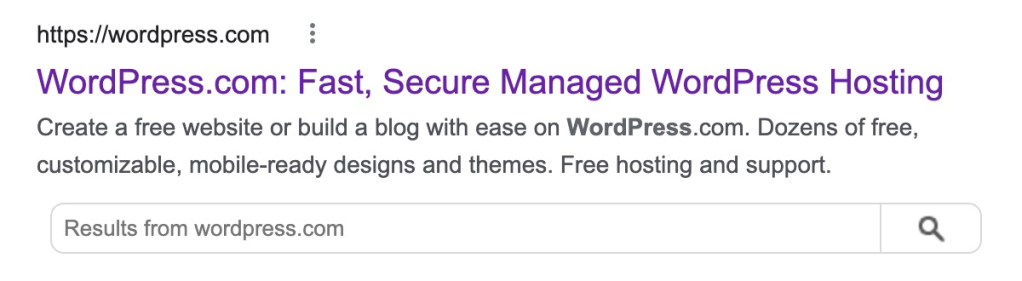
The Page Title Structure determines how the titles of your content appear in search engine results and social media sites. For example, in the image below, we have chosen to display the Site Title (WordPress.com), a colon (:), and the Tagline (“Fast, Secure Managed WordPress Hosting”):
If you do not add anything to the Page Title Structure settings, your pages will display the page title in search results by default. If you wish to customize how the titles appear, take the following steps:
- Starting from your site’s dashboard, navigate to Tools → Marketing → Traffic (or Jetpack → Settings → Traffic if using WP-Admin).
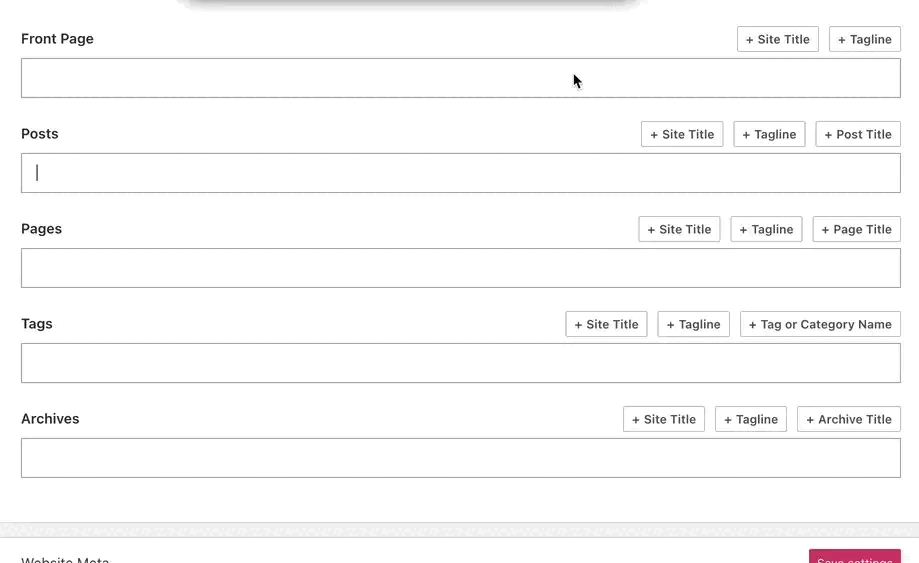
- Scroll down the page and look for Page Title Structure.
- Click on any of the available buttons like Site Title, Tagline, Post Title, and so on to use them for your respective content types. This will automatically assign the selected elements in the preview when your content is shared or searched for.
- Don’t type any custom text in this section unless you want it to show for all your posts, pages, or other selected content type.
- Click into the box area and type to add your own custom separators (symbols) between the elements like a colon [:], slash [/], hyphen [–], tilde [~], or an empty space.
- Use your keyboard’s delete or backspace button to remove any elements as needed.
- Click the Save settings button to save your changes.
A meta description is a short summary of your website used by search engines. Search engines sometimes use this information to determine the site’s relevance for specific searches.
This meta description setting applies to your site’s front page only. To customize your site’s front page meta description, follow these steps:
- Starting from your site’s dashboard, navigate to Tools → Marketing → Traffic (or Jetpack → Settings → Traffic if using WP-Admin).
- Scroll down the page and look for Front Page Meta Description.
- Type a short description of what your site is about.
- Keep in mind that there is limited space on search result pages — about 160 characters.
- Click the Show Previews button to see how your description will look on Google and social media platforms.
- If you’re happy with the description, click Save settings.

After updating your site’s meta description, allow search engines two to four weeks to re-index your site and display the new information. If search engines index your site before you have added a meta description, they may display a message like “No information available for this page” instead of a description.
Typically, search engines will pick up the page or post content and use that in their search results.
You can customize the title and description to catch the eye of the reader and potentially increase the search page ranking of the page or post.
To customize the SEO title and description of a page or post, follow these steps:
- In your site’s dashboard, navigate to Pages or Posts.
- Click on a page or post to open the editor.
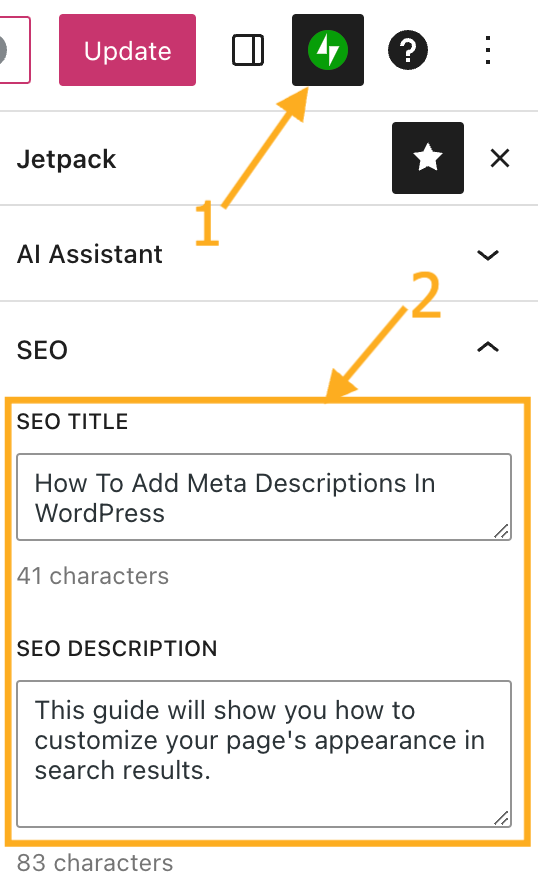
- Click the Jetpack icon (that looks like a lightning bolt on a green circle) in the top right corner of the editor screen.
- Under the SEO section, type an SEO Title and SEO Description.
- Click Publish or Update to save the change.
If your site is already listed on search engines, you should see the new title and description in search results within a few hours. However, search engines may choose to display a description taken directly from the content if they determine it to be more accurate than what is written as the custom SEO Description. The description used for a page or post may even be different for different search terms.
You can exclude a particular page or post from search results entirely. Follow the steps below to achieve this:
- In your site’s dashboard, navigate to Pages or Posts.
- Click on the page or post you wish to hide from search engines.
- Click the Jetpack icon (that looks like a lightning bolt on a green circle) in the top right corner of the editor screen.
- Under the SEO section, check the box labeled “Hide page from search engines.”
- Click Publish or Update to save the change.


Join Our Free SEO Course
Understanding search engine optimization (SEO) is valuable for anyone looking to improve their site or blog for both search engines and humans. This course will give you a solid foundation of what you can do to ensure people have the best chance to find your content when they search online.

