
When you own a restaurant, your goal is to bring in as many customers as possible. In the hospitality industry, this means facilitating a favorable experience for patrons and doing your best to accommodate their every need.
One of the ways you can do that is by accepting online reservations. This added option may provide a significant convenience for your customers and can benefit your business in a variety of ways. Plus, thanks to WordPress blocks, adding reservation functionalities to your website is incredibly simple.
In this article, we’ll discuss the benefits of offering digital reservations. Then we’ll walk you through how to put together an easy-to-use reservation system using WordPress.com’s OpenTable block. If your site is not hosted with WordPress.com, you can also use the OpenTable block if your site uses Jetpack. Either way, let’s get started!
The Benefits of Accepting Online Reservations
As you can imagine, there are plenty of advantages to accepting online reservations. This applies to both customers and business owners.
When you’re running a restaurant, you typically get a fair share of walk-ins. However, if you tend to get crowded during certain times of the week, it makes sense to accept reservations. That way, you don’t have to turn away customers or lose out on revenue.
In fact, many people prefer making reservations because they like to solidify plans and avoid unnecessary wait times. Some customers may prefer calling your restaurant directly, but plenty of other potential diners will prefer reserving online.
As such, there are many benefits to taking reservations through your restaurant website. First, it enables your patrons to book reservations outside of operating business hours:

Today, many users rely on the internet to search for the products and services they want, including local establishments. Customers also look to review sites such as OpenTable to find choices that meet their criteria.
You can list yourself on these platforms, and make it convenient for users to book their reservations directly from your website or the third-party platform. They can view a calendar that lists your available dates and times, and then instantly choose what’s most convenient for them. This can also free up your staff to focus on more pressing matters, such as the patrons currently dining or visiting your place of business.
Furthermore, an online booking system can minimize no-shows. If customers decide they no longer want to honor their reservations, they can quickly cancel them through the system the same way they booked them.
Finally, accepting reservations online can provide you with valuable insights and analytics. For example, you can easily see your busiest times of the day or week. You may even be able to identify which months you get the most traffic.
This can help you forecast and plan ahead to ensure proper staffing and accommodations are available. On top of that, if you take online reservations with a platform that offers a built-in review feature, you can get near-instant feedback from your guests. That way, you can learn how to improve your products and services.
How to Take Online Reservations With WordPress Blocks (In 5 Steps)
As one of the most popular online reservation platforms, OpenTable offers an excellent way to book guests conveniently. In this tutorial, we’ll show you how to use the OpenTable block to create an appointment booking feature on your WordPress site. Note that you’ll need a WordPress.com Business or Premium account to access this block.
Step 1: Create an OpenTable Listing for Your Business
If you don’t have an OpenTable listing for your restaurant or business, the first step is to make one. That means creating an OpenTable account. If you already have one, go ahead and jump to step two.
Otherwise, to set up your listing, you can navigate to the OpenTable website and click on Get Started. Next, you’ll need to fill out a form with your business’ information:

Once you’re done, select Sign Up Now. Then a team member will get in contact with you to establish your account. Follow their instructions, and you should have a working listing in no time.
Step 2: Add the OpenTable Block to Your WordPress Site
Once you have your OpenTable account up and running, the next step is to create your reservation page by navigating to WP Admin > Pages > Add New. You may want to name this page something like “Reservations – Book Online”. Another option is to add this block to your existing Contact Us Page.
Once you’re on the page where you want to add the online reservation system, click in the Block Editor and select the Add Block button (the plus icon). Then search for and select “OpenTable”:

Alternatively, you can type “/opentable” in a paragraph block, and then press your Enter key. With this method, the block will automatically be inserted into the page.
Step 3: Insert Your OpenTable Restaurant Embed Widget
After you place your block, the next step is to add your OpenTable Reservation Widget embed code. This will connect your OpenTable listing to your WordPress block.
To locate this code, you can navigate to your OpenTable account and click on the three lines in the upper right-hand corner. Then go to Restaurant Profile > Reservation Widget in the left-hand menu:

This is your first opportunity to edit your widget settings. You can add a second restaurant, and change the widget language, style, and more. However, if you prefer to do this later so you can see how it will look on your actual reservation page, you can. That’s one of the benefits of the OpenTable block, so that’s what we’ll do here.
For now, review your widget settings choices and ensure that your restaurant is selected. Then click on Copy Code. Your reservation widget code block will look similar to this:

Next, return to your WordPress reservation page and paste the code within the OpenTable block. Then select Embed.
Step 4: Configure and Customize the Block Settings
Once you’ve added an OpenTable block with your embed code, there are a variety of settings you can configure and customize directly in WordPress. You should notice a toolbar at the top of the block. This is where you can make those adjustments:

These controls let you change the Alignment to full or wide width. They also enable you to change the styling:

If you click on the paintbrush icon, you can choose from four styles: Standard, Tall, Wide, and Button. The above example features the Wide style. However, if you want your users to be able to quickly view a calendar, you may want to go with Tall:

Also note that your restaurant ID will be automatically added under Settings to the right of the editor. There, you can make additional adjustments, such as changing the languages supported by OpenTable. Furthermore, if you want to add custom CSS to your block, you can do so by navigating to the right under the Advanced drop-down panel.
Step 5: Save, Preview, and Publish Your Changes
When you’re done configuring and customizing your OpenTable block, you can preview it on the front end of your website to make sure everything looks as it should. If you’re satisfied with how it looks and functions, you can save and publish your changes. That’s it!
Here’s an example of a finished reservation page with a fully-functioning OpenTable block:
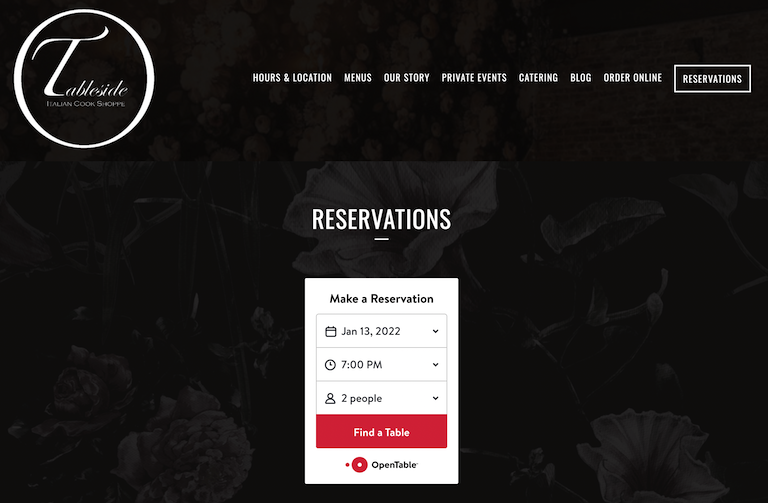
As you can see, the OpenTable block is a versatile tool that can be customized to fit any WordPress site.
Furthermore, if you plan to use this block across multiple pages and posts of your website, we recommend adding it to your WordPress Reusable Blocks. This may save you a lot of time. You can do so by clicking on the three vertical dots at the end of the block toolbar, and then selecting Add to Reusable Blocks.
Conclusion
Owning and managing a restaurant can be stressful, especially when you’re constantly pulled in a million different directions. However, by streamlining your reservation system with online bookings, you can easily elevate your customer experience. This can drastically improve your overall business, and even boost your profits.
Let’s recap how you can use the OpenTable WordPress block to accept online reservations in five simple steps:
- Create an OpenTable account to claim your business listing.
- Add the OpenTable WordPress block to your post or page.
- Insert your OpenTable Reservation Widget embed code.
- Configure and customize the block settings.
- Save, preview, and publish your changes.

