
Email marketing is one of the most powerful and effective methods you can use to grow your business. However, in order to make it work for your company, it’s essential to leverage the right strategy and tools.
That’s where Mailchimp can help. If you’re a WordPress user, integrating this solution with your website can help to streamline your efforts. As one of the most trusted and widely-used email marketing service providers available, Mailchimp can boost your engagement and conversions in no time.
In this post, we’ll discuss some of the benefits of performing email marketing. Then we’ll walk you through how to integrate Mailchimp with your WordPress site in six simple steps. Let’s get started!
The Benefits of Email Marketing
There are many strategies you can use to reach a wider audience, build trust and credibility with your existing customers, and drive sales and conversions. Among the most popular, affordable, and effective options is email marketing. In fact, email newsletters are the second leading type of content marketing, right behind blog posts.
One of the factors that make this channel so useful is how convenient and accessible it is. For example, there are currently over 4 billion daily email users. Perhaps this is why approximately four in five marketers say they’d rather give up social media than email marketing.
There are many benefits to email marketing that make it a worthwhile endeavor for just about any type of business. For example:
- It’s an excellent channel for creating and delivering personalized content.
- Email campaigns can help you generate leads, increase engagement, and drive conversions and sales.
- You can communicate directly with your customers on a platform that’s convenient for them.
- It’s incredibly cost-effective, especially when compared to many other online marketing techniques.
- You can create and schedule newsletters at times when it makes the most sense for your specific audience (based on when they’re most likely to check their emails, their most common time zones, etc.).
These are just a few of email marketing’s many advantages. However, even when you know that this strategy can be advantageous to your business, it can be tricky to figure out how to get started.
In this guide, we’ll help you navigate the process by showing how you can use Mailchimp with your WordPress site.
How to Integrate Mailchimp With WordPress (In 6 Steps)
Note that we’ll be using the Mailchimp block, which is available for all WordPress.com websites. However, if you are hosting your WordPress site elsewhere, you may want to check out the Mailchimp Pop-Up plugin as an alternative solution.
Step 1: Sign Up for Your Mailchimp Account
To integrate Mailchimp with your WordPress site, you’ll first need a Mailchimp account. Therefore, if you haven’t created one yet, that’s the first step you’ll want to take.
To create a new account, you can visit the Mailchimp website and click on the Sign Up button:

Then you can fill in your email address and create a username and password. After that, select Sign Up.
You should soon receive a confirmation email. You can click on the link in that email to verify your account. Then you’ll be taken directly to your dashboard.
It’s important to note that Mailchimp is free to use. However, the free tier only allows up to 2,000 subscribers. If you have (or plan to have) a larger list of subscribers, you’ll want to upgrade to one of the plugin-enabled plans.
Step 2: Create Your Email List and Signup Form
Whether you have an existing account or just created a new one, you’ll also need to create an email list on Mailchimp. This is your list of the subscribers you’ll send your newsletters and campaigns to.
During the account setup process, you can choose to Import Your Contacts:

If you don’t have a list of contacts that you’re ready to import just yet, you can select I’ll do this later.
Whenever you are ready to add your contacts, you can do so by navigating to the Audience tab along the left-hand side of your dashboard:

Whether you have your contacts or not, you’ll also want to create a signup form. This is what you’ll add to your website so that visitors have an easy way of subscribing to your email newsletter.
To get started, you can click on the Create form button, which you’ll also find in the Audience tab of your Mailchimp dashboard. You can select an ‘audience’ (which is how Mailchimp refers to your mailing list), followed by Begin:

There, you’ll be able to customize the subscription form. When you’re done, you can click on the Save & Publish button.
A pop-up will appear asking you to connect to your WordPress website:

You can enter your website’s URL, accept the terms and conditions, and then click on the Get started button.
Step 3: Add the Mailchimp Block in WordPress
WordPress includes a Mailchimp block that makes integrating these two platforms significantly easier. If you have a WordPress.com website or use the Jetpack plugin, this block will immediately be available. Otherwise, you’ll want to install the Mailchimp plugin.
To add the Mailchimp block, navigate to the page or post where you want to insert your subscription form. Next, click on the Add Block button and search for “Mailchimp”:

As a shortcut, you can also type “/mailchimp” into any paragraph block in the editor. When you hit Enter, the block will automatically be added.
Step 4: Connect the Mailchimp Block to Your Account
Once you’ve added the block, the next step will be to connect your site to Mailchimp. You should see a notification like this one:
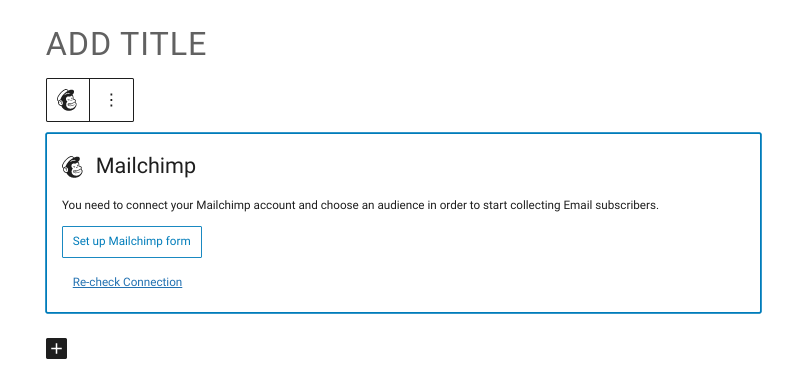
This will automatically redirect you to your dashboard, where you can manage your WordPress integrations (under My Site > Tools > Connections). Once again, you’ll be prompted to sign into your Mailchimp account, and then you can select the Audience you want to use.
Once you’re successfully connected, you can navigate back to the Mailchimp block and click on Set up Mailchimp form again:

The email list form will be added to your post or page. As you can see, it offers an easy way for visitors to provide you with their email addresses without having to leave your site.
However, by default, the form looks a little plain. Let’s take a look at how you can further customize and personalize it.
Step 5: Customize the Mailchimp Form
There are a handful of ways you can tweak the Mailchimp form so it fits with your site’s style and audience. Let’s start with the all-important signup button.
By default, the button’s text is “Join my email list”. However, you can edit this simply by clicking on the button and replacing the text. On the right side of the screen, you can also change the button’s appearance:

You have a variety of options, including:
- Changing the default style from Fill to Outline
- Switching the background and text colors
- Adjusting the border radius
- Changing the button width
When you’re done, you can repeat the same process for the disclaimer text, which is the content that appears below the mailing list button. To change this, you can simply click in the text box and replace the wording. Then you can alter the style using the toolbar along the top:

You’ll also want to note the settings to the right of the block. You can use these controls to customize the email placeholder text, as well as the text that appears for processing, success, and error notifications.
The last settings we want to discuss are those that appear along the Mailchimp block toolbar. You can use the middle icon to change the block’s alignment on the page:

If you click on the three vertical dots, you can also access more settings. For example, if you plan to use this signup form on other posts and pages, you can add it to your Reusable Blocks. That way, you won’t have to re-customize it each time.
Step 6: Publish Your Changes and Begin Sharing Your Email Signup Form
Once you’re happy with how your form looks, you can click on Save Draft in the top right-hand corner of the screen. You can also click on the Publish button to take the page or post live:

You can insert the block anywhere else you wish on your site, including other posts and pages. This is particularly easy if you added it as a Reusable block earlier.
To access your fully-customized signup form, you can click on the Add Block button wherever you want to add it, and then select the Reusable tab:

Also, keep in mind that you can use WordPress blocks wherever you can access the Block Editor. This means you may also want to consider using the Mailchimp block in your site’s widget areas, such as footers and sidebars.
Conclusion
Email marketing is a must for any serious marketer. However, figuring out what strategies and tools will help you best manage your campaigns can seem challenging. Fortunately, you can use Mailchimp on your WordPress site to start growing your email list right away.
As we discussed in this post, you can use Mailchimp with WordPress by following six simple steps:
- Sign up for a Mailchimp account.
- Create your email list (or ‘audience’).
- Add the Mailchimp block to any post or page.
- Connect your WordPress site to your Mailchimp account.
- Customize the Mailchimp block’s settings and style.
- Publish your email signup form.

