Quick tips on using Canva and Pablo for your design needs, from image widgets and blog headers to custom social media images.

Getting Started: To use Canva, you need to sign up for an account. Pablo, on the other hand, doesn’t require an account — just visit the Pablo page and start tinkering. Both are free to use, but note that Canva includes images you can buy for a small fee, too.
Given the popularity of our posts on designing custom image widgets and headers, photo apps, and free-to-use image resources, here’s a peek at two free tools that can help you create customized widgets, headers, and other extras for your blog: Canva, a program to make images and designs of all kinds and sizes; and Pablo, a tool to build social media posts, created by Buffer. I’ve been using both recently for design and image purposes: each have their pros and cons, but overall are great tools to try.
We’ve published tutorials using other design and image editing tools, notably PicMonkey, so I hope this post introduces more free options for you. Not everyone has access to software like Photoshop, so I encourage you to take these tools for a spin to see if they fit your needs.
Not sure where to start? Here are three scenarios where Canva or Buffer might be helpful.
Custom image widgets and headers
With Canva, you can create custom image widgets for your sidebar or a header image for your blog. You’ll find Canva’s tools on the left-side panel, where you can search and select an image in the library to act as the base for your design. You can also upload your own image from your computer. Below, I’ve chosen one of my images of Hong Kong skyscrapers.

An image widget for a blog category on writing about city living, made quickly with Canva.
On the left, you’ll also see ready-made logos and designs with a variety of default fonts, which you then drag to the right onto your “canvas.” There are some sleek, professional designs, and you can tweak the font or type size, or change the alignment of text. You’ll find other options in the panel, from design layouts to backgrounds and patterns.
Want to create an image widget a different way? This tutorial is also handy.
In the example above, I kept my design fairly simple, with two layers: a photograph of my own, with a circle-shaped coral logo, taken from one of the pre-made designs. I updated the text to “Tales from the City,” so I can use this design for an image widget for a blog category on writing about urban culture.
Want more? Read our tutorial on creating a custom header in ten minutes, using PicMonkey.
Before you begin a new project in Canva, you can specify exact image dimensions, which is handy for those of you who want a custom header for your site, or special featured images for individual posts (like a weekly series or recurring feature). If you have one of the many themes with featured images and aren’t sure what your theme’s ideal image sizes are, check the specs at the bottom of your theme’s page in the Theme Showcase.
Visual social media posts to promote your blog and online presence
If you’re using Twitter, you might already know that image tweets perform better — people are more likely to stop, read, and click and generally engage with them more. You can upload an image to a tweet right from Twitter, or use another service (like Buffer).
With Pablo, you can create custom image tweets (and Facebook posts) to promote your online presence and strengthen your visual identity and personal (or business) brand. For example, here’s a custom-designed tweet for our current photo challenge, Broken, created quickly with Pablo:

In Pablo, I uploaded the featured photograph for the photo challenge, added some text, uploaded a logo to brand it as a Daily Post tweet, and added another line of text for our URL. You can also place your text and logo where you’d like; update the font style, size, and color; adjust the logo size; and do basic image editing (blur the background, switch from color to black and white, and increase the contrast) in a simple interface:
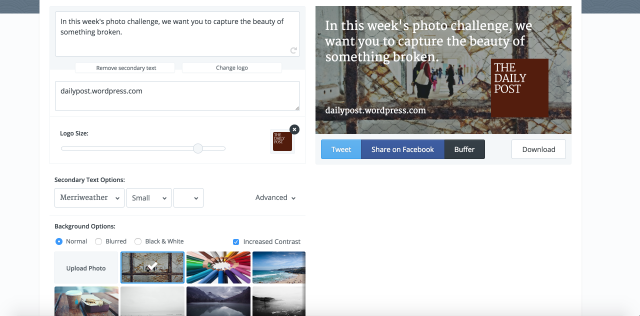
A custom tweet created with Pablo.
With Pablo, you can also design quote tweets and posts, and experiment with designs that match your aesthetic and various elements of your blog. If you’re promoting a new gallery in your portfolio, use your best image in the tweet, then add a bit of description on what the photoset is all about. Or if you’ve published a Q&A with your favorite blogger, highlight the best quote in the tweet. There’s a ton of room for creativity.
A unified design across your social profiles
If you don’t have your own images to use, both Canva and Buffer have libraries of stock images. You can also find more free-to-use images and patterns online.
So, let’s say you’ve created a new blog header and a few image widgets for your sidebar, and your site looks fantastic and visually cohesive. What now? With these tools, you can make the visual elements on your blog and social profiles consistent. In Canva, select canvas sizes for Facebook cover photos, Google+ images, Twitter headers, YouTube channel art, and more — and design images using the same colors, fonts, and logos.
The header image below and this post’s featured image above were both created with a free-to-use image from Unsplash (found via the handy and searchable pexels.com). They could also be used as a Facebook page cover photo, Twitter header image, and on other platforms. (I suggest differing the design slightly across channels — for instance, using the same background image, fonts, and color palette, but experimenting with font size and text placement.)

Interested in experimenting? Try out Canva and Pablo. I personally like the sophisticated fonts and ready-to-use designs in Canva, but find it difficult at times to use (sometimes, what I preview isn’t exactly what I get after downloading). Saving steps and downloading finished designs also takes a bit of time — more than ten seconds, for example — and my computer slows down while using it. Pablo isn’t as powerful and doesn’t have as many options as Canva, but it’s an intuitive tool that you’ll get the hang of right away — and you don’t need an account to start.
Currently blogless? You’re a click away from sharing your story.
Create your blog at WordPress.com


Reblogged this on and commented:
I just started playing around with Canva and I am in love with it!!!!
LikeLiked by 2 people
I just wish there were a way for Canva to pull images from the cloud – I keep very few on my iPad & would love Flickr integration (or something similar).
LikeLiked by 1 person
Hey Chris — thanks for the comment. Note that we have no affiliation to Canva — if you have questions or feature suggestions, you should direct them to Canva: https://support.canva.com/hc/en-us
LikeLike
Haha… sorry Cheri, I knew that. Was just openly venting… 😉
LikeLiked by 1 person
Super cool! Thank you so much for this! Definitely makes it easier to create cool flyers, and lettering! Wahoo!
LikeLiked by 1 person
This is super helpful. Thanks! 🙂
LikeLiked by 3 people
With Buffer/Pablo are the images you create copy right protected or do they become property of Buffer?
LikeLike
I meant Canva…
LikeLike
If you have specific questions about either Canva or Pablo, it’s best you direct them to these organizations:
https://support.canva.com/hc/en-us
https://buffer.com/extras (contact and FAQs in footer)
But generally, if you want to copyright your images (assuming you own them), you need to register them:
http://www.photoattorney.com/five-things-you-can-do-to-protect-your-online-images/
http://www.naturescapes.net/articles/business/how-to-register-the-copyrights-for-your-photographs/
We published a recent post on protecting your images online that might be of interest — it focused on watermarks, but the roundup is helpful in general if you’re concerned and interested in image protection:
https://wordpress.com/dailypost/2015/04/30/watermarks/
LikeLike
Thx
LikeLike
I just started using Canva and was happy to find something on line that gave me some options for easily creating my own visuals without paying for pricey design programs that can be confusing. I’ll have to go play a little with Pablo to see if I like it as well. Thanks!
LikeLiked by 2 people
I’ve been using Canva for a while now and, I love it! I used to only use PicMonkey but, now I use both. I didn’t know about Pablo though. I’ll check it out.
LikeLiked by 2 people
Canva is pretty cool! I’m a fan!
LikeLike
Diptic is an app for the iMac that does a lot of the same stuff. I been using that but I’ll have to try out Canva and Pablo!!!!
LikeLike
Thanks for adding another suggestion to check out!
LikeLiked by 1 person
Wow! Just played around with Canva and it’s terrific! I already posted an image on my blog. Thanks so much for sharing. https://ajoyfullife11.wordpress.com/2015/05/28/desert-splendor/
LikeLiked by 1 person
Gotta say I love Canva … it’s pretty easy to use and they have got a lot of design tutorials for non-designers like myself which is a great tool for getting used to it.
LikeLiked by 1 person
Thanks for sharing I am an Artist so I create all my images myself! But sometimes when something quick is needed those are great tools! Thanks 🙂
LikeLiked by 1 person
I used Canva for an internship last summer, it’s SO easy to use! I forgot about it and will definitely be checking it out again 🙂
LikeLiked by 1 person
Fantastic tools. Thank you for the information, I’ll be sure to put them to good use! 😀
LikeLiked by 1 person
Thanks for the software’s information. Have you used Font studio and Photofy. Both of them are great, bit with some limitations. Hope canva and Pablo are better then them.
LikeLike
No, I haven’t used either of those — thanks for listing them for others to check out if they’d like!
LikeLiked by 1 person
I use Canva all the time for work, resumes, event, etc. It’s great!
LikeLiked by 2 people
Have been using Canva for awhile now. My next step was to start using it to create info-graphics. I think it is also a great tool for kids as they begin to find new ways to convey their understanding of a topic. Will have to try Pablo to see how it works.
LikeLiked by 3 people
Thank you very much!!! I just started my blog and was looking for something like Canvas. Super helpful!!
LikeLike
This is informative, and wonderful.
LikeLike
Canva is great, but have not been able to find a transparent background for the logos, so for those I uss pic monkey 😉
LikeLike
This is helpful. Thanks!
LikeLike
Both Sites good for design some card?
LikeLike
Canva has various canvas sizes and designs that would be good for cards, posters, etc.
LikeLiked by 2 people
Hi, I tried Canva.. It’s got some cool stuff.. But, I’m baffled as to how to embed the pics after downloading.
My idea is this – Instead of adding pages, I simple wanna add pictures and link them to the contents I want.
For eg. I’ve a picture created in Canva with the caption ‘Short stories’. So, how do I embed that in my main page of the blog, so that readers can click those links in order to be transported to the short stories collection?
Please someone help me out. The theme that I’m using now is AfterLight theme.
LikeLike
Hi Tara, I visited your blog at https://quirkinessandme.wordpress.com and noticed you now have three categories on your static home page, and when you click each, you go to the appropriate category page, which has all the posts tagged with that category. Is this what you wanted to do? (A suggestion: ultimately, if you keep this grid look, it’d be great if there were 4 boxes for a total of 4, which would look balanced.)
I see you’ve also added an image widget in the footer for your poems — this is another good way to use images to lead your readers elsewhere. When configuring your widget, pay close attention to the “Image URL” and “Link URL” fields, which are necessary for the widget to display and work correctly:
https://wordpress.com/support/widgets/image-widget/
LikeLiked by 1 person
Thank you so much for the timely reply! I renovated my blog, changed the theme, incorporated the pictures and gave it a brand new look with The Confit theme. Thanks once again! 🙂
LikeLike
Cool — great to see. Note that you can also change that default background image that came with the theme (the drink/glass) — details on the Confit theme page (generally, go to Appearance > Background). (It can be an image, pattern, or solid color.) I’d suggest keeping it simple, if you have a grid of images on your homepage already — but up to you, of course! 🙂
Past posts we’ve written on custom backgrounds:
https://wordpress.com/dailypost/2014/01/29/background-color-texture/
https://wordpress.com/dailypost/2013/04/09/custombg/
LikeLiked by 1 person
Yea, thank you so much for assisting me to build my blog in a better way. Sure, I’ll em’ out! 🙂
LikeLike
I’ve been using Canva to make the featured images and widget images for a while and it is a quick and easy way to really add some personality and style to a site. The issue of the image not appearing correctly I think is to do with waiting until it does it automatic saving.
LikeLike
Thanks for the tip!
LikeLike
Thanks. This information is really helpful.
LikeLike
For super quick and easy simple stuff is Google Drawings, its really simplistic and intuitive, check it out!
LikeLike
Thank you so much for this, just as I was about to make my own inspirational quotes. Superb timing! 🙂
LikeLike
Thank you so much! This is really a great article. ❤
LikeLike
Ooo this is very interesting! As a relatively new blogger this is a fab post to help me with my blog!
LikeLike
This is great, thanks so much for sharing!
LikeLike