On exposures, star trails, tripods, and more.

By day Marcus Kazmierczak works as an engineer for Automattic on new product research; by night he heads out for photography. He writes about night photography at night.exposed. You can find more of his photography at mkaz.com.
The sun going down doesn’t mean you have to put your camera away. Night photography offers up an opportunity to take unique photos — often with surprising results. With long exposures, the camera captures light and scenes in ways that our eyes can’t; this makes night photography fascinating to me.
This guide will help you get started with night photography, including a few tips and tricks I’ve picked up while shooting at night. So if night is the only time you have free for yourself and for your photography, you can still get out there.

Conservatory of Flowers, SF. f/8, 20min, Fuji 64T
Getting started
Tip: I wear fingerless gloves, which allow me to make camera adjustments, but keep my hands from freezing.
A key to night photography is making sure our basics needs are met, so we turn to our good friend Maslow and the first two level of needs: warm clothes and food and drink. If you are hungry or cold you aren’t going to be motivated to go out and shoot long exposures. So dress for the weather and don’t go out hungry (or bring a snack).
My best tip for safety? Bring a friend. Going out with a fellow photographer is not only a great motivator to get you up and out, but a companion also gives you a sense of security in the dead of night and someone to talk to during your long exposures.
Secondly, you need to be safe and secure. Be wise about where you go and shoot; you want to feel comfortable and not worry about the neighborhood. There are other dangers besides crime: for example, don’t try to climb difficult terrain or unknown areas while carrying equipment. It can be very easy to slip and fall, especially in dark, unfamiliar areas.
Types of night photography
OK, so we aren’t hungry or cold and we feel secure, our basic needs are met, check. Now we need camera equipment, the next level on the hierarchy of needs. You don’t really need fancy equipment: most cameras will do.
I’ve shot at night with all sorts of cameras, from digital SLRs to cheap toy Holgas, and from mobile phones to Hasselblads and even homemade pinhole cameras.
The way I think about night photography is that it falls into three types of photos, determined by their exposure length. I’ll call them short, medium, and long exposures. It gets much more nuanced when you start throwing in flash and light painting, but we’ll keep it simple at these three.
Keeping it short
A short exposure is any shot that can be handheld, no tripod required. This is the easiest way to get into night photography: it requires no additional equipment, and typically the camera can manage auto-exposure pretty well.
Need a refresher on some photography jargon? The Fundamentals of Light, by Wenjie Zhang, explains the three elements of exposure: shutter speed, aperture and ISO.
Short exposures will require some bright lights, like you’ll find on city streets or an amusement park. Your slowest shutter speed will need to be around 1/60 or higher to avoid motion blur, holding the camera steady when shooting. To get a proper exposure for that shutter speed (which in night photography is pretty quick) you will need to set a high ISO of 3200 or 6400; and shoot with a wide open aperture, f/2.8 or if you have the lens f/1.4.
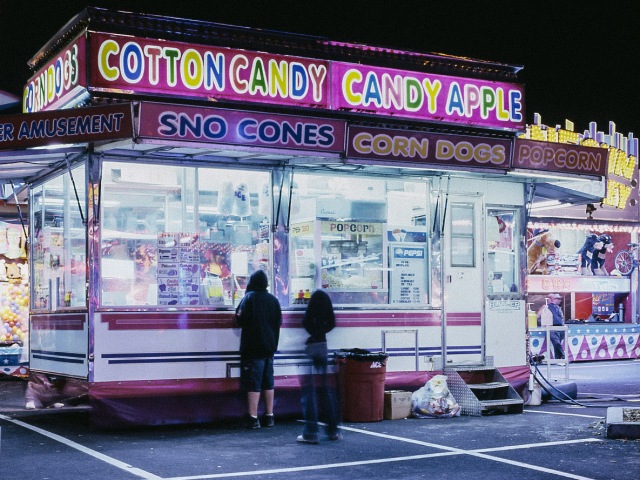
People don’t always stay still for these shorter shutter speeds, so sometimes you just need to embrace the blur. One way to do this is to take out-of-focus shots on purpose, which works well when taking bokeh light photos. Read more about bokeh — as well as a technique called panning — in my post Tripod Not Required.

Brooklyn Bridge Bokeh, f/2.4, 1/45, ISO 3200
Lingering on
The next two types of night photography involve longer exposures — too long for you to hold the camera still, so they require one additional bit of equipment: the tripod.
Tip: It’s a good idea to practice with your tripod and camera settings before you head out. It will be dark and a bit harder to see and change settings after you leave. If I can, I’ll attach my camera to the tripod and set everything ahead of time, so once on location I’m ready to shoot.
Tripod choices are numerous and vary by size and price range. Try not to get sucked into listening to the pros and swayed by snobbery about carbon fiber and leg reverb. Most tripods do the job of holding the camera steady. If you don’t have one already, find a tripod that is strong enough to hold your camera. I aim for a rating of double my camera weight. Also, get one that gives you a decent height. You don’t want to crawl on the ground in the dark to operate your camera.
A medium exposure length to me is anywhere between 1/2 second up to 30 seconds. I draw the distinction between medium and long exposure because most cameras can set the shutter speed in this medium range.
However, this is usually beyond the limit of the camera’s auto-exposure. So you will need to turn your camera to manual-mode (M) and set the shutter speed by hand.
Shots in this range can be city scenes, traffic trails, and, with a high ISO, a night sky with no star trails. The hardest aspect of night photography is figuring out that right exposure.
I took the image below with a 15-second exposure at f/2.8 and ISO 3200; it was shot close to a full moon, which is why it was so short. I shot it at 9:00 pm on a pretty dark night — the lights behind the mountains are city lights from Calgary in Alberta, Canada.
To avoid star trails, you’ll usually need an exposure under 20 seconds. Otherwise, the rotation of the earth will give a little bit of movement to the stars.

Banff, Canada. f/2.8, 15s, ISO 3200
Out all night
Finally, a bit about long exposures — which I consider anything longer than 30 seconds. If you want to capture some beautiful star trails or scenes that are only lit by moonlight, you’ll need an exposure measured in minutes.
To achieve these long exposures, you need to set your camera to bulb mode. Bulb mode will take an exposure for however long your finger is on the button. For cameras with an exposure dial, you can set bulb mode by turning the exposure dial to B.
Each camera is a little different. To find your manual, search for “[camera model] manual”. This will likely return a PDF of your camera’s manual. Download it and search for “bulb mode.”
To set bulb mode for digital SLRs, you need to switch to manual mode and then change the exposure time past the longest setting, which is often 30s. Here are two sample instructions for Nikon and Canon.
| Nikon Bulb Mode | Canon Bulb Mode |
 |
 |
| From Nikon D700 manual | From Canon Rebel Ti manual |
You don’t really want to hold down the button for several minutes, which would get boring. You would end up shaking the camera, which would cause blurring. So you’ll want a cable release or a remote control, or program your camera so you don’t really have to hold your finger there.
See your camera’s manual for compatible remotes. Some digital remote controls can be programmed to set the exposure time. Also, fancier digital cameras can be programmed or even tethered: I went out with one friend who used his laptop to control the camera.
A lot of new cameras can also be controlled by mobile phones, so long exposures might get a bit easier. I just use a simple cable release which has a slide to hold the button down.
Choosing the right exposure
Not sure where to start with the different exposure levels? Here are a few suggested exposures to give you a starting point. Remember, every scene is different and reflections and stray lights at night can change things dramatically. You’ll see lights in your picture you never noticed while composing the scene.
Scene Aperture Shutter ISO Bright city streets at night f/4.0 1/125 ISO 1600 Buildings and monuments at night f/2.8 1/60 ISO 3200 Fireworks f/8.0 4s ISO 200 Stars (no trails) f/2.8 15s ISO 3200 Star trails f/8 30min ISO 200
It is best to bracket your exposures by taking multiple shots with more and less exposure. A stop of light is halving or doubling the time, so adding ten seconds to a ten-minute exposure won’t make much difference.
Digital cameras offer the advantage that you get to see the shot afterwards. Your eyes will be adjusted to the darkness, so images on the backlit LCD display will seem much brighter then what they might actually be. Check the histogram to see if you have a good distribution of highs and lows.
The single greatest method to get the right exposure is: practice, practice, practice.
A few more technical pointers
I normally shoot at night with an aperture of f/8 and an ISO 200. Most photos I want to be sharp throughout and f/8 gives good sharpness without overly long exposure times. I keep the ISO level low to reduce noise.
These exposures can be up to twenty minutes or longer, so can feel a bit slow going at only three shots an hour. However, if you want star trails or other similar effects that’s what you’ll need to do.
If you’re after star trails, which add a lot of excitement to an image, you’ll want even longer exposures. You may need 30 minutes, an hour or more, you can get longer exposures with using a smaller aperture, or if you want a really long exposure, combine with neutral density filter.
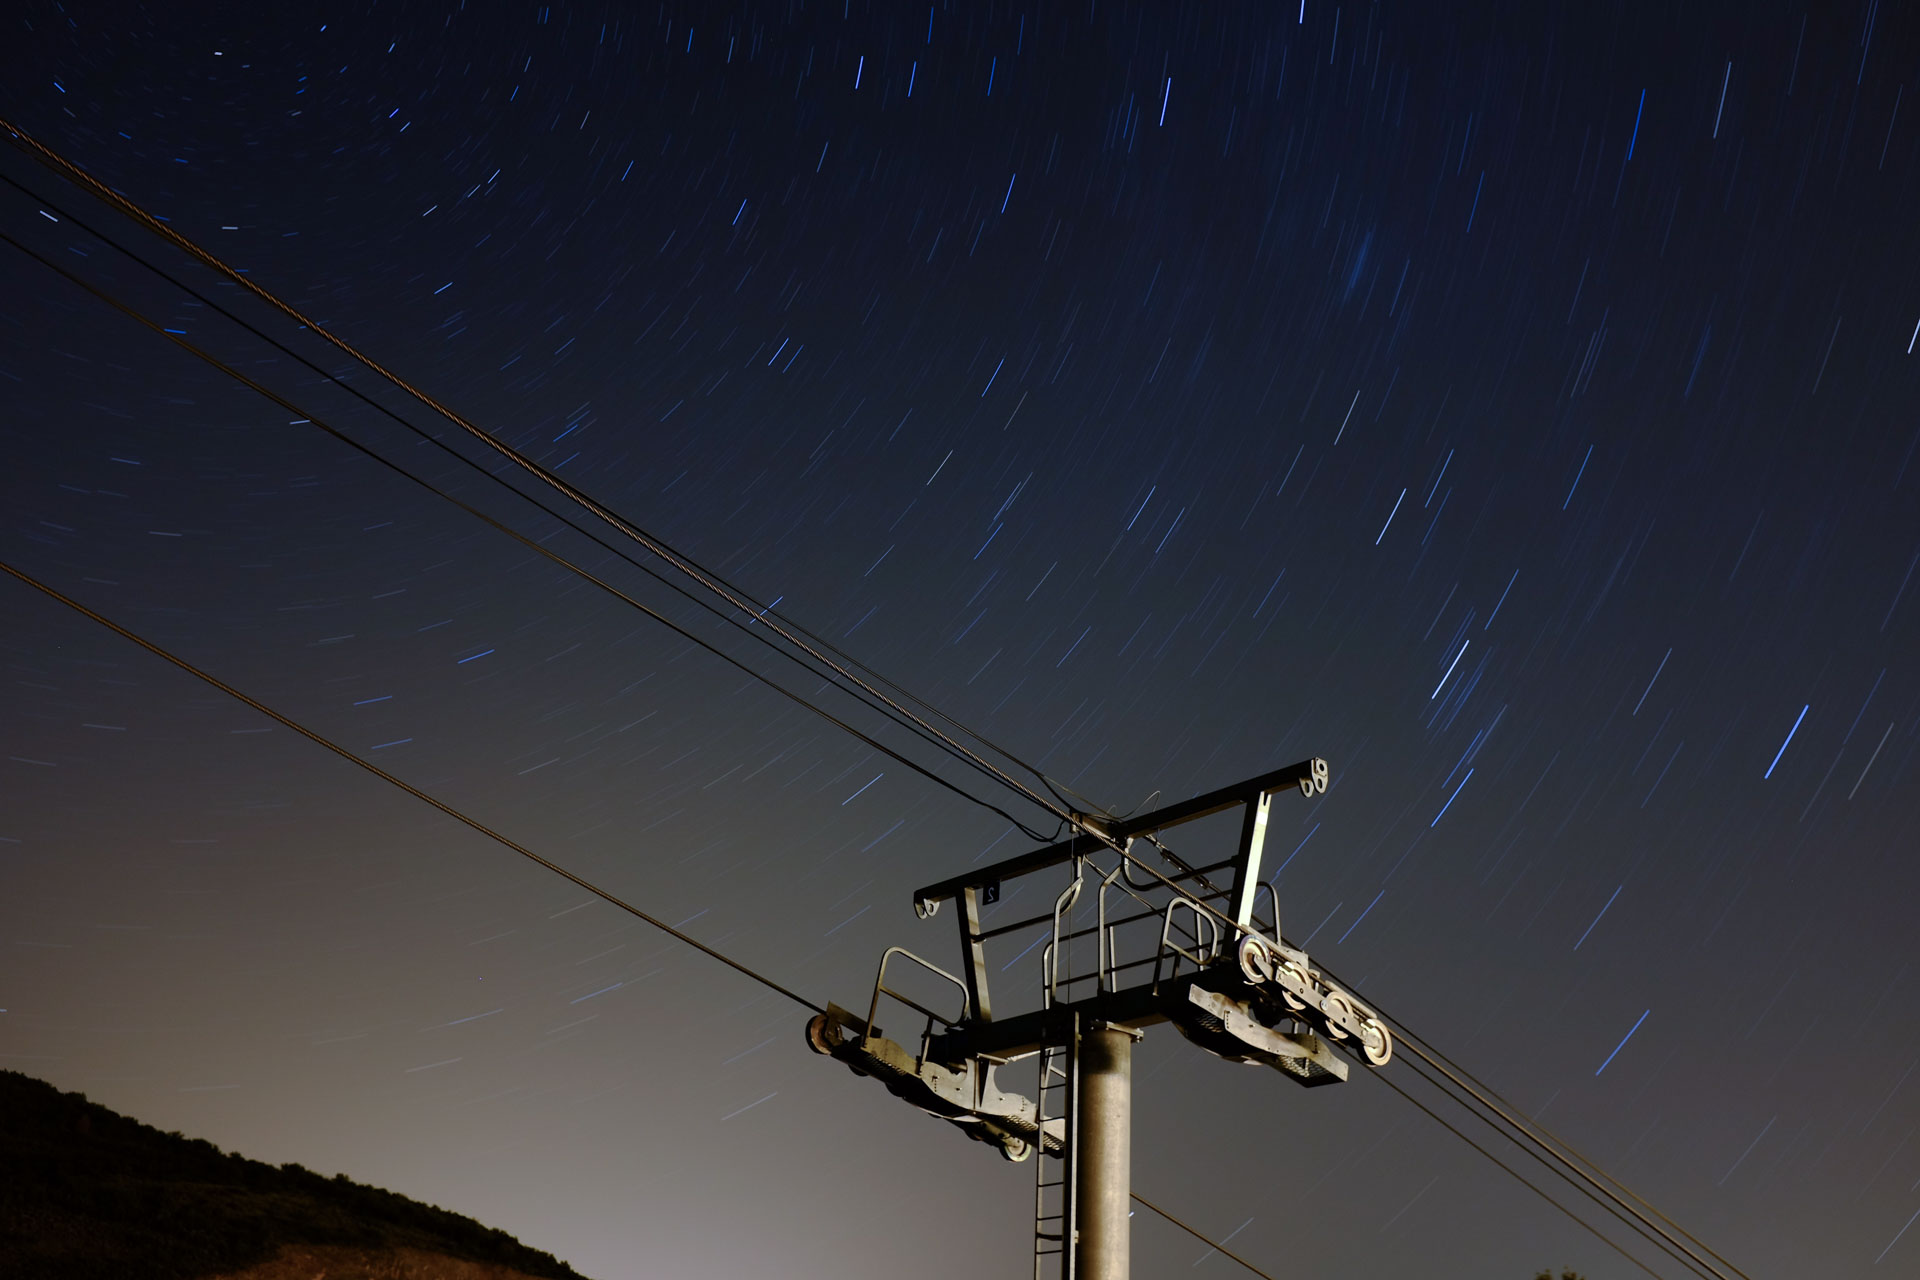
Wheels and Stars. f/5.6, 11min, ISO 200
Your camera’s auto focus is relatively useless at night. I almost always shoot in manual mode. I will focus on the subject by hand, and using a smaller aperture (f/8) helps keep most of the scene sharp.
White Balance can be tricky at night because different types of lights give off different colors; oftentimes you can get many different lights in the same scene. It is common to shoot at night using Tungsten white balance, especially when relying on moonlight. Tungsten gives more blue and purple hues to the photos, which is what we often associate with night.
Many digital cameras have a noise reduction setting for long exposures. Once the shot is complete, it tries to calculate the pattern of the noise and then removes it from the image. The problem? Noise reduction takes as long as the original exposure, and I don’t really notice a difference. As the camera could be tied up for another twenty minutes I always turn this setting off.
A few final tips
- Bring a flashlight or two. It is difficult to see the camera settings in the dark, so a small flashlight helps.
- Look out for cars that might drive into your scene — it can be nice to get some car trails. However, if they are close and pointing directly into the camera, the headlights can quickly destroy a shot.
- It’s a good idea to use your lens hood to avoid light spilling into your lens.
Into the night we go
I hope this guide helps get you started in night photography and gives you some helpful tips when you go out. Find a buddy, grab your gear, and get out there.
To further hone your photography skills, be sure to check out our Photography 101 course starting March 2-27. It is a four-week, intro-level course open to all, from new bloggers to hobbyist photographers to pro-shooters.
Currently blogless? You’re a click away from sharing your story.
Create your blog at WordPress.com


I did the previous Photography 101 course and am sure gonna sign up again for this one. This time I will do it with my newly created photography blog so photos will not mess up the look of my personal blog.
LikeLike
What a great little guide with some really helpful tips, thank you! I get frustrated a lot by not being able to capture what my eyes can see at night time, I shall definitely try some of these 🙂
LikeLiked by 1 person
Thinking of 101!
LikeLike
Very informative post! I have always wanted to capture great night shots, but couldn’t seem to keep the noise from ruining them. After trying many times, I gave up. But, after reading this, maybe giving night photography another shot is in the cards.
LikeLiked by 2 people
To avoid noise, try to shoot at the lowest ISO setting. You’ll need more time with a lower ISO. Good luck!
LikeLiked by 1 person
Well, and probably a better camera than I have would make a difference — even with low ISO I still get noise. I’m thinking after rereading your post that a camera with more manual settings would help.
LikeLike
Great tutorial! Thank you for thisC! I will try to implemen some of the ideas tonignt. 🙂
LikeLiked by 2 people
This was a fantastic post, particularly since I’ve been wanting to get back into night photography! Thank you so much! 🙂
LikeLiked by 1 person
Thanks so much for this useful post. I have bookmarked it for when the nights get a little warmer.
LikeLiked by 1 person
These are some outstanding photographs! Thank you for sharing your techniques.
LikeLiked by 2 people
I love shooting at night. I’ll point to the North star and let it soak in for about 30 minutes. Although, it can get noisy with digital. Ever have that problem? Any fixes?
LikeLiked by 1 person
Noise is often a problem, especially since it is so noticeable in a dark sky. Try to use the lowest ISO setting for your camera to get the least amount of noise
LikeLike
Yeah, tried that. I guess 30 minutes is just pushing too far… Break out the film.
LikeLiked by 1 person
This was very interesting and helpful! Thanks 🙂
LikeLiked by 1 person
It is so well composed, so well lit. You must have a professional-grade camera for results such as this. I wish my point-and-shoot could deliver such photos!
LikeLike
San Francisco’s Spun-sugar Palace, The Conservatory, has never looked more beautiful. Bravo. You’re right about being careful where you shoot – Golden Gate Park at night is spooky and not that safe…Love your work.
LikeLiked by 1 person
Thank you in advance for the explanation. Now I see the reason why the night photos from professionals always look great.
LikeLike
Very informative.
LikeLike
I took some night time photos back in November as a task for PhotoChallenge.org group. I was blown away by the results. Everyone can give night time photography a try.
LikeLiked by 1 person
Thanks for the excellent article. Renewed my interest in night-time photography. Haven’t done that in decades.
I do have the winter clothes… summer is the issue where I am. blackflies/mosquitos will drain you here. I will invest in a good bug jacket for the spring/summer/fall and get some film.
LikeLiked by 2 people
Be careful with the bug repellent around your gear! That stuff melts plastic.
LikeLike
Wow, thank you so much for sharing these very beautiful scenery photos with us, you kind guy. We enjoyed them very much !
LikeLike
Great Advice – will be going out to experiment at the next available opportunity! Thanks!!
LikeLike
This is so inspiring!! Some very very amazing photographs!! Thanks for this post!!
LikeLike
Photos are absolutely beautiful! Thanks for sharing 🙂
LikeLiked by 1 person
This article indicates that your course would be worthwhile. I hope to see you there!
Regarding equipment, I’m wondering about cameras on smart phones. I downloaded several, and haven’t yet played with any. I welcome suggestions.
I wonder about single objects at night, not just landscapes. Shutting down the f stop while extending the shutter speed presented challenges that have overwhelmed me with trial and error, and no surviving successes. Your ratio of stops and exposure times helps a lot. Thanks!
I have yet to use a camera that has a histogram. I understand its value from my photo editing work. I look forward to playing with one on a camera.
When I first heard of Maslow in college, I was hooked. I love his pyramid, and gravitate toward anyone who mentions it. Therefor, the subject matter of your post caught my attention, and your mention of Maslow sucked me in.
By the way, I love the WordPress theme that you chose! I like writing my comment beside your post, instead of scrolling up and down as I respond to what I read.
LikeLike
These pictures are incredible, great tutorial.
LikeLike
MK…hop over to the Palace of Fine Arts (San Francisco’s other most wonderful building) for the year long celebration.
LikeLike
That is so awesome i have always wanted to capture great nigh shots but it doesn’t really come out so great. but that is some very very amazing photographs!!!
LikeLike
Thanks for sharing these great tips…! 🙂
LikeLike
Beactufull .
LikeLiked by 1 person
nice tips and information for me that want to learn more about photography, and nice portfolio.. very inspiring
LikeLike