Make a custom Image Widget with this step-by-step tutorial.

 Widgets on WordPress.com are handy features: they display important information and visually enhance our sidebars and footers. For those of you who want to personalize your site a bit more, consider creating a custom Image Widget, which you can use to:
- promote a book, project, or event
- call attention to specific links, like your social channels
- shape your visual identity
Here, we’ll show you how to design your own image, which you can insert into an Image Widget.
Custom Image Widgets can be simple — consider the colored blocks of text for some of Bethany Meyer’s tags and categories on LifeAbsorbed (seen at left).
Or, you can mix images and graphics with text to create even more personalized Image Widgets, like these clickable images promoting Phoebe and Matt’s social channels at travel blog Little Grey Box:

You don’t need to be a Photoshop whiz to achieve certain editing effects. All you need is this tutorial, a photo editor like PicMonkey, and a willingness to experiment. I encourage you to follow the steps below with your own image.
So, let’s say I want to create an Image Widget for my “Essays on Nature” category of posts, which I’ll display prominently in my sidebar. Here’s what we need to do:
Select an image for the Image Widget
Find an image that will act as the background for your widget. Your sidebar and footer are fairly narrow spaces, so choose an image that displays well at a smaller size. Stay away from pictures with lots of detail, or wide-angle landscapes that won’t look as clear in thumbnail size. Close-up shots, abstract images, and patterns work great. If you don’t have an image that works, browse a site where you can download free images.
Drop the image into PicMonkey
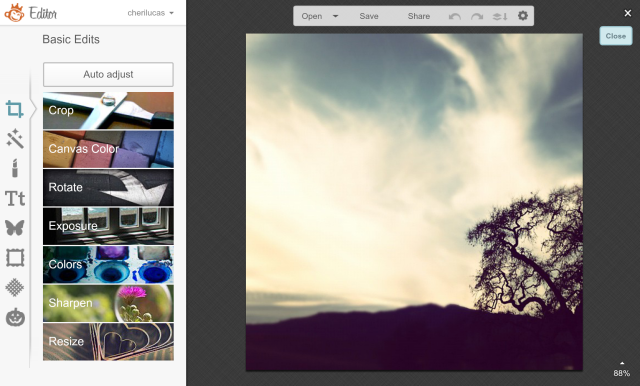
Drop your image into PicMonkey. On the homepage, click “Edit a photo,” and then “Open new” to locate the image you’d like to work with. After you select your image, you should see an interface like this:
Use tools and filters to achieve an overall effect
The Exposure tool: I primarily use the Brighten and Contrast options. More than 5 to 10 points in either direction can really change the quality and feel of your image, so tweak with care.
The primary features I use in PicMonkey’s toolbox are Crop, Exposure, and Sharpen in the Basic Edits panel. Crop this image first, before you do anything else. If you’d like to stack numerous thin widgets atop each other, as shown on LifeAbsorbed or Little Grey Box, crop the image to the desired size. Make sure there’s enough space for text, and a large-enough, readable font.
Next, I’d like to place a soft filter over my image. One of the handiest areas of PicMonkey is the Effects panel — click on the magic wand on the left:
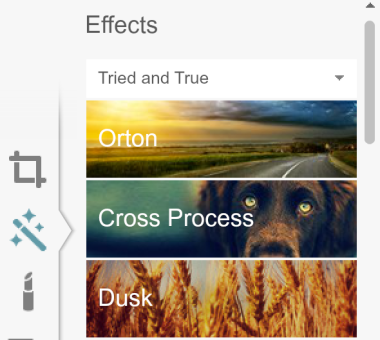
The panel changes, and you’ll see a new list of options for filters. Click on different ones to see the effects applied on your image, and click Cancel if you’re not happy with the effect. You have the option to set the intensity of each effect, too.
To get a vintage look, Tranquil and Rapture might work for you. Or, scroll down and click on Yester-color, which combines a 1970s film filter and rounded edges.

The Sharpen tool: This is usually a final image editing step, just before moving on to the text layer. While each image is different, I tend to stay between 5 and 10 for Sharpness and 5 and 20 for Clarity.
Once you’re done experimenting, head back to the Basic Edits panel to the Sharpen tool and increase the Sharpness and Clarity a bit. This makes your image crisper, which is helpful if it’s displayed at a small size.
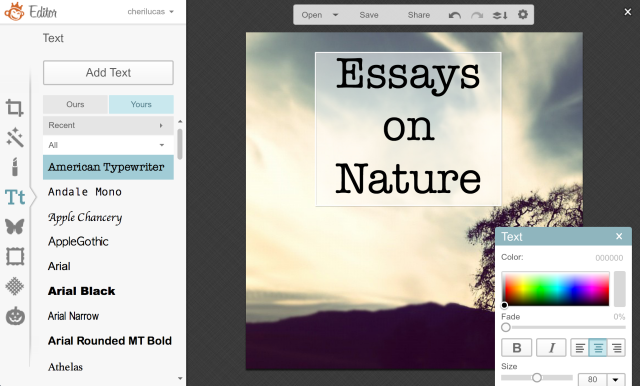
Add a layer of text
Click on the Tt icon to view font options. This is where you can have some fun — as font can be playful, or sophisticated — and set the mood for your site. Be mindful of the font you choose, making sure that it complements the fonts already on your site. (If you don’t know what fonts your theme uses, use a browser extension like WhatFont to identify them.)
Frame the image with a border
This step is optional, but an Image Widget with a border can look sleek, especially if you create multiple Image Widgets with the same frame. The frames offer a visually cohesive look — and if the border is the same color as an accent in your theme’s color palette, even better.
Click on the Frames icon to see border options, from thin black lines to faux-film edges. You can also apply shape cutouts and create widgets that are circular, heart-shaped, and more.

Save your image and insert it into an Image Widget
Once you’re happy with your image, upload it into your site’s Media Library (My Site(s) → Media → Add). Now, to add your new Image Widget, go to your Customizer (My Site(s) → Customize → Widgets), click on the site section where you’d like to add the widget, click “Add a Widget,” and search for and select “Image.”

Not all of the widget fields are mandatory — for instance, you don’t have to display a widget title or fill in the fields in the “Edit Image” view. Some people forego a widget title for a cleaner look.
Add the image you just created to this new widget. Under “Link to,” insert the link that you’d like readers to be directed to when they click on this image on your site. For our example in this tutorial, I’ll add the link to the category page I’d like to promote — my essays on nature.

You can also adjust the size of the image by clicking Edit Image and selecting one of the options in the Size dropdown menu, or setting a custom size.

Admire your new widget!
Once you’ve published your new Image Widget, go to your site and click on the image to ensure it goes to the page you’ve specified. After that, you’re all set. Happy image making!

Currently blogless? You’re a click away from sharing your story.
Create your blog at WordPress.com


Really helpful and easy-to-follow guide. Thanks for sharing it: it’s given me some good ideas for ways of promoting content on my blog.
LikeLiked by 3 people
Great — happy to hear it’s helpful.
LikeLike
Thank you, thank you, thank you! I just sent a help request to somewhere in the wordpress world to help me with this issue-this could not have been more timely or appreciated!
LikeLike
You’re welcome, you’re welcome, you’re welcome!
LikeLiked by 1 person
Oh gosh, exactly what I’ve been looking for! Thank you so much for this easy-to-follow guide. Here I go, taking a crack at this techy magic *flexes fingers*
LikeLiked by 2 people
Awesome — glad this was what you’ve been looking for.
LikeLike
Thank you! I was actually just trying to figure out how to add some custom designs with an absence of software. Thank you!
LikeLike
You’re welcome — and that’s great. You don’t need to pay for software to do these sorts of things.
LikeLike
Very useful and interesting! Thanks so much!
LikeLike
Wow, I wouldn’t have thought it was so simple. Thanks
LikeLike
LOVE.
LikeLike
Useful info! Thank you!
LikeLike
I’ve used picmonkey for photos but how do you create the social media bars that were given in the example?
LikeLike
Good question. I could probably do a whole other tutorial on this, but since you’ve used PicMonkey before, here are some general steps you could do:
— At top of PicMonkey homepage, click on Design and then Custom.
— Set your canvas size, which will depend on your sidebar/footer space and what you want. 200×50? Probably larger than that.
— Use the Canvas Color picker on the left panel to choose your background color.
— Click on Tt icon (for text), pick your font, and add text to the canvas. You’ll probably need to adjust the font so it all fits — but don’t make it too small…
— Save the image, then follow the instructions from this tutorial on copying the image URL and creating the Image Widget.
If you have further questions on using PicMonkey itself, the PicMonkey site and tutorials are likely much more thorough than I could ever be! http://www.picmonkey.com/blog/category/tutorials/
LikeLiked by 1 person
Oh, the steps above would be to create one single bar. You’d then repeat this process for multiple social accounts, and you can use either the same background color or different ones, as shown in the example.
LikeLike
This was helpful! 🙂
LikeLike
I use PicMonkey for all of my widgets too! It is really easy to do and the more creative you are, the better your widgets turn out! Have fun and experiment today and make a widget! Stop on over to check out mine!
LikeLike
Thanks so much. It was easy!
LikeLike
Hooray!!! I’ve been wondering how to do this. PicMonkey has already become a favorite of mine, thanks to your recommendation. Can’t wait to give it a spin for an image widget. 🙂
LikeLike
Great idea, will try it when ever I got an free hour! Thanks for a very neat and clear tutorial!
LikeLike
This was SO helpful. Thank you, thank you, thank you for this easy to follow tutorial!
LikeLike
Awesome idea and very helpful. Thanks
LikeLike
Simple and great ! Thank you for sharing.
LikeLike
This is useful information and so easy to follow. Thank you!
LikeLike
Thank you for sharing these great tips. I NEVER knew how to do this. I had so much fun creating one.
LikeLike
Very simple! Great info, thanks 🙂
LikeLike
If I wanted to create an image widget for a follow button, where can I locate the URL for the link to follow my blog?
LikeLike
There isn’t a URL for this — from what you’ve said, it seems like you want to create a custom image for the Follow Blog widget, but that’s not possible, as far as I know.
One option, though, is to create a new page titled “Subscribe” (or “Follow Me,” etc.), and on that page you can include this (added in your Text Editor):
[blog_subscription_form]That offers the same function as the Follow Blog Widget. You could then create an Image Widget that links to this page.
Alternatively, there are URLs for your blog’s feeds, for your readers that follow blogs/sites via feed readers. It’s not the same thing, but it’s also an option: https://wordpress.com/support/feeds/
As shown in the Your Feeds section, your main blog feed URL is: http://soulsetinmotion.wordpress.com/feed/
LikeLiked by 1 person
Is it possible to get the widgets side by side? I have a pretty small icon that I’m attached to, but it doesn’t make sense to have it all spread out. (I have a basic xyz.wp.com site) Is there a way to clean it up or am I going to have to make new icons?
LikeLike
To get smaller images side by side, I believe you wouldn’t use Image Widgets, but instead create a Text Widget which has multiple images that are then linked to whatever you want (social accounts, other sites, etc.).
A similar request: https://wordpress.com/forums/topic/2-widgets-side-by-side-in-the-sidebar?replies=4
For more on creating Text Widgets, read the “Get creative with text widgets” section in this post: https://wordpress.com/dailypost/2013/01/31/widgets-101/
LikeLiked by 1 person
This is fantastic information. I’m just getting started with WordPress and this will definitely help me make my blog much more interesting!
LikeLiked by 1 person
Really liked it 🙂
LikeLiked by 1 person