Creating and organizing menus is a common stumbling block for bloggers new and old — it’s definitely worth revisiting this helpful road map to menu success from Happiness Engineer Andrea Bishop.
Creating and organizing menus is a common stumbling block for bloggers new and old — it’s definitely worth revisiting this helpful road map to menu success from Happiness Engineer Andrea Bishop.
A reader is visiting your site for the first time. Where do they go? What do they click on? Adding a custom menu to your site helps readers see how your site is organized and what you consider important.
Why would you need a custom menu? Maybe you’re a food blogger trying to organize sweet and savory recipes:

navigation on bigalittlea.com in the Just Desserts theme
Or, maybe you’re a world traveler looking to organize your adventures by location:
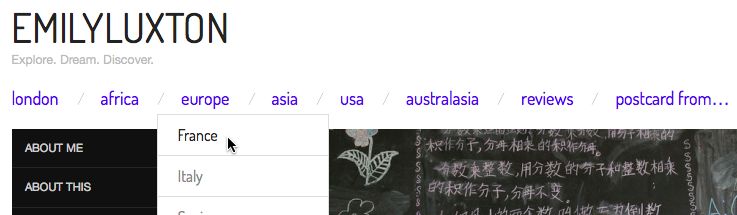
navigation on emilyluxton.co.uk using the Oxygen theme
Perhaps, you don’t like the default order of what is being filled in your navigation as you create new pages. Creating a custom menu allows you to specify what appears and in what order.
Basics
To create a custom menu, you’ll need to have already created some of these pages, categories, and posts so you can add them to your menu.
Now to create the menu!!!
- Go to Appearance → Menus.
- If you have existing pages but no menu yet, we try to give you a head start with a menu named Menu 1 that includes those pages. Nifty! (If you don’t want to keep an added page, go ahead and open it up and click the link to Remove it.)
- Name your menu and click Create Menu. I usually choose something simple like main, but you can name it anything.
Once the menu is created, you can start adding things to it.

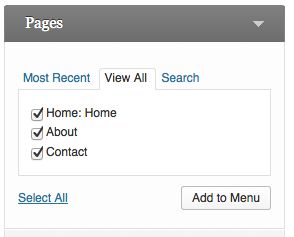
- To add a page, put a check next to the page and click Add to Menu. There are tabs in the Pages box to help you find your pages faster.
- Custom Links give you the option to link to anything. Just enter the URL and use the Label to set the text that will appear in the menu. Then click Add to Menu. You can link to another blog, your RSS feed, an external website, and other things that don’t deal with pages or categories specifically. Imagine a menu for your film blog that makes it easy for readers to get to IMDB.

- When adding categories, use the tabs to find the ones you want to add. Keep in mind View All will show all your categories (even the ones with zero posts). Adding a category with zero posts will give you a Not Found message on your site until you mark posts in that category, then content will appear. If you have taken the time to put your posts in categories, why not utilize them? Take that same film blog and allow readers to sort your posts by genre, year, or director.

- You can also link to specific posts or tags. If you don’t see those options on your screen, head up to Screen Options at the top of of the page, pop open that tab, and put a check next to Posts and Tags. Then, you’ll be able to add posts or tags to your menu in the same manner.
Organizing your menu
Once added to the menu, all of those items (pages, links, categories, etc.) can be dragged and dropped around elsewhere in the order you want. Drag them up or drag them down to change the order. If you want to have a dropdown below a menu item, drag it to the right of what you want the “parent” to be. Start adding the countries you’ve visited below the continents for example:

If you change the order, don’t forget to save the menu when you are done.
Creating more than one menu
Do you love your new menu so much you want to create another one? Some themes support multiple menus (above the header, below the header, in the footer, etc.): Able, Academica, Beach, Blaskan, Bold News, Comet, Debut, Fresh News, Imbalance2, Isca, Lifestyle, Magazine, Magnate Express, Mixfolio, Modern News, Nuntius, Outspoken, Oxygen, Scrollider Express, Shaan, Sight, Stay, Traction, Traveler, and Yoko.
To create another menu, click the create a new menu link, name your menu, then click the Create Menu button. You can switch between which menu you’re editing by using the select drop-down. Choose the menu by its name and click Select.

Establishing where your menu goes
You can set your menu’s location in two different ways. One way is through the bottom of the menu via the checkbox.

The other is via the Manage Locations tab at the top of the Menus page. Just set the drop-down box to your menu’s name. Save before leaving this page.

So go forth! Be an explorer and navigate that blog! In the end, it’s up to you to decide which parts of your site you consider important and how to organize it.
Currently blogless? You’re a click away from sharing your story.
Create your blog at WordPress.com


goods !
LikeLiked by 1 person
That’s given me something to think about, thanks. I’m not 100% happy with my page layout so I might give this a go.
LikeLiked by 1 person
Thanks for the great information 🙂
LikeLike
That post addressed exactly what I was looking for. Thanks
LikeLike
I recently worked this out too, and it is a great idea, now I can have the menu exactly as I want it, and some can be links as well. Great idea.
LikeLike
That is of great help thank you
LikeLike
Perfect timing! Thank you, I was getting into an awful mess with my menu and this cleared it all up 🙂
LikeLike
Sweet as, that simplified linking my blogs, thanks!
LikeLike
Thanks for the tips!
I love all the great tips on here as I am very new to blogging and trying to set my page up
LikeLike
I actually did this! I am so proud of myself but it’s all due to your clear instructions. Thank you. Now I have a link to my Novel (on Amazon)plus I was able to make a category of most popular posts with a drop-down menu. I never thought I could do something so “sophisticated!” One question if I may – – my menu is a very drab gray color…..is that just standard unless you pay to upgrade or is there a possibility of changing the color of the font of my menu items?
LikeLike
Great post, thanks for the great info!
LikeLike
Thanks for this helpful post.
I am making my custom menu now.
LikeLike
aha…so we just organize it according to our creative principles…or view points.
http://www.phaderewaw.wordpress.com
LikeLike
Nice . like
LikeLike
hi guys! i’m new to this site and i don’t have followers yet so hope you guys help me out by viewing my page and even following me!!!! pls i’d love to meet you all
LikeLike
http://iammohhit.wordpress.com/2014/05/25/twisted-fantasy/
LikeLike
A really useful article. I am new to blogging and it has given me quite a few ideas.
The Science Geek
http://thesciencegeek01.wordpress.com/
LikeLike
please check my blog http://ewanesska.wordpress.com/
LikeLike
So useful! Thank you so much!
LikeLike
As a new blogger I was having difficulty customizing my page…this is really helpful…thanx 🙂
LikeLike
This was SO helpful, as I had actually been thinking about how I could create drop down menus, but couldn’t figure out how. Great instructional post!
LikeLike
awsome
LikeLike
Thank you!
LikeLike
This was so valuable. Thank you! I look forward to learning more about formatting and making my travel blog as inviting as possible and will look regularly to your posts for inspiration and good, practical techniques!
LikeLike
http://informasihariini.wordpress.com/
LikeLike