In Blogging 101 and 201, lots of you were customizing your blogs and playing with widgets. This post is a great tutorial on how to create a totally unique, branded look for your widgets, all with easy online tools.
In the first post of this series, “Widgets 101,” we introduced some popular widgets, including the Text and Image Widgets, and also mentioned quick ways to transform an image by changing its shape or adding a frame. Since this month is all about photography and phoneography, let’s focus on Image Widgets and explore how to customize them.
If you’re short on time and want to skip ahead:
Image widget essentials
First, let’s make sure we’ve got the basics down. To activate an Image Widget in your sidebar, go to Appearance » Widgets in your dashboard and locate the widget that says “Image” under Available Widgets. Then, drag it to the right, where you’d like it to appear.
 Be sure to fill in the required fields for this widget — the “Image URL” is important, as WordPress.com needs to know where your image is saved so it can display your image. In other words, you need to grab the image’s URL, which you can do by going into your Media Library (Media » Library), clicking the “Edit” link under the image, and copying the link under “File URL.”
This URL is what you’ll insert in the “Image URL” field, shown in the screenshot on the left.
You can also use an image URL on another website — be sure to check the URL in your browser before adding it to the widget to confirm it ends with an extension specific to an image file (such as .jpg, .gif, .png).
Also, do take advantage of the “Link URL” field at the bottom. If you want an image in your sidebar to direct readers somewhere on your site (or elsewhere), specify the link here.
Custom-made image widgets
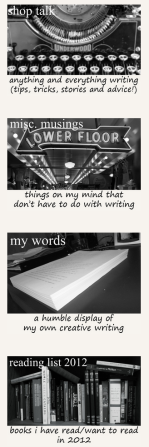 Connor at adventures of a wanna-be writer created Image Widgets for his sidebar, each labeled with text and linked to specific categories on his blog. We like how the black-and-white images (and the font of the image text and captions) work together as a cohesive visual set, and how the objects in the images evoke the literary life.
You can create similar images, too. If you have a working knowledge of Photoshop, whipping up sidebar images is probably a snap. If you don’t have Photoshop, or are a design and photo editing newbie, use another online photo editor (like PicMonkey, Pixlr, or FotoFlexer) to transform your images with text, textures and effects, overlays and icons, frames, and more.
Let’s say I want to create an Image Widget for my sidebar that, when clicked, directs my readers to a page on my blog of galleries of ocean photographs. I can do this easily by adding effects to one of my own images.
So, here’s what I’ve done: I grabbed this Instagram image of the Pacific Ocean from my feed; dropped it into PicMonkey; and used its various effects to insert text, add texture, and crop and frame it — all in less than a minute. Here’s the result:
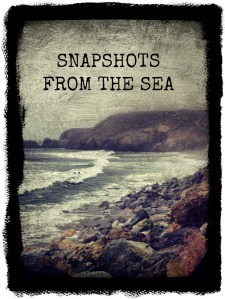
Next, I’ll add this image to my Media Library, copy the “File URL” as described in the section above, and insert this URL into the field in the widget. I’ll control the size by inputting the dimensions (in pixels) for the “Width” and “Height.” And voilà — I’ve created a custom-made Image Widget, which I can link to a gallery page on my site.
The process is pretty simple — all you need are some images to experiment with and an online photo editor. Custom-made Image Widgets help to shape your site’s overall aesthetic, as Connor’s widgets illustrate above, and contribute to the visual branding your blog, which we’ll talk about next.
Visual identity: branding your blog
Not too long ago, Pick talked about branding your blog: creating an overall mood and ensuring your site visually represents you and your interests. We like the look of Zoe’s blog, Miss Zoe: The Art of Creating, because she creates a visual identity using color, font, and pattern — not just in her sidebar, but everywhere.
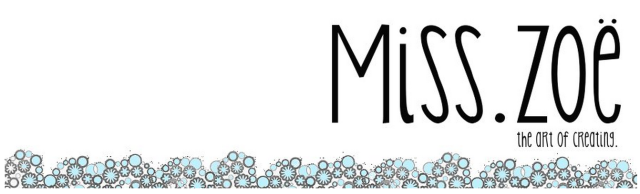
Miss Zoe’s custom header image
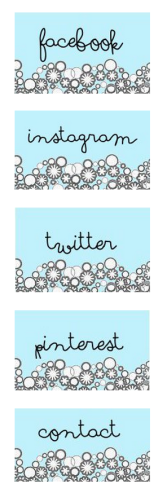
Miss Zoe’s image widgets
The pattern used in her custom header — underneath the name of her blog — matches up perfectly with her custom-made image widgets, which direct users to her social media profiles on Facebook, Instagram, Twitter, and Pinterest, as well as a contact email link.
In your dashboard, you’ll find many widgets, including ones for Twitter, Flickr, About.me, and more. They work in different ways — some display your latest content (tweets, Flickr photos), while others simply link to your profiles elsewhere.
Creating your own images for your favorite social networks will help to visually unify your site, especially when combined with a specific color palette. You can specify a custom link color in Oxygen, Zoe’s current theme (and her shade of powder blue is #0da4d3, in case you’re wondering!). The image backgrounds and header design match this color, creating a nice visual package.
So, consider how you can use color in Image Widgets, as well as other features like a custom header and custom background image, to visually brand your blog.
If you’re interested in experimenting with backgrounds and textures, browse options on sites like Subtle Patterns, My Site My Way, Squidfingers, and GRSites.
Have questions? Ideas? Let us know in the comments.
Currently blogless? You’re a click away from sharing your story.
Create your blog at WordPress.com


I saw this idea a few weeks ago, and changed up my website with pictures as links to Facebook and Twitter! How does it look? I sometimes think it looks a little out of place considering the rest of my blog, but I’d love others’ feedback. Thanks all!!
neverstationary.wordpress.com
LikeLiked by 1 person
Hi, Cat… I just checked out your blog and like it. I only saw an empty box in the upper right-hand corner with an image that seemed to indicate a broken link or something. Otherwise, it looks good to me. I’m heading back to check it out more. 🙂
LikeLike
Valeu eu já fui gato,agora estou mais rato brincadeira gostei dos comentários obrigado.
LikeLike
Yep, I see the same thing Cat.
LikeLike
Valeu estou aprendendo,talvez eu demore para fazer os acertos necessários.
LikeLike
i like it, clean with catchy images
LikeLike
Obrigado você foi compreensivel.
LikeLike
This is a new idea for me, I tried to add a new picture of mine onto the right upper corner of my homepage:
http://cxianliu.wordpress.com/
LikeLike
Your picture looks very nice on your page and you have a lovely blog. After checking it out, I’m now a follower. I believe we have several things in common.
LikeLike
Thanks!
LikeLike
As always, great information. Thank you!
LikeLike
Omigosh. I did it! Is it too big? What fun.
LikeLike
I am def. gonna have to try this!!
http://www.thehillbillyblogger.com/blog
LikeLike
I cannot get my FaceBook to link to my blog at all which is very annoying as I am doing the same for other links and they are working great. Any ideas? x
LikeLike
I couldn’t even find your Facebook link to try it for you. Am I just missing it?
LikeLike
Lol it’s just a black box on side under the other links 😞
LikeLike
Oh, okay. It does work fine for me. The all-black box without any FB identifier made me skip right over it. Do you want it to be more recognizable or do you prefer the mystery of the black box?
LikeLike
I would like it to say and link to my Nanny Cool FB page.
LikeLiked by 1 person
LikeLiked by 1 person
The Fitted-In Project – Fighting against injustice and for social justice
LikeLike
Okay, as usual there are some amazing options laid out before us, sort of like a “Blogasbord Smorgasbord!” But something very puzzling? I really liked Miss Zoe’s custom header that you featured here (and all her other little details!) so I clicked on the link you provided for her blog. But I didn’t find anything resembling that look at all. I just found a carrot in her header? I hope this isn’t part of Menopause?? 😉
LikeLiked by 1 person
I got the same. I think it might link to another blog. Unless we both have the same issue 🙂
LikeLike
I don’t know….Do you have insomnia, hot flashes and brain fog too? 😉
LikeLike
No more than usual 🙂 I got through it pretty well. All the best.
LikeLike
Oh, okay, must be a wrong link then. Can’t be both of us!!
LikeLike
Great work. Thanks a bunch!
LikeLike
Use natural ingredients
LikeLike
I still love the appearance of my blog but would love to update the Facebook, Twitter, and image widgets. I’m short on time lately and barely keeping up with regular posting but will put that as my next project.
LikeLike
Totally agree with you 🙂
LikeLike
I’m a new blogger here. I will try to improve my blog page. Thanks a lot for sharing your ideas. 😃
LikeLike
I have image widgets which “show” when there is a particular category, linking to pages with links to other posts in that category, a “best of” page.
But no-one has liked me on facebook! It’s been up for two days!
LikeLike
I like custom-made image widgets and use to them direct readers to posts I like. I use Pain.NET and Inkscape to make them. The blog is in Dutch…
http://vhvnarbeidszaken.com/
LikeLiked by 1 person
Widgets are swimming in blog, and I am sure they are having fun. 🙂
LikeLike
Thanks so much. I’ve been trying to figure out how to do that for ages.
LikeLike
Thanks for this …..really informative and I have a question. You mention framing and some how or other I have missed how to do that could you give me the link?? would be grateful : )
LikeLike
I use Pix Builder Studio and Photo Scape also HP Photo Creations there are links for others in the story above: (it is not a ‘Wordpress feature’.. you edit before upload) Excerpt from story above: “If you don’t have Photoshop, or are a design and photo editing newbie, use one of the free (and very handy) online photo editors out there (like PicMonkey, Pixlr, or FotoFlexer) to transform your images with text, textures and effects, overlays and icons, frames, and more.”
PicMonkey is good, I’ve used that one also..
I hope this helps you.. 🙂
LikeLike
Thanks muchly for this info : ))
LikeLike
I will definitely have to try this out. I’ll put it towards my tea theme. I’m obsessed with tea as of late but I’ve found some great visual tea pictures to use. I even use pictures in my posts to identify the different types. Like poetry has a different image in the middle from short story or chaptered works; in the near future when I get with it.
LikeLike
I am a newbie at blogging (my blog is only a day old!), and I am still learning about how widgets work. This post (and the links to other widgets-related posts) is really timely for me! Thank you.
LikeLike
text
LikeLike
Thanks so very good.
LikeLike
Need help to enhance my blog as i am new to this
http://yourmoneyonlin.wordpress.com/
Thanx in advance
LikeLike
(y)
LikeLike
I’m new to the bloggers world. This is very helpful thanks you. 🙂
LikeLike
Agradeço vou trabalhar isso.
LikeLike
Hi,
I have been trying to use custom images to do something like was Zoe has done for Facebook, instagram, etc. It works great. But I was wondering if there is a way i could use Facebook and Instagram icons and have them neatly put next to each other vs having them stacked up one ontop of each other as I do now. Do let me know. Thanks!
I’m at theincurablecook.com
LikeLike
That’s very inspiring. Will try my best to create an interesting look for my blog. Thanks!
LikeLike
hi
LikeLike
quit e-mailing me for gods sake
Date: Sat, 3 May 2014 16:01:40 +0000 To: dayaan599@live.com
LikeLike