
 Earlier this month, we discussed cropping as a quick fix to your images. Since Instagram, Hipstamatic, and similar photo apps and editors are so popular, let’s talk about using the filters on these types of tools, too. If you’re already using filtered images on your blog, or if you’re wondering if it’s worth experimenting with, dive in.
Some photographers would rather not use instant effects, like Instagram’s popular Earlybird and Lo-Fi filters, at all. In some cases, you might take a perfectly fine photograph and taint it with unnecessary saturation and contrast (which Leanne Cole touched on in her editing tutorial).
Or, if you run a 1970s retro filter (like Instagram’s Walden) over a picture, you might like the dreamy effect, but in doing so may have decreased the quality and clarity of the image. So, take our suggestions if they’re fit for your work and style. Ultimately, remember: using filters can be fun, and if used with care, can kick up your photos a notch.
Experimenting with filters
Editing a photograph depends on a number of factors, from the mood and style you’d like to achieve to how the image will be displayed on your blog (on its own, within a gallery, as a thumbnail, or in full size). You might want to do heavy editing over your image, especially if you’re going for a dramatic or abstract feel, or you may want to keep it light, simply to sharpen or make the colors pop a bit. The size of the image, and the context in which you’re displaying it, might also affect what you do with it.
Consider this photograph, taken in the harbor of Monterey Bay in Central California:

The big empty space in the upper part of the frame creates an unusual composition, while the colors on the boats — especially the bright blue — add nice details. Compare several filtering options, done in Instagram:


Sometimes people go filter-crazy! In the left image, I used Kelvin, which creates an over-saturated look with warm and orange hues. Sometimes it works well, and other times, it ruins the image. In this case, I miss the smooth, calm surface of the sea in the original photo.
The center image uses the Toaster filter — marked by its dramatic vignette effect. The filter creates an aged, burnt quality, reminiscent of faded film photographs in your grandmother’s family albums. The effect looks great on images you want to purposely age, but I’m not sure it works here: the vignette is distracting and doesn’t add anything to the original — there’s no need to make it look old.
Finally, on the right, I didn’t add a filter but instead used Instagram’s Lux tool — the sun symbol on the right in the app’s editing screen — to give it an extra boost.

You can use the Lux tool to brighten an underexposed or low-contrast image. Sometimes, it can improve an image dramatically, adding highlights, sharpening details, and making colors pop a bit more. In the right image, you can see the Lux tool bumped up the contrast a bit, while making the ripples in the surface of the water more pronounced. The effect is more subtle than the other two.
Using filters to enhance — not to drastically change
Take a look at this image, snapped along Sonoma County’s Russian River in Northern California:
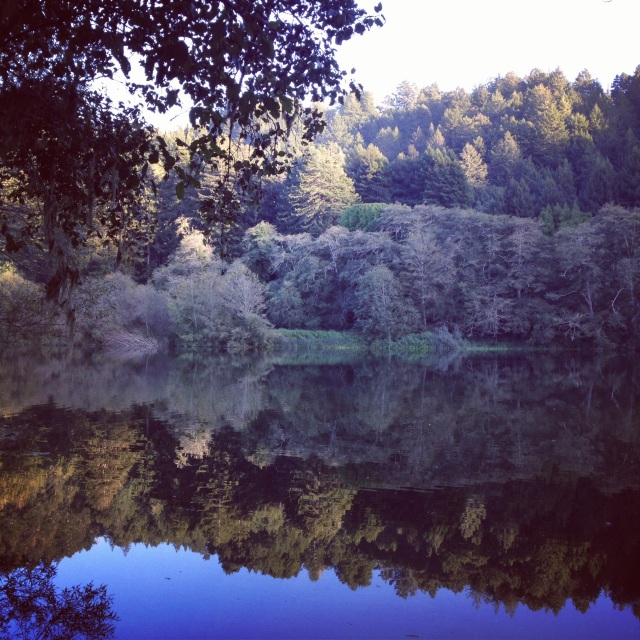
The foliage and reflections on the water might be lovely as is, but what happens if we played with filters a bit?


Photo apps and online editors — from Instagram to Photoshop Express to PicMonkey — let you transform a color image into black and white. On the left, I used the Willow filter, one of Instagram’s two black and white options. While I love black and white images, this filter completely strips the life from the original image — the forest’s shades from green to gold were the photo’s strength. Now, it feels flat.
In the middle, the Kelvin filter has once again brightens the photo, but the tones are off, creating unnatural hues in the tips of the trees and a frosty effect on the foliage along the riverbanks. When choosing filters, pay attention to the look and feel — it’s easy to manufacture a completely different mood. Sometimes that may be your intention, but as a general rule, use a light editing hand. Oftentimes, less is more.
The image on the right, using the Mayfair filter and the Lux effect, is a better balance: it brings out the golden hues in the treetops, but also emphasizes the greens along the riverbank, creating a variety of colors in the frame. Overall, the contrast is increased, which also brings out the details.
You might prefer the original instead — and when it comes down to it, there’s no clear-cut right or wrong way to use filters. Overall, think about the mood you want to convey, and always compare your originals to your edited versions.
Quick takeaways:
- For artsy and abstract, to make architectural images sharp, or to define shapes and lines, try black and white.
- For warm and bright, or to mimic a faded retro effect, use yellow and orange hues.
- To keep an image cool, go for filters that look green and blue.
- Use Instagram’s Lux button (or similar contrast tool) first to see if it helps — sometimes that’s all you need.
How would you have edited these images? What other tips do you have for those who want to experiment with filters?
Currently blogless? You’re a click away from sharing your story.
Create your blog at WordPress.com


Nice post! The effects demonstrated with examples were informative. I’ve been experimenting with filters since I put up my blog last month. Infact for my post for the Daily Prompt:BFFs today I have applied monochromatic filters to the photographs….I think the effects were OK.
LikeLike
Actually, I’ve been using the free programs that came with my computer… so I’m looking forward to trying out more options. I had been experimenting with possible new background images and ended up not changing at all. However, I did use those images (and a few others) for a post on how (not) to develop background images for a blog last week:
LikeLike
I normally do not use preset filters but try to create my own in Lightroom. Sometimes I come across a preset that is perfect for what I am trying to achieve but most times I use a filter as a starting point only.
LikeLike
Great ideas. Thanks for showing us the different options. I usually just prefer the original.
LikeLike
Yep — sometimes the original is the best 🙂
LikeLike
Interesting. For landscapes I tend not to use any filters, though may adjust levels, crop, straighten etc. But I have been playing around with filters on my architectural photos where sometimes they bring out a detail that previously was unnoticed. I think if you don’t overdo it, then filters can enhance a photo. And if it doesn’t you can always go back to the original 🙂
LikeLike
Thanks so much for this excellent post jammed packed with useful information. I’m drawing it to my hubby’s attention as he’s into photography.
LikeLike
nice post!
LikeLike
Great post Cheri. I use Snapseed’s editing options and filters when I am working images on my iPad. Always happy with the results.
LikeLike
Ah, yes — Snapseed is another popular tool. Thanks for sharing. (And for more: https://wordpress.com/dailypost/2013/03/13/photo-apps/)
LikeLike
Thanks for the link Cheri
LikeLike
In my own work I use filters to move my closer to the original image I viewed when I snapped the shutter . I don’t always shoot with my DSLR in RAW which gives a wider latitude of post-adjustment. My pocket camera and old auto-zoom only shoot jpeg. Those almost always need some tweaking to move closer to reality. Without lens’ hoods, screw on filters, umbrellas, reflectors, or tents, some subjects never come close to original lighting using average cameras. I’m a big fan of OnOne products. They have a free download program that works extremely well for the average shooter. Another terrific post.
LikeLike
I enjoy playing with filters and relaxing while making a number of different pics using photo effects.
One can always learn something new, at least getting some sort of inspiration going through articles like the above posted one.
Thank you for sharing your experience with us! 🙂
LikeLike
Thank you for this enlightening and insightful post. Exactly the information I was wondering about! I’m a big fan of post-editing and I love trying out different effects for the fun of it. Good to hear about free options for filters — PicMonkey looks good, I’ll need to give it a try. I normally work with paid but inexpensive photo-editing software (I recently got Corel Paint Shop and I’m very happy with it), but there’s never enough filters to try out 🙂 Thanks again for the write-up!
LikeLike
It will probably take me awhile to learn all of that. But I like photography so I would like to know those specifics. Thanks for showing those variances.
LikeLike
awesome images.
LikeLike
Pics Art and Instagram are my fave. I love using filters especially for outside images.
LikeLike
Very helpful. I haven’t posted an image yet in my blog, but this is going to help me decide what to do with some of my photos.
LikeLike
First time I’ve used preset filters as I like to be at the controls. It was fun to play with picmonkey and see what it could do.
http://moondustwriter.com/2014/01/28/filtering-your-shots-photography-dphcallenge/
LikeLike
Thanks for the suggestions. I love my Instagram filters. You just never know what picture you’re going to get by playing with it.
LikeLike
I’m so fond of the two blurs you can use too.
LikeLike
Me too! Although I use them sparingly.
LikeLike
I do adjust my photos –usually small tweaks to sharpen, add a slighter richer hue/colouring but none. My objective is not to overly distort the colour radically but to make shapes and certain objects pop out a bit from the background. Then of course, I crop and shrink the size for blog.
I’m sure um…others like the retro 1970’s look but no, it just um bores me. It reminds me of my teen years which is when Polaroid cameras were very popular.
LikeLike
Great write up. Its surprising sometimes how people don’t realize photos are “over-edited”
LikeLike
Snapseed is my favorite iPhone/iPad app for photo editing. I can fine tune the image, even add some HDR effects and then throw a filter or several on it. Then, send it to Instagram for sharing.
LikeLike
some guy asked me the other week what my best camera was and i said my 5Dmk3 to which he said that it wasn’t because I didn’t always have it with me unlike my iphone which is always in my pocket. essentially true, and especially so when you consider all the apps and filters available. here’s a few shots of just the Transamerica Pyramid in San Francisco, all with different fun filters: http://adamoe.com/2014/01/27/my-sf-iphone-pyramid-building-snap-collection/
LikeLike
this is a great way of showing how different lighting can change an entire picture. doing a whole project on this would be great!
LikeLike
I paint in oils, but I’m greatly interested in photography. The differences in use of a filters changes the mood of the picture and evokes so much emotion with each change. Thanks for the images.
LikeLike
I think we’ll look back at images from 2013 and 2014 and decide they were the years of the over-used filters. Filters can enhance, but they can also be redundant and distract from the essence of the original image. We should aim to use them sparingly and with care.
LikeLike
Completely agree!
LikeLike
How about educating yourself, learn to make your own digital filters or even better do what we did in days of yore and buy or make your own glass filters using coloured cellophane, gels or painted glass.
Shooting in RAW then putting it through photoshop in RAW and play its great fun, if you haven’t go Photoshop you can get a very good alternative called Gimp which again if you play you can make amazing effects, the world goes far to fast its quicker for people to use the build in filters, slow down, take your time, enjoy the changes that you can make. You can find Gimp at gimp.org
I am currently rewriting a photography course I taught at school when I was working, I am updating it hopefully it will be ready by the end of February to follow it through for spring photos. 🙂
LikeLike
Thanks for sharing your thoughts and suggestions for other readers!
LikeLike
I also agree, the rise in the use of mobile phones have brought this frenzy of using filters and it seems every image that comes from a phone has had a filter applied, in 200 years time people will think that their ancestors in 2014 are pink and fuzzy or walked around all soft without a single spot or blemish 🙂
LikeLike
Agree. We are a culture of easily erased memories, deleteable relationships, and perfectly framed selfies.
LikeLike
I have been warning for the last 5 years about the disappearance of a generation, the perfectly framed selfies will never see the printers ink, they will be lost with the next generation of phones making it onto the market, cards being lost down the couch, images on hard drives fade with the electronic head crash while the ink on the heads of the printers set solid. I always told my students print, print, print. Compatibles are amazingly cheap and so are the printers to go with it. Online companies 100 5×7’s for less then £10. Its not a lot to ask to save a generation of selfies from vanishing now is it?
LikeLike
I follow someone who uses “Rise” a lot and it gives her image a soft, tranquil quality. However, it helps that her compositions are usually very minimalist and tend to complement the filter.
“Rise” is probably my most used Instragram filter, but I usually process my images through the “Camera+” app if I want to get the look just right. It has more B&W filters (including my favorite, “Noir”, which really emphasizes the blacks) and lets you combine the light setting with a filter application. I understand folks who don’t personally go for filters, but I live in the Pacific Northwest and the lighting is almost always never ideal. 🙂 (Pictures I’ve taken in the Philippines, though, are almost always never filtered. Because it’s always so bright, and the colors just pop.)
LikeLike
Hi again.
The picmonkey suggestion turned out to be really helpful. I finally managed to get a good new background image using that and the programs installed on my computer. (Yeah, I ran an image through Picmonkey and then two other programs…)
Thanks for the idea.
LikeLike