
If you’ve followed our Photography 101 series from the beginning, congratulations! We’ve covered the fundamentals of photography — from composition to lighting to color theory — and hope our guest photographer-led tutorials have helped sharpen your visual eye and given you tips for using your camera.
Now that you’ve graduated from this section on the nuts and bolts of photography, let’s talk more about the post-shooting process. So, you’ve taken a bunch of photos in your camera. Now what? Here, photographer Leanne Cole walks us through some image editing basics: straightening; cropping; setting exposure, contrast, and saturation; and spot correcting.
With so many options available these days, taking and editing photos can be complicated. If you’re new to photography, editing your images might seem daunting. There are many different types of software out there, but with the majority of them, you can do the same basic tasks to improve your images.
Take your photography blog to the next level with a custom domain, advanced design options, and more storage space — find a WordPress.com plan that’s right for you.
In this tutorial, I’ll use Photoshop Creative Cloud (PS CC), but the steps we’ll cover here can be done in other programs. I’ll mention some alternatives where I can.
Here’s an image I’ll use to illustrate some editing tasks, opened up in Photoshop:

I took this photo at Cape Shanck on the Victorian Coastline in Australia. Some of you might notice immediately that there are issues with it — what problems do you see?
I sometimes have trouble photographing scenes straight, with a level horizon line. So, let’s straighten this image.
Straighten an image

In Photoshop, head to the toolbox on the left side and look for the Eyedropper tool. If you hold your mouse key down on this tool, you’ll then see more options, including a Ruler tool. Click on it:

Take the tool to your image and find a line that should be straight, like the horizon line. Click and hold on one side, then drag it along the line and unclick. Once you have your line, go up to the top where it says “straighten.” Click on it, and you’ll end up with this:

The horizon is now level!
If you use Photoshop Elements (PSE), you’ll find this feature with the modify tools. In GIMP (GMU Image Manipulation Program), the tool isn’t available — if you want to straighten an image, use the Rotate tool and do it visually.
Quick tip from The Daily Post: If you use Instagram, you can straighten your images right in the app. Just click the icon on the left to open up the tool:
Other camera apps and photo editors offer a similar tool.

Crop an image
We successfully straightened the image above and made the horizon line level. As a result, do you see the white bits on the left and bottom of the image? Now, we must crop it.
Cropping can be done with any software — the icon for the Crop tool often looks like an image on a chopping board, or image corners superimposed atop one another (you might look for an icon with scissors as well). In Photoshop, it looks like this:

Once you click on a Crop tool, you can usually drag the borders of an image in and out, and place them exactly where you’d like to create your new borders.

In Photoshop, an outline will appear on the image, and you can move each line (border) to where you want it.
Quick tip from Leanne: No matter your editing software, click around and experiment. Make sure you know how to undo an action: Ctrl + Z works for many tasks, but note there are variations to these shortcuts depending on your computer and software. For example, if you’re using Photoshop on a PC, use Alt + Ctrl + Z.
Quick tip from The Daily Post: You can crop an image you’ve uploaded to your Media Library right in your dashboard. In Media → Library, click Edit under the image you want to crop, then Edit Image under the image, and click the Crop tool (on the far left of the editing options):

Set levels and adjust exposure
The next task in my workflow is adjusting the levels and ensuring I get the exposure I want for an image. (Wenjie introduced exposure in his post on light fundamentals.) The photo we’re working with is quite dark in places, so let’s see if we can fix this.

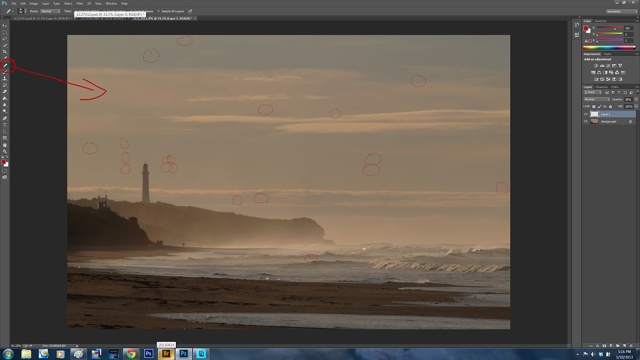
First, head to the right panel in Photoshop and look for Adjustments. Then, click on Levels. You’ll see a histogram, or a graphic like in the image above. Under this histogram, look for three arrows in a line: one at each end and one in the middle.

The arrow on the far left will make your image darker if you move it to the right. (So, in the example above with our too-dark photo, I’ve left it alone.) If you move the arrow on the far right to the left, the image will lighten. (If you look at the screenshot above, you’ll notice I moved the right arrow, circled in red, slightly.)
The middle arrow (also circled in red in the screenshot above) changes the mid-tones, which helps with the image’s shadows. As you can see, I’ve moved it to the left to lighten up the shadows. The result? The rocks stand out a lot more.
Experiment with contrast

The Brightness/Contrast tool is great. In Photoshop, look for the sun icon on the right-side panel. Though I don’t use it too much, it can be useful for an image like the one we’re working with. Contrast is the difference between the lightest part and the darkest part of an image. For this image, there’s a big difference between the lights and the darks, so you can play with the Brightness/Contrast tool to change this.
By turning down the contrast (moving the arrow to the left) I’ve lightened the blacks. If I move the arrow to the right, I’ll increase the contrast instead — and lose the details in the rocks.
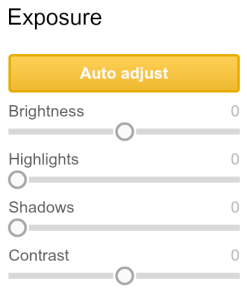
Quick tip from The Daily Post: Don’t have Photoshop? Not to worry. Try an online editor like PicMonkey and head to the Exposure panel. You’ll see tools to adjust several settings, including Contrast:
One of the best times to use the Brightness/Contrast tool is when working with black and white images. You can convert to black and white in Photoshop in different ways: you can change to grayscale by selecting Image → Mode → Grayscale. Or, you can use the Hue/Saturation tool on the right and move the arrow under Saturation all the way to left, which removes color in an image:

However, most people convert to grayscale or use the Saturation tool but don’t make any further edits, which means the image likely won’t have the blackest blacks or the whitest whites. Adjusting the contrast allows you to produce a true black and true white in your image:

Try moving the arrow under the Contrast tool to see how it affects the blacks and whites in your image. If you’re interested in a more in-depth tutorial, check out my post on converting to black and white on my blog.
Adjust the level of saturation

I see many images on WordPress.com that I think would look better if the photographer didn’t go overboard with the Saturation tool, which I mentioned briefly above. (In a previous post on color, Ming discussed saturation, too.) I’ve added saturation to the image above, which makes the colors stand out more. But it also exaggerates colors you probably didn’t realize were there!
When adding saturation, be careful not to lose detail in the image — when overused, this tool can flatten your photo. I’d recommend staying away from the tool until you’ve gotten the hang of image editing. While there’s certainly a place for it, I don’t use it very much and am more likely to tone down the saturation so the colors are not so bright.
Quick tip from The Daily Post: To experiment with saturation in a program other than Photoshop, try the free online editor Pixlr. The interface is reminiscent of Photoshop and Photoshop Elements but much simpler. You can access basic editing tools in the top navigation menu:

Correct and remove spots

See all those red circles in the photograph above? When I took this image, my camera really needed cleaning; the sensor was so dirty. So, I had a lovely image that was unfortunately full of spots.
There are various ways to remove these kinds of spots, and one of the easiest methods is the Spot Healing Brush tool, which resembles a bandaid in Photoshop. Select the tool from the left-side panel, then click on the spot in the image to make it disappear.
I recommend a brush that’s not too big. (If you need something more sophisticated, play around with the Healing Tool, but note that you have to nominate an area for it to copy first. The Clone tool also works in a similar fashion.)
Before and after
Here’s the original shot on the left, next to “after” image on the right. With basic edits, you can correct and improve a photo.


These common editing steps are appropriate for anyone who wants to learn how to edit their own images. Now, we encourage you to experiment to figure out what works best for you — and how to enhance your photos without over-processing.
If you’re interested in more tips, check out Leanne’s photography tutorials on her blog.
About Leanne Cole
Leanne Cole has been taking photos for over 20 years. She has a bachelor of fine arts from the Victorian College of the Arts and specializes in fine art photography. She shares her knowledge of and love of photography on her WordPress.com blog, Leanne Cole Photography.
Other posts in the Photography 101 series
- Philosophy of Photography
- Viewing the World with a Photographer’s Eye, I
- Viewing the World with a Photographer’s Eye, II
- The Fundamentals of Light
- The Quality of Light
- The Rules and Elements of Composition
- Finding the Best Shot — Portrait or Landscape?
- Finding Your Focus
- Establishing a Point of View
- Shape, Line, Texture, and Pattern
- A Primer on Color Photography, I
- A Primer on Color Photography, II
- Shooting in Black and White
Currently blogless? You’re a click away from sharing your story.
Create your blog at WordPress.com


Photoshop is hideously expensive. Including the on line version used in this demo. There are many free on line editors – some built in to photo services like flickr (which now uses Aviary) and Google. But by far the best solution in my experience is GIMP which being open source is free to download. After that you can edit without needing to be on line, and GIMP has everything that the full blown version of Photoshop has at no cost. There are versions of GIMP for all operating systems including Mac – go to http://www.gimp.org to find out more
LikeLike
Thanks for your suggestions. We agree — Photoshop is a pricey tool, which is why we’ve mentioned a few free alternatives and also state that you can do these basic editing steps in nearly every other editor. The next post in the series covers even more tools for editing, from Picasa to Pixlr and other apps that your fellow photographers use.
Thanks again for the comment!
LikeLike
thanks for the Gimp link – a new one on me
LikeLike
I have a mac & it comes with great photo editing software, for free, called ‘iPhoto’. Many of the tools mentioned in this article (in fact, all) are available on iPhoto. Thanks for the article. I learned a lot!
LikeLike
Yes, GIMP is one of the best photo editing tool and is free and open source.
LikeLike
Thanks for the great post. Would you consider a follow-up post that addresses cropping in greater detail? Cropping is by itself a pretty big topic.
I think readers would be interested in the finer points of cropping, such as the rule of thirds.
One thing that I struggle with when cropping is deciding whether it’s important to choose the best visual crop, or if maintaining a ratio that matches typical printing and framing proportions is worth pursuing. For example, if an image’s most visually pleasing crop happens to be nearly, but not quite square, would you pursue a square crop, 4:3, 4:5, or just keep the visually pleasing one, even though it’s an odd size?
LikeLike
The next post covers a bit more on editing and the tools/software that others use, but I’ll note your comment for the future. We covered the rule of thirds a bit in Jeff Sinon’s post on composition, but didn’t go deeper into cropping there, so I’ll keep your request in mind.
LikeLike
Leveling is a wonderful secret weapon, especially for cloudy days that don’t naturally offer a lot of contrast.
LikeLike
thanks to all the contributors so far – these posts are well written with good topics – no excuse for not improving even my basic skills
LikeLike
I know you can get the basic Adobe photoshop for $100. Not too bad for its capabilities. Nice write up!
LikeLike
I’ve used gimp before & it’s a fairly simple program with lots of effects for image editing but I still recommend using photoshop.
LikeLike
Well written tutorial!
LikeLike
Leanne, thank you so much for doing this post, you know that I have been following your blog for quite awhile. I’m going to read and practice and read and practice until I understand what you have taken the time to post here. I don’t know if you know that I gave you recognition for the birds on my Challenge Eerie post. Jim Hope that new camera is working out for you.
LikeLike
Most photo editing is over the top nowadays, I love Leanne’s restraint and also her style which often errs towards the darks and the shadows in an image rather than the light. I think there should definitely be an element of art in photography, but also it’s inherent truth status should still be apparent in the digital age – it’s a very tricky balance that we’re all trying to achieve.
LikeLike
“I love Leanne’s restraint…” +1
Completely agree. Some people go overboard with saturation and other effects — using restraint when editing is a great tip.
LikeLike
nice basic intro 🙂
LikeLike
Great post, I’m new here and I’m trying to make my photographs better …
LikeLike
Welcome to The Daily Post! If you’re new to this photography series, you’ll see all the previous posts at the bottom of this one.
LikeLike
Thanks!!!
LikeLike
http://jadedesert.wordpress.com/
I have recently posted some of my photography on my blog. It would be great if you could let me know what you think!!
LikeLike
thanks
LikeLike
great pic . i believe you can get the best basic !
LikeLike
good tutorial here!
LikeLike
Nice tutorial
LikeLike
I always love your tutorials, Leanne – so clear to follow. Well done!
LikeLike
Good tutorial! Thanks!
LikeLike
understanding basics is the first step to building a strong venture. Thank you for shedding more light on the basics of editing
LikeLike
Thanks for the tutorial, very helpful.
LikeLike
thanks for posting this! I’m going to use it as a resource once I save up enough to buy a camera and start taking photos
LikeLike
Great article Leanne. I get almost as many questions about how to post process an image as I do about making them. This article will feature high on my list of places to send people to for some excellent information on where to begin.
LikeLike
I have used Gimp and have recommended it as an alternative to Photoshop.
LikeLike
This is really helpful thanks. When using photos and scanned pictures to produce a book cover we have struggled with these types of techniques so this advice is useful. Will definitely be trying GIMP and picMonkey.
LikeLike
great picure, i can really see the difference when its leveled
LikeLike
I am personally not a fan of editing photos. While it may look very breath taking, I feel that it takes away from the originality of the photo. I enjoy seeing the world for what it is.
LikeLike
Great post/🍀
LikeLike