How to set up a test blog.
Building a blog you’re proud to share isn’t just about high drama, stunning photography, or sublime comedy. You also need to love the way your blog looks and functions.
Customizing your theme, getting creative with widgets, or tweaking your settings can be nerve-wracking on an active blog — what happens when that perfect new header image is off-center? Your custom font illegibly small? Your attempt at CSS makes your widgets disappear? Luckily, there’s a simple way to ensure that your readers never see a site you’re less than thrilled with: welcome to your own private bloggy playground, AKA a test blog. It’s free, it’s easy, and it’ll let you put your best blog forward.
Why create a test blog?
I know, I know: you barely have time to keep up with one blog. How can we expect you to have two?

Not this kind of test, thank goodness. Image by wecometolearn, CC BY 2.0.
A test blog doesn’t actually add to your to-dos, because you’re not writing posts there. A test blog is simply a private place for you to play with your layout and get comfortable with everything WordPress.com lets you do:
- Test drive themes and explore their options to find which you like best.
- Try different layouts — one sidebar, or two? A static home page? Custom menus? — and see what suits your content.
- Practice your WordPress.com skills. Insert a tiled gallery of images, or embed a few tweets. Play with post formats. Create a custom form, and tweak the fields. Get comfortable with the tools at your disposal.
- Give CSS a try. Hide a post’s metadata or change the padding around images without worrying that you’ll accidentally delete your header or turn your font purple.
A test blog is especially handy for playing with widgets, which lack a “preview” option like posts and pages. You can use text and image widgets to create simple custom touches for your blog, and use a test blog to make sure all your HTML tags are in a row before re-creating the widget on your public blog.
There are limits to what you can do on a test blog: notably, premium themes and upgrades like Custom Design are per-blog, so you’d need to purchase them specifically for your test blog. That might be a worthwhile investment to get your dream blog, but there’s plenty you can do with a free test blog — all the widgets, menu options, post formats, and free themes are your oyster.
How to do it
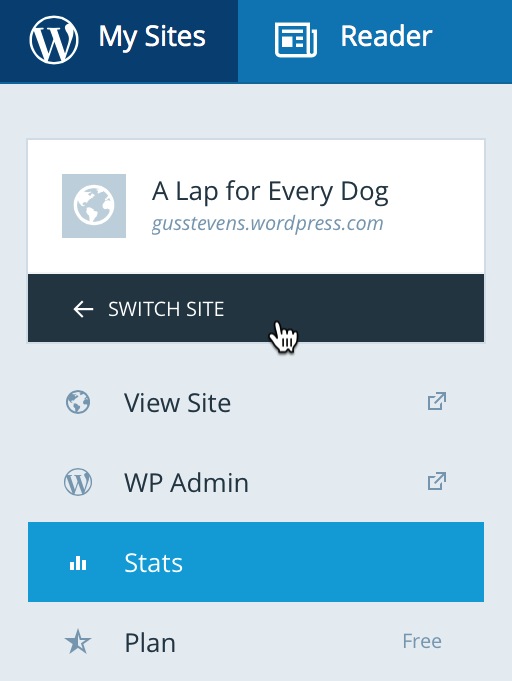
If you’re already registered at WordPress.com, creating a test blog takes all of twelve seconds. Log in to WordPress.com, and click on My Sites on the top left-hand corner of the screen and then Switch Site.
Now, scroll to the bottom of your list of sites and click on Add New WordPress:
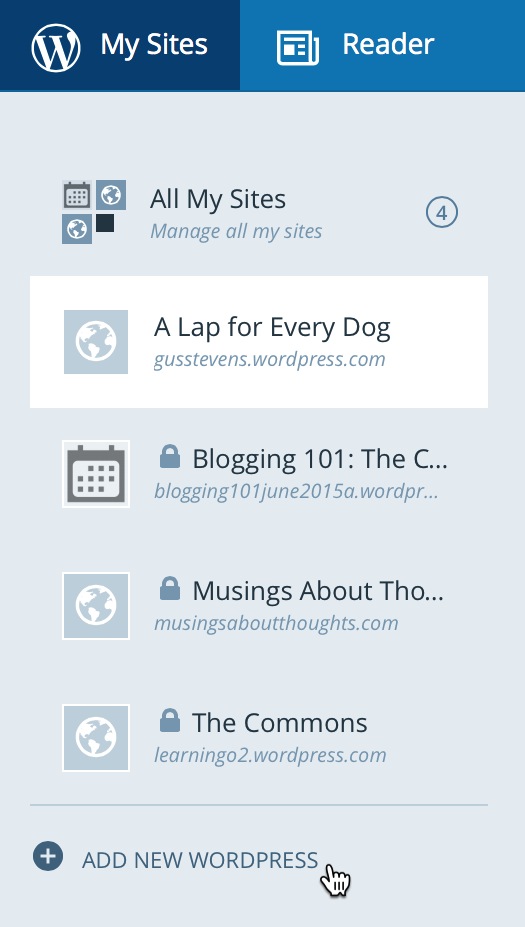
You’ll be asked to choose a new URL, a theme, and a plan.
To set your site to Private, go to My Sites → Settings → General. Under Site Visibility, check the radio button next to: I would like my site to be private, visible only to users I choose. Be sure to click on the Save Settings button for the change to take effect.
You’re done. Get to testing!
(Note: now is not the time to use up that super-clever domain name you thought of — no one but you will see this blog. Be polite, and leave it for a new blogger who’s trying to make a splash.)
It’ll be easier to see what your public blog will actually look like if your test blog has a few posts and pages to display, so publish a few. If you have some published posts, copy and paste them in — testing will be even more effective if it uses your actual content. If not, no worries! These posts and pages don’t have to be real; they just need some text and a few images. Copy a few paragraphs from a book you’ve got handy, or use a lorem ipsum generator to create some dummy text.
Now what?
Time to play! Activate some themes, including a few you don’t think you like — you never know how a little customization can radically transform them. Maybe a theme that seems too stark will be the perfect canvas, or a few tweaks will transform a cute seasonal theme into your elegant dream site. Just like jeans, you never know how a theme will fit until you try it on.
Now, dig into your dashboard. Change settings, and see what happens to the blog. Try enabling a static front page to create a more home page-like experience — how does that feel? Enable post excerpts. Turn infinite scroll on. Go to town with widgets: enable them all. See what they look like. Drag ’em around, and customize their content and titles. If you decide to add the Custom Design upgrade, do more than futzing with colors and fonts; get your hands dirty with some CSS.

This is awful and you should NOT publish a website that looks anything like it, but it’s a-okay on your test blog!
It doesn’t matter how cluttered your sidebar gets, or how distracting your Grateful Dead bear background is. This is simply testing! Experimentation! Science Blogging! Explore all your options with an open mind — and without fear of wrecking anything. When you’re happy with your test site’s settings and features, mimic them on your public blog.
There is another way to create this playground for yourself: set your blog to private (head to My Sites → Settings → General in your dashboard to access the privacy settings), and experiment before opening it to the public. If you’ve just started your blog and haven’t shared the URL with anyone yet, this is a great option — you can still write and publish in the meantime, and all your content will be accessible as soon as you update the privacy setting to “public.”
If you’ve already got an active blog, a test blog may be more up your alley. (A test blog also gives you a place to experiment in the future — we add new themes and features all the time, and you may want to try them out risk-free.)
If you have a site you love to look at, rather than one that’s just “good enough,” you’re more likely to put in the effort to publish regularly and attract readers — and isn’t that why you started in the first place?
Was this helpful? Great! These might be, too:
- Customizing series on the WordPress.com News Blog
- Branding Your Blog
- Widgets 101, 201, and 301
Currently blogless? You’re a click away from sharing your story.
Create your blog at WordPress.com


I love how friendly and helpful the WordPress community is, as a whole. I love the positive vibes. And thank you for a great tip. 🙂
LikeLike
Fortunately, I’ve been blogging for several years before creating my blog now. Let me tell you, I’ve changed it a thousand times. Now, I really love it. I love customizing it and making it my own. But it took a while to get there.
LikeLike
Perfect idea 🙂
LikeLike
wow
LikeLike