All about image widgets — and ideas and inspiration for customizing them.

Short on time? Skip ahead:
In the first post of this series, “Widgets 101,” we introduced some popular widgets, including the Text and Image Widgets, and quick ways to transform an image by changing its shape or adding a frame. In this post, let’s zoom in on Image Widgets and how to customize them.
Image Widget essentials
First, let’s make sure we’ve got the basics down. To activate an Image Widget in your sidebar or footer, go to My Site → Customize → Widgets, select the section of your site where you’d like to add a widget, click on Add a Widget, and search for and select the widget that says “Image.”
 You don’t need to fill in all of the fields in this widget, but make sure you fill in the fields shown on the right to ensure your widget displays properly. The “Image URL” is important, as WordPress.com needs to know where your image is saved so it can display it. In other words, you need to copy the image’s URL, which you can do by going into your Media Library where all of your images are stored.
To get to your Media Library, open up a new post, click on the “Add Media icon,” find and select the image you’d like to use, and click “Edit.” Then, copy the entire link in the “URL” field. This is the URL you’ll insert in the “Image URL” field, shown in the screenshot above.

The displayed Image Widget, which — when clicked — goes to a specific URL on your site.
You can also use an image URL on another website — be sure to check the URL in your browser before adding it to the widget to confirm it ends with an extension specific to an image file (such as .jpg, .gif, .png).
Also, take advantage of the “Link URL” widget field at the very bottom. If you want an image in your sidebar or footer to direct readers somewhere on your site (or elsewhere on the web), specify the link here.
Custom-made image widgets
 Many bloggers create custom-made Image Widgets for their sidebars, which direct readers to different places on their site: a static page, a category page, a social account, and more. The black-and-white images on the right were previously displayed on a writer’s site. The images, font, and captions work together as a cohesive visual set, and the objects in the images evoke the literary life.
Related Reading: Check out our in-depth tutorial on creating a custom Image Widget for non-designers.
You can create similar images, too. If you have a working knowledge of Photoshop, whipping up sidebar images is probably a snap. If you don’t have Photoshop, or are a design and photo editing newbie, use a beginner-friendly online photo editor (like PicMonkey, Pixlr, or FotoFlexer) to transform your images with text, textures and effects, overlays and icons, frames, and more.
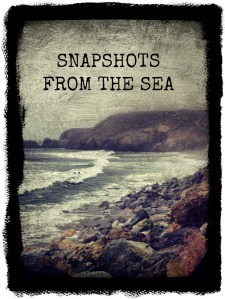
Let’s say, for example, that I want to create an Image Widget for my sidebar that, when clicked, directs my readers to a page on my blog of galleries of ocean photographs. I can do this by adding effects to one of my own images.
So, here’s what I’ve done: I grabbed this Instagram image of the Pacific Ocean from my feed; dropped it into PicMonkey; and used its various effects to insert text, add texture, and crop and frame it — all in less than a minute. Here’s the result:
Next, I’ll open up a new post and add this image to my blog’s Media Library, copy the image’s “URL” as described in the section above, and insert this URL into the “Image URL” field in the widget. I’ll control the size by inputting the dimensions (in pixels) for the “Width” and “Height.” And voilà — I’ve created a custom-made Image Widget, which I can link to a gallery page on my site.
Custom-made Image Widgets help to shape your site’s overall aesthetic, as the writer’s widgets illustrate above, and contribute to the visual branding your blog, which we’ll talk about next.
Visual identity: branding your blog
Finally, let’s talk a bit about branding your blog: creating an overall mood and ensuring your site represents you and your interests. For example, consider the package of visual touches below (color, font, and pattern) that a blogger once used to create a visual identity:

An example of a custom header image
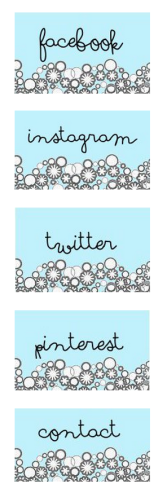
An example of complementary Image Widgets
The pattern used in the custom header — underneath the name of the blog — matches perfectly with the design in the accompanying image widgets, which direct readers to social profiles on Facebook, Instagram, Twitter, and Pinterest, as well as a contact email link.
In your Customizer, you’ll find many widgets to choose from, including ones for Twitter, Flickr, About.me, and more. They work in different ways — some display your latest content (tweets, Flickr photos), while others link to your profiles elsewhere.
Creating your own images for your favorite social networks will help to visually unify your site, especially when combined with a specific color palette, like the powder blue scheme shown in this example. (You can personalize colors if you have a Premium upgrade, while some themes on WordPress.com have free background color options or a setting to customize the link color, like Oxygen, Yoko, and Twenty Eleven.) You can create a cohesive visual package by matching your site’s header image, background, or link color with the elements in your custom images.
So, consider using color in Image Widgets, as well as other features like a custom header and custom background image, to visually brand your blog.
If you’re interested in experimenting with backgrounds and textures, browse options on sites like Subtle Patterns, My Site My Way, Squidfingers, and GRSites.
Ready for more? Continue on to “Widgets 301.”
Currently blogless? You’re a click away from sharing your story.
Create your blog at WordPress.com


I don’t know if reblog is a widget but I can’t get mine to work. I keep getting the 404 error
LikeLike
Reblogging isn’t done through widgets, it’s built right in to WordPress.com — details here: https://wordpress.com/support/reblogs/ .
What is it that you’re trying to do when you get the 404 message?
LikeLike
I trying to reblog someone’s post. What I get when I go there is no image message with the 404 error. I simule post to Facebook and when you click the link it goes to my blog and again the 404 no image message
LikeLike
It works the same way from the reader as it does from the reblog button on the tool bar
LikeLike
This has been the hardest thing for me to understand. I can never get widgets onto my page, and the instructions for putting them up are never clear. Maybe you should publish a Widgets for Idiots guide.
LikeLiked by 1 person
Like!
LikeLike
We’ve actually just launched a totally revamped version of the tutorials at learn.wordpress.com, including a section on working with widgets. Take a a look, and let us know if it helps:
http://learn.wordpress.com/get-configured/#leswidgets
LikeLike
I wholeheartedly agree. Thanks.
LikeLike
What is PicMonkey? How do you get words and phrases into pictures… I’m not very technical and I always have difficulty with everything before I finally get it… It just takes me a while longer than normal…
LikeLike
PicMonkey is a photo editing program you can download that lets you add text to your images, as well as other special effects — click the link in the post to learn more.
LikeLike
I’m inspired to switch around my widgets and try something new 🙂 thanks for this informative post!
LikeLike
Connor’s custom made image widget is a great idea. Thanks for the tips.
LikeLike
What about a pinterest “follow” button widget?
LikeLike
There’s no ready-made Pinterest widget, but you can make one yourself using the instructions in this post — upload a picture of the Pinterest logo to your media library, put it in an image widget, and link it to your Pinterest page.
LikeLike
This is nice. I will surely try them.
LikeLike
I’m nowhere near understanding widgets
LikeLike
Check out the link to learn.wordpress.com I recommended above — I think it’ll help: http://learn.wordpress.com/get-configured/#leswidgets
LikeLike
Reblogged this on euzicasa and commented:
Widgets….How to make them, how they work: I wish I would be able to make widgets with Active script, but yet I not able to figure that out
LikeLike
I just discovered this widget last night with intentions of doing what Connor at adventures of a wanna-be writer did. Great to see it in a similar use. Thanks for providing further instructions!
LikeLike
This is really helpful! Thank you.
LikeLike
Well, I’m game to try! I can do the basics with them but it never occurred to me to customise widgets. You can bet I won’t do it in a 1, 2, 3 seconds!
LikeLike
Wow…customising widgets…this is a great idea. Who knew we could get this creative…thanks for planting the seeds of many new ideas 🙂
LikeLike
That’s what we’re here for 🙂
LikeLike
okay, I loved this post. I think I stumbled on here by accident, but I’m so glad. lots of useful stuff, I particularly liked the information about how to use images in your side bar and editing them on the online photo editors – I didn’t know about that. Great! Can’t wait to see your next post 🙂
LikeLike
Take a look at the Widgets 101 post linked to in the article, too — there’s way more you can do with a plain ol’ text widget than you might think!
LikeLike
Wow, lots of great ideas! Thanks! 🙂
LikeLike
How do I find out if I have a blog accoun?. I started signing up but got lost somewhere along the way
LikeLike
If you’re registered for a blog with us, you can use this form to recover your password and log in (you will need to know the email address you used when signing up):
https://wordpress.com/support/passwords/#lost-password
LikeLike
This is fantastic! I’ve been looking for a way to easily create a button on my blog, and this works marvelously! Thanks for the helpful post!
LikeLike
This was REALLY helpful. Thank you! I need a little time to dig in with some added creative effort, but I can hardly wait. The possibilities are endless and I needed a little hint about how to get started. I’m appreciative. 🙂
LikeLike
I may be the only person in the world doing all blogging + computing by phone, but maybe not. (With a 3gig monthly limit, too on my plan.) Wish there was more I could do, mobile-ly.
(I set up my blog in a fever of rushing through, at a friend’s house, but I don’t get the chance to “play” online often, if at all.) ( I know, it’s unusual, but that’s what comes from becoming disabled, and the ensuing poverty.) I can’t watch videos or listen to music from other sites if I want to post a photo or 2 everyday, which I do. But it’s given me a fantastic outlet for my creative frustration.
Good info, will store this somewhere for the happy day I have access to a real computer + unlimited interwebs. 🙂
Until then, it’s phonetography business as usual.
LikeLiked by 1 person
Reblogged this on cowbell nation presents….
LikeLiked by 1 person
I tried to use SnapWidget.com to put my instagram photos on my blog. Every time I copy and paste the code into a “text” widget it all disappears and wont show up. Any ideas?
http://www.missoleary.wordpress.com
LikeLike
Hi I display my instagram photos via the Flickr widget. I think I saw this in a forum when I was trying to look for ways on how to show my Ig feed. What you have to do is to assign a hashtag that Flickr will pick up and it will automatically be displayed on your Flickr widget. Hope it helps, cheers!
LikeLike
Thank you for the comment! I love your blog layout and design. The photos are incredible!
LikeLike
I owe this fabulous design to Automattic. I did however had to purchase it from WP. Your words of encouragement fuel my passion for writing. Thank you.
LikeLike
We’ve actually been to a few of the same places! I was in Pamanga, Philippines in November and Tokyo when I was much younger!! Keep writing and always keep traveling! xoxo
LikeLike
I hope you had a lovely time in Pampanga, they’re known to be great cooks 🙂 Thank you – will sure do, have a great weekend. Cheers!
LikeLike
Thanks for the tip/alternative, @TheEagerTraveller!
LikeLike
My pleasure. Please keep me posting, I enjoy your entries
LikeLike
Hi @Margotoleary — I’ve never used SnapWidget.com so can’t comment on the service. I do know that some code isn’t allowed on WP.com blogs because they’re potentially dangerous, and if nothing appears in the widget when you try to use some bit of code, that *may* be why. (More on this here: https://wordpress.com/support/code/)
Alternatively, you can follow these steps to embed Instagram photos on your blog: https://wordpress.com/dailypost/2013/03/12/embed-your-instagram-images/
LikeLike
Thank you so much!!
LikeLike
Thanks for all the great tips! I think I’ll work on this today!
LikeLike
Thanks for the love!!!! Very helpful post!
LikeLike
You’re welcome Miss Zoe 🙂
LikeLike
This was great. I was able to link to my website where I display photos for sale.
LikeLike
this is great..
LikeLike
Awesome! I love going to The Daily Post because it gives me unexpected inspiration and more fuel to actually improve my blog one day at a time. Heading off to the widgets section of my blog now to hopefully promote my brand better. Cheers!
LikeLike
This is something very interesting. I never really tried anything like that. Thanks for posting this. I should try this.
LikeLike
I would very much welcome some video tutorial, because I have tried to insert the Pinterest widget but without any success……
LikeLike
While we don’t have a Pinterest widget in the dashboard to use, you can make one yourself using the instructions in this post — upload a picture of the Pinterest logo to your media library, put it in an image widget, and link it to your Pinterest page.
Also, we currently don’t have video tutorials here at the Daily Post, but there are some beginner videos on WordPress.tv in case you want to take a peek.
We also have a general section on widgets at Learn.wordpress.com.
LikeLike
Dear Cheri, thank you so much for answering my question. I tried to put the Pinterest widget to my image library, but it only allowed me to download things from my computer, so I didnt get any futher. But dont worry, I will try to work on it. Thank you again. I love Word Press, it is great place to be :o)
LikeLike
I use PicMonkey for all my headers…I can’t believe I never thought to make matching images to link to my social media! DUH. I know a blog that’s getting a makeover.
LikeLike
am a bit of widget fan-atic but have to curb my enthusiasm. Nice clear instructions and some inspirational ideas though a word of warning is that widgets slow page loads as well as create an overfussy, messy look.
LikeLike